Analytical Surveys provides customized data conversion, digital mapping, and consulting services. In this paper we discuss how we are using ArcIMS to improve client/vendor communication by allowing customers of a data conversion project to not only view intermediate project data, but also to flag or "red-line" locations in the data that need further attention. Security and privacy issues are also addressed.
An important aspect of good client relations is communication. Clients want to be well informed about progress and status on a data conversion project. Furthermore, early access to the converted data may spark discussions about how the project is to be done, conversations that are best had early before much effort is expended on a conversion project. Seeing the data over the internet allows the client to get a sense that progress is "real" and the data has "life".
Furthermore, serving data over the internet may be more expedient as a delivery method. Instead of checkplots and overnight shipments, deliveries can be made by viewing the data over the internet. Data delivery is potentially more immediate, assuming the map site is up-to-date. The data is certainly more dynamic than checkplots, with the user able to interact with the data using the browser/viewer.
In the project presented here, Analytical Surveys prototyped and made public an internet mapping system for publishing intermediate conversion project data. Clients can, after signing in, view project data and annotate with comments map areas that need further attention.
Early in the project, we made some basic system architecture decisions. We selected ArcIMS 3.0, prerelease version, as our internet mapping solution. For a web server we use Microsoft's Internet Information Server (IIS) running on a Windows NT server. This software is freely available with the Windows NT Option Pack Setup. Our web server is enabled to run active server pages (ASP). ColdFusion was considered, but it was decided we could do everything required in ASP without paying for a server license as required by ColdFusion. (We will strongly consider ColdFusion in our future work.) ASP is a sensible choice for developers that are comfortable with Visual Basic or VBScript. Along with ASP, we also enabled the Active Data Objects (ADO) component of the web server to communicate with a client feedback database.
Several languages can be used when programming server-side customizations, including VBScript, JScript and PerlScript. Our server-side customizations are done with VBScript. Most of our scripting is done on the server side, with some small amount of client-side scripting done in JavaScript.
Finally, for scalability and security reasons, the IIS web server and the ArcIMS spatial server are on different server machines. The ASP ActiveX Connector is installed on the web server, and communicates with the spatial server via the ArcIMS application server. With this server configuration, and with a desire for maximum performance, the map services on the spatial server are exclusively image servers, not feature servers.
An important feature when serving maps to clients is the ability to maintain security and data privacy. Multiple client projects may be communicating with the web server, and people from each project should only have rights to see their own data. Two things we do to achieve this is validate each client through a sign-in process, and we also keep the spatial server behind the ASI corporate firewall.
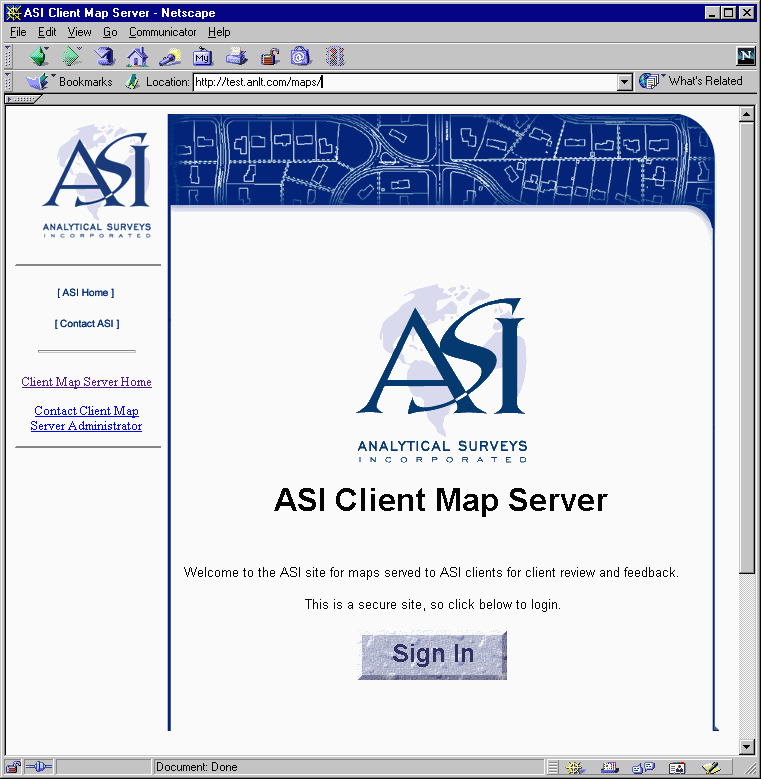
When a client arrives at the client map server site, with a web address of http://test.anlt.com/maps, the client is greeted with the above web page.
The layout of the client map server home page and all subsequent pages is consistent with the corporate home page in terms of look and feel. To match the corporate look and feel, a table layout for the web page was selected, where a large HTML table controls placement of all the page elements. Whereas this allows a tight alignment of page elements, it does cause the entire page to refresh as any contained map is updated.To sign in, the client clicks the sign in button and is taken to a login form, as seen next.

The form is submitted using the POST method to a "login.asp" file. The POST method puts "login" and "password" parameters into the body of the HTTP request. The POST method is preferable, as described in "ASP in a Nutshell":
"Always use the POST method with forms that change something or cause any irreversible action (most do). POST is safer and more efficient; GET should never be used to change anything. In developing your ASP scripts, you can decide whether you want to support data passed to your program using the GET method." (1)Furthermore, with the POST method the subsequent request is not visible in the address or location line of the browser, as is the case with the GET method.
The information of this form submission is sent to the ASP script file "login.asp". A very
simple version of this "login.asp" script follows:
    <%
      strLogin = Request.Form("login")
      strPasswd = Request.Form("password")
      Session.Contents("login") = strLogin
      Session.Contents("password") = strPasswd
      if (strLogin = "user1" and strPasswd = "sesame") Then
        Response.Redirect "manchester_ortho/default.asp?cmd=Reset"
      Else
        if (strLogin = "user2" and strPasswd = "caraway") Then
          Response.Redirect "manchester_planimetric/default.asp?cmd=Reset"
        Else
          Response.Redirect "login.htm"
        End If
      End If
    %>
This file gets the login and password strings from the form collection of the request object. These values are saved as part of the session. Then, a series of nested if statements look for a match to the login and password combination, and redirects the user as appropriate. If there is no match, the client is redirected back to the same "login.htm" page for another entry attempt.
The current version of the "login.asp" is just as short, but by including some additional
ASP include files, is more sophisticated. Client login and password are found in a
database instead of being hard-coded. The current version of "login.asp" is as follows:
    <%@ Language=VBScript %>
    <%
      Session.Contents("login") = Request.Form("login")
      Session.Contents("password") = Request.Form("password")
    %>
    <!-- #include File = "include\initdb.inc" -->
    <!-- #include File = "include\validate.inc" -->
    <%
      strProjDir = Session.Contents("ProjectDir")
      strTarget = strProjDir & "/default.asp?cmd=Reset"
      Response.Redirect strTarget
    %>
This "login.asp" file first obtains the "login" and "password" variables that were set in the POST method request. These variables are assigned to the Contents collection of the Session object, saving this information for the session so the user can be validated throughout the session. Next, two included ASP files, "initdb.inc" and "validate.inc", are included to initialize a connection to an ODBC database, and then validate the session login and password. The "validate.inc" ASP include file also sets a Session variable to indicate the location of the project directory.
The "validate.inc" ASP include file is listed below. This script includes a SQL query to a database table of login entries, and if the user fails to be located in the database, then we redirect the user back to the login page that we saw above.
    <%
      ' Validate the login variables of this session.
      Set adoConnection = Session("ClientFeedbackDB")
      strLogin = Session("login")
      strPasswd = Session("password")
      If adoConnection.State <> adStateOpen Then
        Response.Redirect "/maps/login.htm"
      Else
        strQuery = "SELECT PROJECT_DIR FROM USER " _
                 & "WHERE USER_ID='" & strLogin & "' " _
                 & "AND PASSWORD='" & strPasswd & "'"
        Set rsUser = adoConnection.Execute(strQuery, , adCmdText)

        If rsUser.BOF Then           ' No records returned...
          Response.Redirect "/maps/login.htm"
        Else
          rsUser.MoveFirst
          strDir = rsUser.Fields(0)
          If (strDir = "") Then
            Response.Redirect "/maps/login.htm"
          Else
            Session("ProjectDir") = strDir
          End If
        End If
      End If
    %>
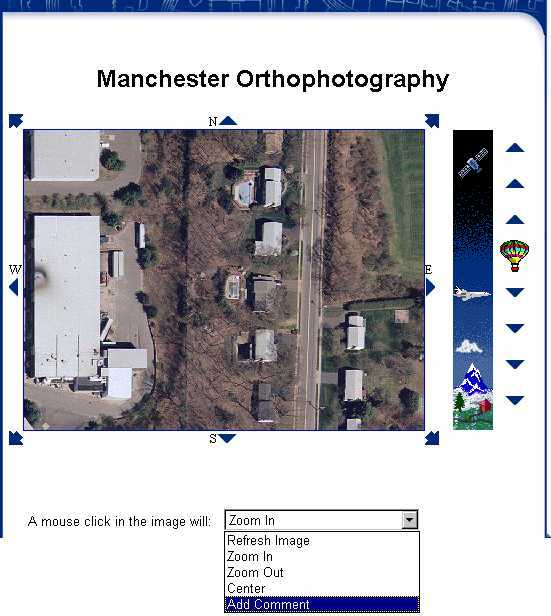
If the client has entered the correct login information, he is taken to the default viewing web page for his project, an example of which is seen below. Each access to view web pages in the client's specific project is revalidated, to prevent illegal access by circumventing the login screen with a deeper, specific path to a location inside a project. This validation is done by calling the same validation script code, "validate.inc", that was used in the initial validation.
Note that the client is validated for the duration of a session. A session ends when the client
closes the browser or when a time-out period expires. The user can also end a session by
selecting the "Sign Out" hyperlink on the left side of the screen. This selection will
execute an ASP line to end the session, specifically:
    <%
      ' Do nothing more than kill the session since the user is logging out,
	  ' then redirect to LOGIN page.
      Session.Abandon
      Response.Redirect("login.htm")
    %>
The prior process is a moderate level of security. The method was easily implemented in just a few lines of ASP code. The ASP code that validates the user is executed on the server, which is good. The ASP script code is not casually available to a user, since the script code is not part of the HTML file that is sent back to the browser. The password, however, is passed as clear text in the body of the HTTP request. A packet sniffer or some similar network investigative tool could find this information if desired. This is comparable password security to commercial web sites such as Yahoo or Amazon.
Greater security could be achieved in a number of manners. One could use a platform-specific validation, such as the Windows NT challenge/response authentication. Or one could use 40-bit or 128-bit encrypted SSL communication with the aid of a company such as Verisign. As of this writing, we have not heard of a conversion customer that needs this level of security. The current level of security was quickly and easily implemented.
A key security issue, independent of the web server authentication, is the security of the spatial server. (Henceforth we will use the term map server to refer to the entire web-based viewing system, and the term spatial server to refer to the server running a specific ArcIMS service that provides raw spatial data.) Using ArcExplorer, anyone who knows the IP address of a spatial server can access the data the spatial server provides directly, without an intermediary web server. At ASI, we prevent this unsecured access by placing the spatial server behind the corporate firewall.
The web server and the spatial server are on separate networks within ASI. The web server is on the ASI "service network", which is behind the corporate firewall but is freely accessible to the outside world for a number of network services such as ftp and http (web) requests. If there were a malicious attempt to breach security, damage could be limited to the service network. A request to any client map server web page, under the http://test.anlt.com/maps address, arrives at a machine in the service network.
The spatial server, on the other hand, is located on the private ASI corporate intranet. Outside network requests are blocked at all port levels from accessing computers on this part of the network. An outside ArcExplorer session cannot directly access this spatial server.
How, then, does the web server obtain the information from the spatial server? The web server has a small piece of ArcIMS installed, specifically the ActiveX ASP Connector for ArcIMS. This ActiveX Connector allows creation of ActiveX objects, accessible in ASP, that can represent such things as a connection to a spatial server. This connection object has it's server name set to the private network machine. A map request is communicated from the ActiveX Connector to the private network spatial server via two specific ports that are allowed open on a VPN (virtual private network) established at the firewall server. The port numbers that are required to be open, ports 5300 and 5353, are identified in the ArcIMS 3.0 Installation Guide.
That is how a map request is sent, and this results in a map image being written to a specific directory location accessible on the private spatial server. (We are exclusively configuring our map services to be image servers.) But how does that map image get back to the public web server? Again, ports are opened between the two machines to allow one-way NT directory sharing. As before, these ports are opened via the VPN on the firewall server. The directory addressed by http://test.anlt.com/maps/output is a shared directory between the two machines. Care is taken that only the two or three ports that are required open are open, that communication is one-way, and that permissions and allowed shared drives are limited as appropriate.
The following diagram illustrates the protections provided by this network architecture:
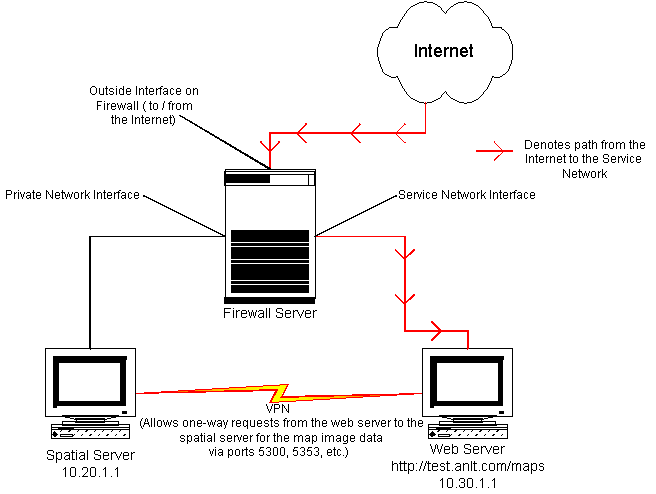
To reiterate, the request from the internet will hit the outside interface on the firewall. Once the request is made to the external NIC on the firewall, the firewall passes the HTTP request to the web server on the service network (the front end web page). When the web server needs data from the spatial server, the VPN tunnel provides the necessary link to this server. The spatial data is then passed along on controlled ports from the spatial server to the web server. (The actual VPN link passes through the firewall, but for the sake of simplicity, in the above diagram it is drawn between the two machines. The above drawing simplifies how the firewall actually handles VPN tunnels).
One final note: The path to the images created by the spatial server must be modified by the server-based ASP code to be the correct path for the web server and not the spatial server. This is accomplished with some string manipulation of the map image path by a VBScript/ASP file on the web server. The proper web address prefix replaces the prefix of the spatial server. The code to do this follows:
    <%
      strServerPrefix = http://test.anlt.com/maps/output

      ' Get the map picture address
      tmpStr     = mMap.GetImageAsUrl()
      output_pos = InStrRev(tmpStr, "/")
      url_len = Len(tmpStr)
      urlImage   = strServerPrefix & Right(tmpStr, url_len - output_pos + 1)
    %>
So, using the above architecture, the data on the private spatial server is accessible only by proper requests sent through the public, but client-validated, web server.
As mentioned earlier, we decided to only use map services configures as image servers. This decision met our security model, and afforded better performance than a feature map service considering data could be viewed potentially anywhere on the internet. We also did not want to require a Java plug-in download. So, we were limited to an HTML viewer for the client.
Further complicating the matter, we intended the client feedback to be a server-side customization. The look-and-feel should be compliant with the corporate look-and-feel. If we were to use the HTML template as a starting point, we would have to make major modifications to go from this frame-based HTML, client-side implementation to a table-based HTML implementation. So, can we still have the functionality of the template-driven viewers? The answer is yes, but we do not get it out-of-the-box.
While many view manipulation and query tools are available out-of-the-box, the same functionality can be hand-crafted using server-side customization. We wrote HTML consistent with our corporate website look-and-feel, and we implemented the pan and zoom and query functions with custom-coded server-side ASP code.
A simple example of server-side customization is the implementation of one of the pan buttons surrounding the map image.
Any given pan arrow is but one data element within a table in the HTML page served to the client web browser. Furthermore, the entire table is within a form that uses the post method to submit the contents of the form to the same ASP file that generated the HTML originally (default.asp). The HTML code for the "Pan North" arrow is as follows:
  <form action="default.asp" method="POST" name="mainform" onSubmit="imageClick()">
  <table WIDTH="300" BORDER=0 CELLSPACING=0 CELLPADDING=0 >
  ...
    <td align=center colspan=1>
      <A style="text-decoration: none" HREF="default.asp?cmd=PanN">
        <font color=black size=-1>N</font>
        <INPUT type=image border=0 src="../images/north.gif" name="PanN">
      </A>
	</td>
The HTML shown above is displayed as follows:
A button click on the text will submit, using the POST method, the form to the default.asp file with the "cmd" parameter set to "PanN". A button click on the triangle-shaped image will send similar parameters that can be parsed and interpreted as a "PanN" command. Relevant lines of the "default.asp" file are shown below.
  <%
  ...
    Case "PanN":
      result = mMap.DoPan(1, 4)
  ...
  resultRefresh = mMap.Refresh()                'Refresh the map

  ' Get the map picture address
  tmpStr     = mMap.GetImageAsUrl()
  output_pos = InStrRev(tmpStr, "/")
  url_len = Len(tmpStr)
  urlImage   = strServerPrefix & Right(tmpStr, url_len - output_pos + 1)
  %>
  ...
    <td width=<%=mapWidthWithBorder%> align=center colspan=1>
      <INPUT type="image" name="click" border=1 src=<%=urlImage%> >
	</td>
If the command is "PanN", the mMap object, previously created with a function call of "Server.CreateObject("aims.Map"), is given a DoPan message, with 1 signifying north and 4 being the fixed amount to pan. Later in the file the mMap object is refreshed, and the URL to the map image is calculated. Finally, this URL, stored in the variable urlImage, is used to fill a data element of the HTML table with the actual map image, as seen in the last three lines of ASP/HTML code.
Similar implementations exist for panning in the 8 cardinal directions, and for zooming to different map scales.
In addition, a click in the map image also can be interpreted as a command. If the user clicks in the map image, a POST is generated as before, with the coordinates of the mouse click set in parameters called "click.x" and "click.y". Furthermore, a parameter called "clickcmd" is sent to the server. The "clickcmd" parameter is set based on a <select> HTML form element, which appears in the web page as a dropdown menu of click command choices such as recenter, zoom in, or zoom out. Given the "clickcmd" parameter and the location of the click, the "default.asp" ASP code can make the appropriate calls to the mMap map object to fulfill the requested command.
The above command architecture can be used for supplying client feedback via mouse clicks in the image. One of the selections in the dropdown menu mentioned in the previous paragraph is an "Add Comment" selection. This will give the "clickcmd" parameter in the POST form submission the value of "Comment". As before, the "default.asp" code will act upon the clickcmd value of "Comment" and the coordinates of the click present in the "click.x" and "click.y" parameters to store a comment in the database.
Before the form is submitted to the web server, however, there is client-side JavaScript code to get a textual commentary regarding the point clicked upon for an "Add Comment" command. Without this JavaScript code, there would need to be a form element for text entry. Furthermore, without this JavaScript code the user would be forced to enter the comment text before the mouse click in the map, a step in the task order that could easily be forgotten. The JavaScript code is as follows:
  <script language="javascript">
  <!--
  function imageClick()
  {
    if (document.mainform.elements['clickcmd'].selectedIndex == 4) {
      var usercomment = "";
      if (((usercomment = prompt("Comment:","")) != null)
	      && (usercomment.length > 0)) {
        document.mainform.elements['comments'].value = usercomment;
        return true;
      } else {
        return false;
      }
    }
    return true;
  }
  //-->
  </script>
  ...
  <form action="default.asp" method="POST" name="mainform" onSubmit="return imageClick()">
  ...
The form tag (the last line above) has an attribute, onSubmit, that contains the name of the JavaScript routine to call before submitting the form. When a form is about to be submitted, the JavaScript function imageClick(), shown above, is called. This function checks if the clickcmd is set to selection 4, "Add Comment", and if so it asks the user for a comment using the prompt() function of JavaScript. It then sets the comments parameter, present as a hidden element of the form, to the string variable returned from the prompt function. If the prompt() function returns null due to the user hitting cancel, or if the string has a length of 0, then the routine returns false and the form is not submitted.
On the server, a comment command is forwarded to the ASP subroutine AddComment() in the
include file "addcomment.inc". The "addcomment.inc" file is shown below in it's entirety:
<!-- #include File = "..\include\initacetate.inc" -->
<%
  Sub AddComment()
    InitAcetate()
    Set al = Session("AcetateLayer")

    ' Fill in the parameters of the new point object.
    Set objPoint = mMap.ToMapPoint(x, y)
    Set objPointSymbol=objPoint.Symbol
    objPointSymbol.Color=192
    objPointSymbol.Width=14
    objPointSymbol.Transparency = 0.5

    ' Add point to acetate layer.
    al.Add objPoint,1

    ' Fill in the parameters of the new text object
    Set objTxt = Server.CreateObject("aims.TextObject")
    objTxt.x = objPoint.x
    objTxt.y = objPoint.y
    objTxt.label = " " & Request("comments")
    objTxt.TextMarkerSymbol.FontColor = 12632064
    objTxt.TextMarkerSymbol.Glowing = 65535
    objTxt.TextMarkerSymbol.FontSize = 14
    objTxt.TextMarkerSymbol.Angle = 0
    objTxt.TextMarkerSymbol.Transparency = 0.5

    ' Add text to acetate layer.
    al.Add objTxt,1

    '
    ' Add information to the feedback database...
    '

    ' SQL command to insert record.
    strQuery = "INSERT INTO COMMENTS(PROJECT,USER_ID,XLOC,YLOC,COMMENT)" _
      & " VALUES ('" & Session("ProjectDir") & "','" _
                     & Session("login") & "'," _
                     & objPoint.x & "," _
                     & objPoint.y & ",'" _
                     & Request("comments") & "')"
    adoConnection.Execute strQuery, , adCmdText

  End Sub
%>
The AddComment() routine first makes a call to the InitAcetate() layer routine in the "initacetate.inc" ASP include file to create an acetate layer and store it in the "AcetateLayer" object of the session. This new acetate layer will be represented by the variable "al". Next, we create a point by converting the image coordinates to map coordinates using the ToMapPoint routine of the map. We add appropriate symbology for this point, of type PointObject, and then add it to the acetate layer using the Add() method. Since we would like to make the client's feedback visible, we add a TextObject containing the comment the client entered previously. This TextObject is attributed and added to the acetate layer in a similar manner to the PointObject.
Next, the point is entered in the client feedback database. The adoConnection object was already initialized as connected to a database on the web server at the time the user was validated. We build an SQL "INSERT" statement to add the project, user, X location, Y location, and textual comment to the "COMMENTS" table of the database. Then we simply submit this SQL to the database using the Execute() method of the ADO connection object.
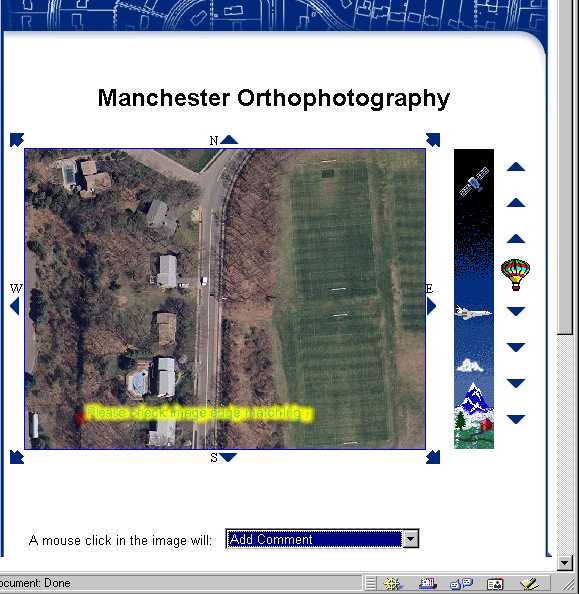
The browser, after submitting the command, would look something like the following:
This implementation is but one possible implementation of how the feedback at the server site could be accomplished. Other implementations are possible. For example, email can be sent to the appropriate personnel. This implementation, prototyped at ASI, would use a Collaboration Data Object (CDO object) identified by the programmatic ID of "CDONTS.NewMail". Another alternative would be to add this data to a data source directly accessible in map form. The action taken on submission of a comment could be customized to the individual project.
So far we have implemented the ability to flag with comments a single point in the data. We next need to be able to red-line an area. The user would click through a series of points that make a semi-transparent polygon.
Also, it would be nice for the client to see feedback for not just the current session, but also prior feedback sessions from himself or herself or other people. This would require a permanent layer of data on the server.
We would like to implement more view and query features. For example, the user should be able to see the attributes on a selected feature.
On the project management level, we need to use this client feedback system on a complete conversion project cycle. Currently the system is in a prototype mode. The system has not been used for serious project feedback.
Last but not least, we need to improve performance. The system is particularly sluggish on slower internet connections using modem speeds.
Using ArcIMS, and adding server-side customizations, ASI has successfully implemented a secure and private client feedback website.
Thanks to Art Warner, Ken Crosslin, and Don Clowers at ASI who's contributions aided in providing the city of Manchester orthometric and planimetric data first available at this web site.
Thanks to the city of Manchester, Connecticut for allowing use of orthometric and planimetric data.Thanks to Mike Naish and Doug Goodman in the Indianapolis office of ASI for their assistance in securely configuring the web server, and thanks to Mike Naish for reviewing the security section of the paper and enhancing the network diagram.
Thanks go to Todd Baltes, Brad Barnell, Jamie Powell, Steve Straka, Anthony Thorpe, and Craig Winters for reviewing and commenting on earlier drafts of this paper.
Esri, The ArcIMS 3 Architecture, An Esri White Paper. Esri, May 2000.
Esri, ArcIMS 3 Features and Functions, An Esri White Paper. Esri, May 2000.
Esri, ArcIMS 3.0 Installation Guide. Esri, February 2000.
Spainhour, Stephen and Valerie Quercia, Webmaster in a Nutshell, A Desktop Quick Reference. First edition, Sebastopol: O'Reilly and Associates, 1996.
Weissinger, A. Keyton, ASP in a Nutshell, A Desktop Quick Reference. First edition, Sebastopol: O'Reilly and Associates, 1999.