
Development of a Geographic Information System (GIS) automated application to transfer, calculate, and summarize values and information between a water utility GIS database in ArcView, IBM AS400 service address database, and the WaterCAD hydraulic modeling software to determine precise service boundaries based on elevation to support master planning and for design, maintenance, and operations.
New Information management technology is allowing us to interface independent information systems and applications. GIS provides a common link between the different types of available information to assist and support our hydraulic model, master planning, as well as system design and operation decisions.
This presentation describes the methods used to: Create a WaterCAD hydraulic model. Transfer the hydraulic junction information into ArcView. Create Thiessen polygons to sectionalize the service area. Create an elevation grid, using Spatial Analyst Assignment Proximity feature. Create a Geocode Address shapefile for extracting and summing average day consumption. Write Avenue programs to batch process the data and automatically populate required data fields. Use the calculated and gathered information in the WaterCAD hydraulic analysis software. Export to ArcView for presenting the final information.
The goal of the methodology effort is to automate data extraction and avoid a tedious and laborious manual task, as well as reduce the time and human resources it would take to calculate and assign the demand and elevation values in the water hydraulic model. This methodology reduces the task at hand from months to days and even hours.
This presentation should provide insight into the capabilities of ArcView, Spatial Analyst, Avenue, and WaterCAD and should prove helpful to anyone wanting to improve or develop ArcView applications.
In 1871, the "Little Rock Water Company" was formed. However, little progress was made on completing a water system.
In 1877, the "Little Rock Water Works Company" was formed and served 132 square blocks. Water was pumped directly from the Arkansas River and treatment was the responsibility of the customer. A portion of the cast iron pipe originally installed still is in use today.
In 1879, the "Little Rock Water Works Company" went bankrupt and "Home Water Company" took over operation.
In 1886, the first treatment plant was built and still is in use today.
In 1910, the "Arkansaw Water Company" operated the system.
In 1936, the City of Little Rock purchased the system and formed "Little Rock Municipal Water Works".
In 1936, the first protected water source, Lake Winona, was built.
In 1956, the second protected water source, Lake Maumelle, was built.
LRMWW is the primary provider of water service in the Metropolitan Little Rock, Arkansas, area. LRMWW owns and operates the two lake sources, as well as two water treatment plants, the Jack H. Wilson Water Treatment Plant, which is a 150-million-gallon-per-day (MGD) plant and the Ozark Point Water Treatment Plant, which is a 24-MGD plant. Additionally, LRMWW maintains over 1,350 miles of water transmision and distribution mains, has over 82,000 metered accounts, and serves over 360,000 people.
The water system encompasses a large portion of Pulaski County, serves the City of Little Rock and suburban communities south of the Arkansas River, and supplies wholesale water to the City of North Little Rock and surrounding communities north of the river.
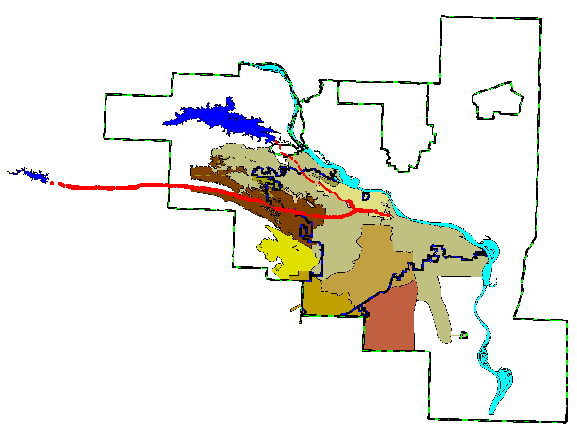
Pulaski County Outline, City Limits, Pressure System Boundaries, Lakes, and Raw Water Pipeline
Figure 1
The water system presently is composed of 8 booster systems and 2 gravity systems for a total of 10 distinct pressure zones, ranging in Hydraulic Grade Line (HGL) from 490 to 950 mean sea level (msl).
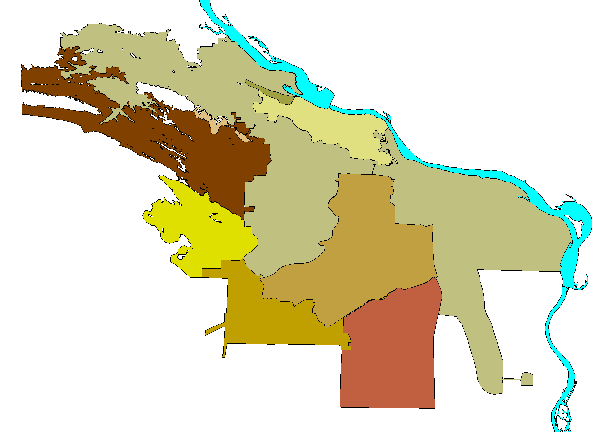
Pressure System Boundaries
Figure 2
The Average Day Consumption for 1999 was 66.4 MGD and the Maximum Day Consumption for 1999 was 107.4 MGD, which occurred 18 August 1999.
The TaskThe LRMWW water distribution master plan was developed in 1986. The predictions made in that master plan for the development and population trends for our service areas had changed significantly. It had become necessary for us to re-evaluate the system.
We had the task of updating the LRMWW Hydraulic Models and Master Plan.
The existing model was text-based with no GIS connectivity.

Sample of Existing Text-based Model
Figure 3
The desired model was to be graphics-based, related to our GIS system, capable of accurately defining our servable areas, and displayed clearly.
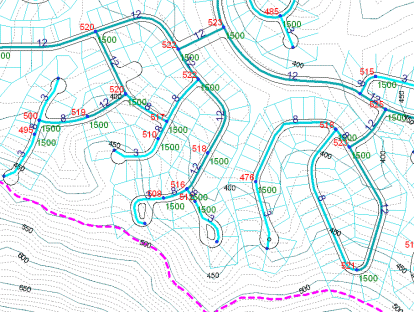
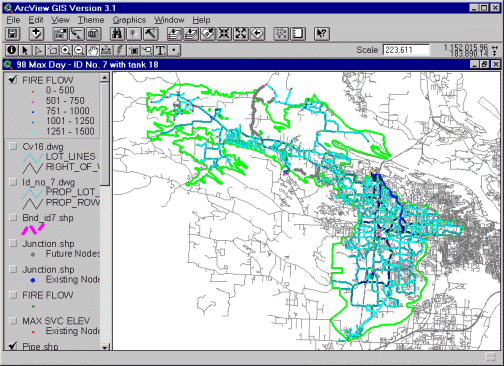
Sample of New Model Displaying Streets, Lots, Pipes, Max Fire Flow Available, Max Service Elevation,Contours, and Boundary (based on elevation).
Figure 4
The steps to gather and process the information in order to build and use a complete, accurate, and reliable hydraulic model are not difficult but can be rather involved.
The following process has evolved through the building of dozens of different hydraulic models using some half dozen different (hydraulic modeling) software packages. This process is, at current, my preferred method of building, using, and displaying results.
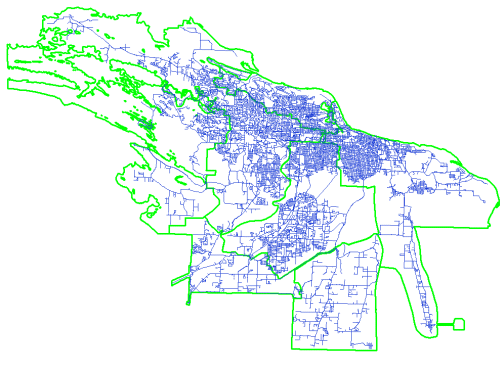
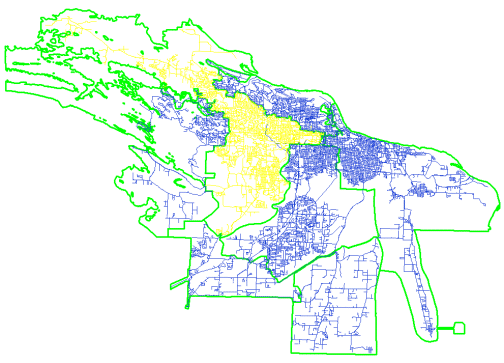
All Piping and All Pressure Systems
Figure 5
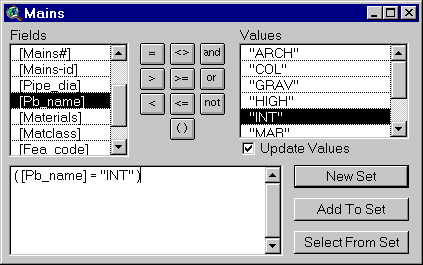
ArcView, Theme, Query
Figure 6
Intermediate System Piping Selected
Figure 7
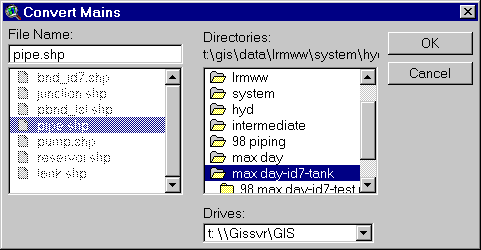
ArcView, Theme, Convert to Shapefile
Figure 8
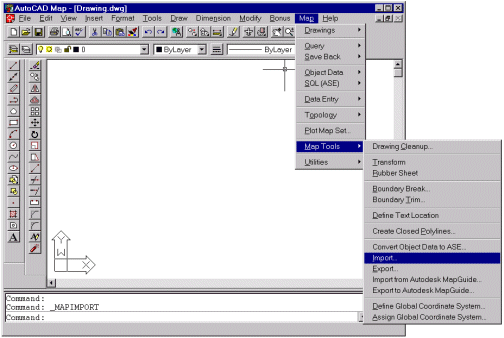
AutoCAD, Map, Map Tools, Import
Figure 9
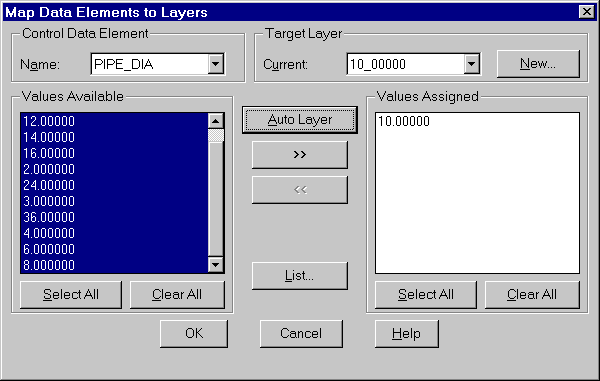
Map Data Elements to Layers, Control Data Element, Auto Layer
Figure 10
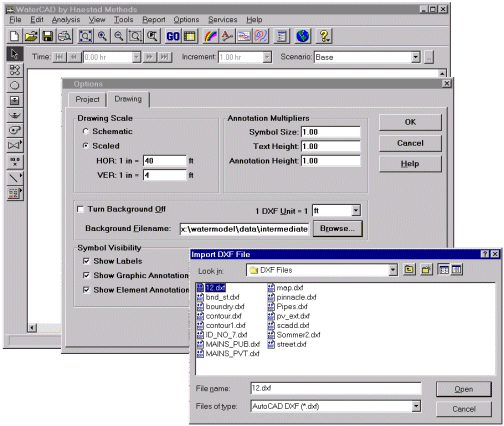
Options, Drawing Options, Background Filename: Browse
Figure 11
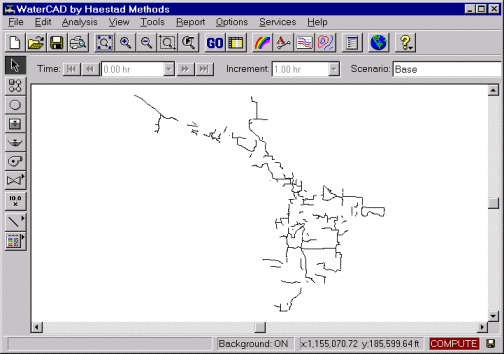
Trace Background Image
Figure 12
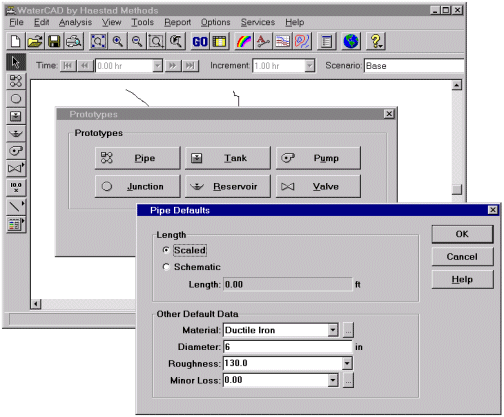
Options, Prototypes, Pipe
Figure 13
Once the Alternatives have been built, then the Scenarios can be built by joining Alternatives together.
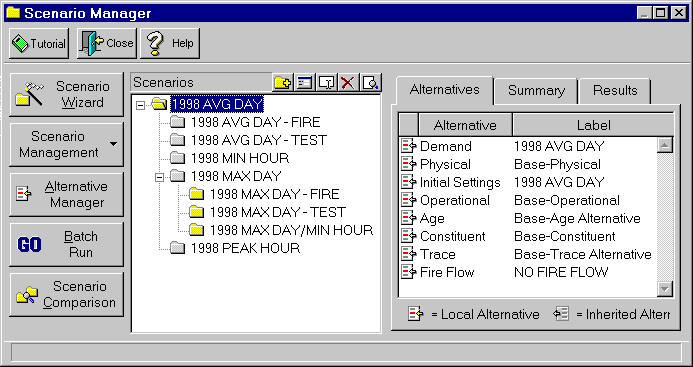
Alternatives and Scenarios
Figure 14
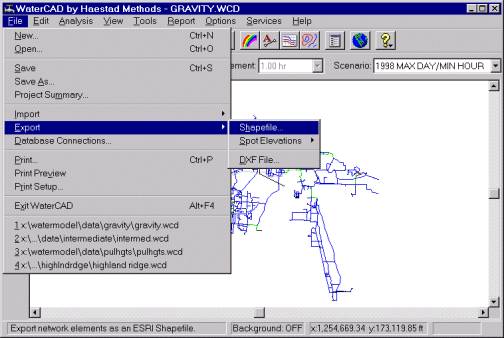
File, Export, Shapefile
Figure 15
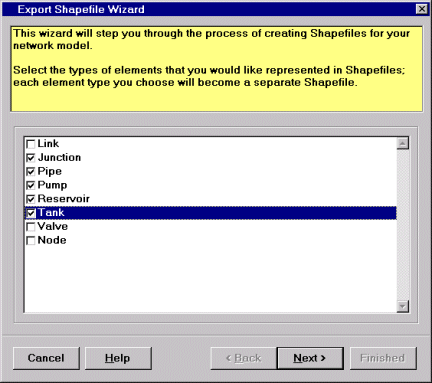
Select the types of Elements
Figure 16
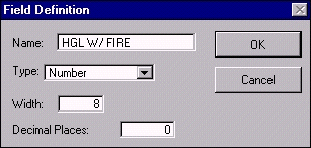
With the Junction theme active, Display the table, Select Table, Start Editing then Edit, Add Field.
Figure 17
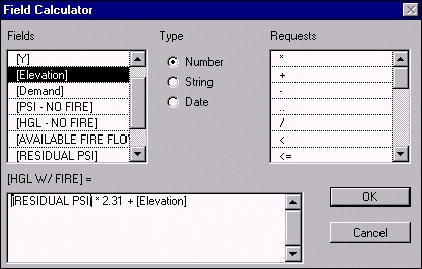
With the new field highlighted, Select Field, Calculate.
Figure 18
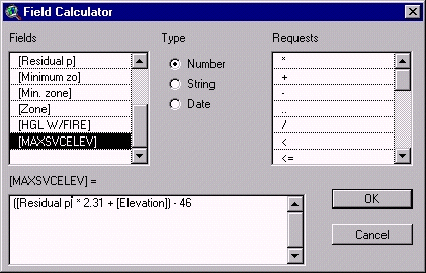
Create and Calculate the Maximum Service Elevation.
Figure 19
Color Code to customize the view.
Figure 20
It is always a good idea to keep a checklist on any project, especially one with as many steps as this process. A checklist can serve many purposes: It can keep you straight on the status of your project, it can make it a little easier to involve other people and keep responsibilities clear, it will keep your supervisor informed, and can come in handy at annual employment evaluation time.
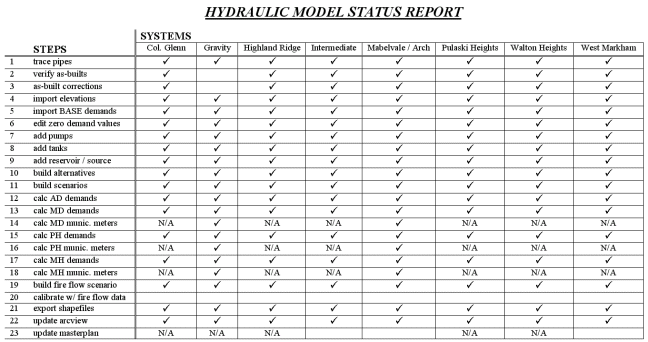
Figure 21
As you go through any project, you will always discover some little something you would like to see changed or added to the software you are using. Keep a running "Wish List" and communicate this with the software manufacturer, as often as necessary.
The role of the GIS Coordinator was to help the Hydrualic Model Analyst accumulate and calculate data for the 10 pressure zones of the Little Rock Municipal Water Works' distribution system. The Hydraulic Model Analyst had to accumulate a large amount of data in a certain manner and in a short period of time. From previous experience it was known that this accumulation was going to take months to do and would tie up valuable manpower. It was clear that an automated way to gather and calculate the data was the only way to meet the short time frame.
The Hydraulic Model Analyst needed ArcView to assign the demands to an address location, total the demand values within a defined area around each junction point, and assign the value to the appropriate field for the point. He also needed to find the elevation closest to the point and assign that value to the elevation field of the point. In areas where there were no contour data, he also needed a way to facilitate assigning an elevation value to the Junction shapefile elevation field.
The Goal was to cut the processing time from months to a few days.
What was needed to accomplish this goal?
A legacy AS400 database table was requested from the Information Services (IS) Section. This database would contain:
SCADD - the GIS Street Centerline ADDress range coverage.
Contours from the GIS planimetric base data.
The Junctions point shapefile from the WaterCAD hydraulic model.
(United States Geological Survey) USGS Digital Raster Graphic rectified to the GIS state plane coordinate system.
Starting the Automation
The entire processing of the data was done using ArcView 3.0.
The first objective was to create a Thiessen polygon for each pressure zone. The Thiessen extention was used to develop the region (polygon ) shape around each Junction point. Thiessen converts a point coverage or point shapefile to a shapefile of PROXIMAL Polygons. Each region contained only one Junction point. Each region has the unique property that any location within a region is closer to the region's point than to the point of any other region.
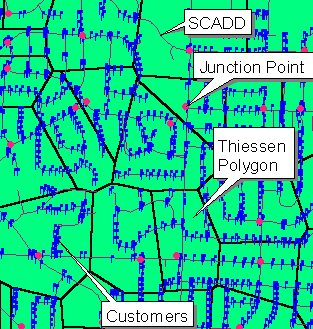 Example of Pressure Zone Proximal Polygon.
Figure 22
The Junction table was used to create a list of Junction labels. The list is an index used in the process to loop through the table selecting the appropriate Junction point record.
The AS400 table was geo-coded against the SCADD range coverage to produce a point shapefile of service address containing the average GPM consumption of each address in the file.
Processing the Data to Populate the Demand Field in the Junction Table
Having the available data, an Avenue script was written to loop through each label point. A Select By Theme process between the Thiessen polygon and the address points having their centers completely within that polygon was performed. The AvgGPM for each selected point within the polygon was summed and the total value assigned to the demand field of the Junction shapefile record. The process then moves to the next Junction record until all points in the entire pressure zone were completed.
Processing the Data to Populate the Elevation Field in the Junction Table
The second objective was to create polygon-grids for each pressure zone. Contours were used for this purpose and were created using Select By Theme to extract available contours for each pressure zone. The Spatial Analyst feature Assign Proximity was used to create the polygon-grids for each available pressure zone. Grid cell size were set to 20 feet and grid cell values was set to the elevation field. The resulting Proximity theme table was used to create a table of elevation to loop through in selecting contour values. The resulting Proximity theme then was converted to a polygon shapefile for the process.
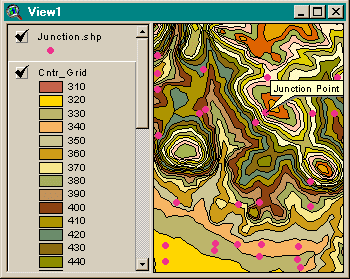 Polygon-Grid and Junction points
Figure 23
Processing the Data Where There Was No Contour Information
The third objective: The Junction shapefile, along with a rectified Digital Raster Graphic quad image, was loaded into the View. An Avenue script was developed for the GIS Operator to interface with the process. The GIS Operator would select and zoom to a Junction point where he or she observed the contour value closest to the point. If the point through other means was already populated with an elevation value, the script would inform the GIS Operator that this Junction point already had a value. If there were no values previously assigned, a dialog box would be available for the GIS Operator to post the observed value. The value then would be passed directly to the elevation field of the point in the Junction shapefile.
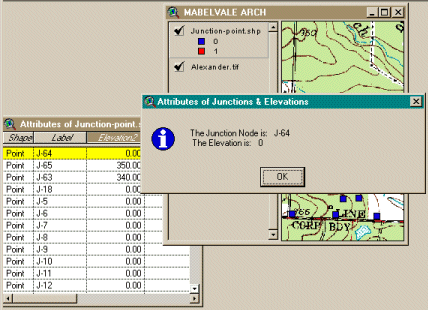 View of DRG Quad Map and Junction Table
Figure 24
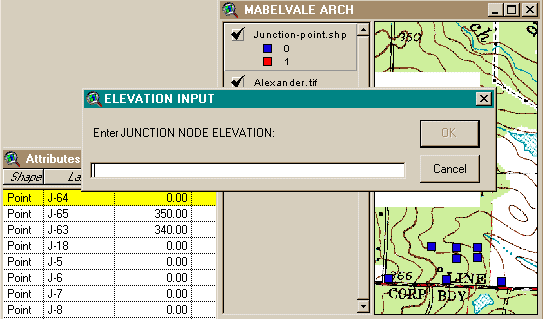
View of DRG Quad Map and Junction Table Input Dialog Box.
Figure 25
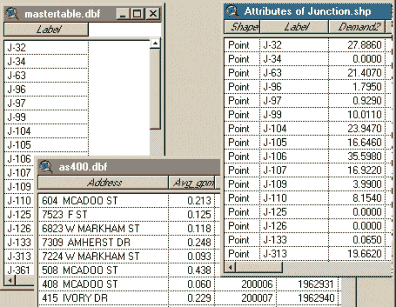
This figure shows the mastertable used as the index table, Junction table imported from WaterCAD, and legacy customer information imported from AS400 system.
Figure 26