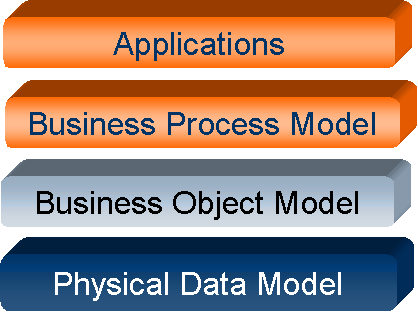
Software Development Process
The starting point to develop any data model is the Unified Modeling Language (UML) tool provided with Visio Enterprise 2000. Data model development involves creating the data model using Visio and then generating the model to a UML repository, which is then used to generate a schema.
Figure 3 illustrates this process.
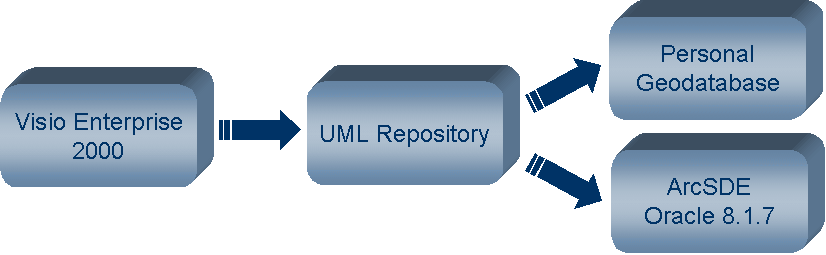
Figure 3 : The software development process
Using Visio Enterprise 2000 instead of Visio Professional as the data-modeling tool is beneficial because Visio Enterprise 2000 also includes a UML navigator. The UML navigator is essential when creating large models within Visio, because it allows the developer to quickly find and edit UML classes.
Numerous seldom-used tagged values are also useful when creating a data model, in particular:
1) CLSID - Allows the developer to set the GUID of the associated custom feature or class extension
2) ConfigKeyword - Allows the developer to set the configuration keyword to use when the feature is generated in ArcSDE
The author believes that it is important to regard the Visio UML diagram as the source of the database schema and to maintain the diagram to reflect this.
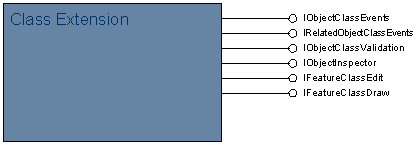
Implementing Custom Features and Class Extensions
The UML diagram can also serve as the design documentation for the custom feature and class extension implementation. Unfortunately, the code generation wizard provided by Esri can be used only once when the original project is generated. However, the code generation wizard can be useful when adding a new custom feature to an existing project, because it can generate the outline code for the new custom feature together with the associated class extension.
The developer should follow certain guidelines when developing custom features. First, the developer should break up the custom features and class extensions so that there are never more than about 15 custom features in one Visual C++ project. Otherwise, the time to compile the project starts to increase exponentially and becomes unworkable. Second, the developer should create one project with all interface definitions and then import this project into the projects, where the custom features are implemented. Figure 4 illustrates this project structure.
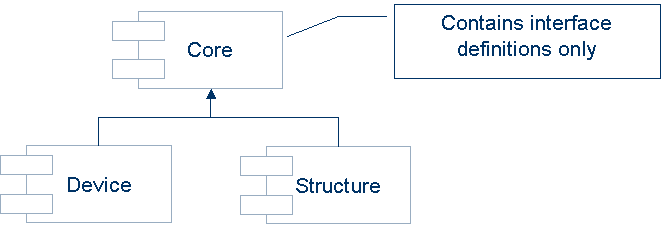
Figure 4 : Suggested Project Structure
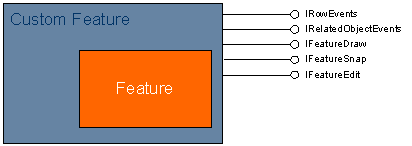
Visual C++ also allows the use of abstract classes. Abstract classes allow the developer to group reusable code into a class. Any custom feature can then inherit this behavior. Figure 5 shows an example of such a hierarchy. Each abstract class implements an interface, the total sum of which the custom feature can inherit.
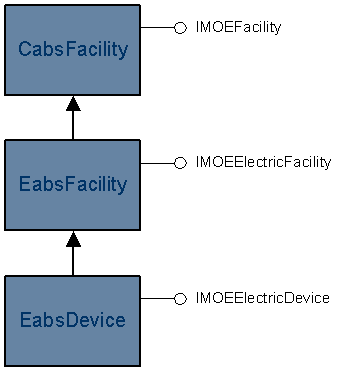
Figure 5 : Hierarchy of Abstract Classes
The developer uses COM interface entry chaining to add abstract classes to custom features. The following code example illustrates the use of this behavior. In this code example, the custom feature for light inherits the behavior and interfaces of the abstract device class.
class ATL_NO_VTABLE EfeaLight :

,public EabsDevice

,public CComCoClass<EfeaLight,;CLSID_EfeaLight>

...

public:

...

BEGIN_COM_MAP(EfeaLight)

...

COM_INTERFACE_ENTRY_CHAIN(EabsDevice)

INTERFACE_ENTRY_AGGREGATE_BLIND(m_pInnerUnk)

END_COM_MAP()

...
Implementing Business Behavior
One of the most complex and most common requirements when building a data model is to provide business behavior. When the developer creates, updates, moves, rotates or deletes a feature, some business event must be triggered. Esri essentially provides two ways to implement this behavior. The developer can choose to implement either IRowEvents on the custom feature or IObjectClassEvents on the class extension. It is important to understand the differences between these two implementation choices. If the developer chooses to implement IRowEvents, these events are then handled simultaneously with the default Esri behavior for that feature. However, when the developer implements IObjectClassEvents, these events are processed after Esri has completed executing the default behavior for the feature.
One of the most common business behaviors is to allow a simple junction to break a complex edge when it is placed. Because of the Esri architecture, this behavior is impossible to implement as part of the IRowEvents interface. It appears that at the time the event is handled the geometric network is not in a consistent state. However implementing this behavior as part of the IObjectClassEvents is a simple exercise. Because of this unpredictability and the possibility of breaking the underlying Esri behavior, the author recommends using the IObjectClassEvents over the IRowEvents interface.
One interesting challenge the developer faces is determining how to reuse the various business rules across multiple features. In ENOM, the author overcame this challenge by creating business rules as separate co-creatable COM objects. When a class extension is initialized, it reads the configuration to determine which business rules apply to that particular feature. The class extension then co-creates and initializes the various business rules. Whenever the developer creates, updates or deletes a feature, the class extension delegates this behavior to the individual business rules. The class extension supports an interface to iterate through the business rules applying to that feature and then turns individual rules on and off. Figure 6 illustrates this architecture.
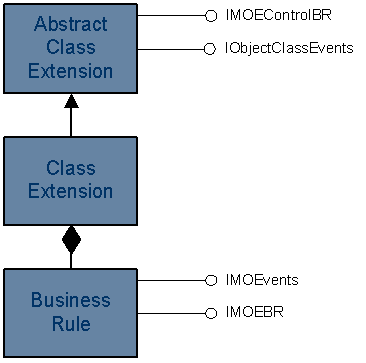
Figure 6 : Business Rule Architecture
Application Development using Custom Features
Circuit reconfiguration is an interesting example of using custom features in ENOM to enable application development. The circuit reconfiguration application aims to determine circuit bounds based on electric connectivity and the direction of flow by individual phase. The design of this application took place at several levels.
At the physical level, one design criterion was to avoid creating physical joins between the circuit table and every feature that can form part of the circuit. Using physical joins unnecessarily complicates the physical model. Using a physical join also means that every time a feature changes from one circuit to another, that feature requires updating. The second design criterion was to provide the direction of flow by phase, mimicking the Esri logical network tables while extending the functionality to allow three different directions.
Translated to the physical level, this resulted in the creation of a circuit table and then a circuit join table. The circuit join table is used to both mimic a physical join and to store the information on the direction of flow. Figure 7 illustrates the physical tables.
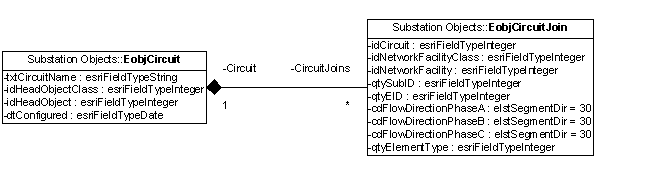
Figure 7 : Circuit Physical Data Model
The next task was to design a set of interfaces to create and access the circuit information. These interfaces should also provide the capability to quickly search for the direction of flow for a set of features so that the flow can be visualized within ArcMap. One key aspect was the capability to search for information by using both the unique facility ID and the EID, which is the unique ID within the logical network. Figure 8 shows the interfaces that resulted from this design.
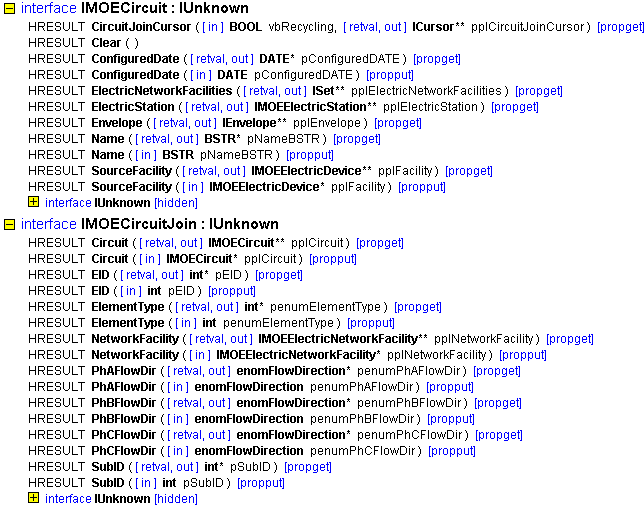
Figure 8 : Circuit Interface Definitions
The next step in the process was to develop an application. The sample application code shown here was developed inside ArcMap as a VBA project. The code is simplistic in that no tracing is done to determine the direction of flow. Flow direction is set to match the digitized direction of the selected features. If a source device is found, that feature is automatically set to be the source facility for the circuit. Although the example below uses interfaces in other parts of ENOM, this code illustrates how simple application development becomes once the developer creates a rich development environment.
Sub CreateCircuit()


Dim pDoc As IMxDocument

Dim pMap As IMap

Dim pEnumFeature As IEnumFeature

Dim pFeature As IFeature

Dim pFeatureClass As IFeatureClass
Dim pNetworkFeature As INetworkFeature
Dim pNetElements As INetElements

Dim pEnumNetEID As IEnumNetEID

Dim pNetworkFacility As IMOEElectricNetworkFacility
Dim pSegment As IMOEElectricSegment
Dim pDevice As IMOEElectricDevice
Dim pBank As IMOEBank

Dim pConductors As ISet

Dim pConductor As IMOEElectricConductor

Dim pCircuitRow As IRow

Dim pCircuit As IMOECircuit

Dim CircuitName As String

Dim EID As Long

Dim Count As Long

Dim ClassID As Long

Dim ObjectID As Long

Dim SubID As Long


Set pDoc = ThisDocument

Set pMap = pDoc.FocusMap

Set pActiveView = pMap


' Prompt for the circuit name

CircuitName = InputBox("Enter Circuit Name")


' Get the first selected feature
Set pEnumFeature = pMap.FeatureSelection

pEnumFeature.Reset

Set pFeature = pEnumFeature.Next


If pFeature Is Nothing Then

MsgBox "No feature selected"

Else

' All of the features selected should support IMOEElectricNetworkFacility

If TypeOf pFeature Is IMOEElectricNetworkFacility Then


Set pNetworkFacility = pFeature

Set pCircuitRow = pNetworkFacility.CircuitTable.CreateRow

Set pCircuit = pCircuitRow


' Create the circuit

pCircuit.Name = CircuitName

pCircuitRow.Store


' Loop through all the features

Do While Not pFeature Is Nothing


' Case 1 - Segment

If TypeOf pFeature Is IMOEElectricSegment Then

Set pSegment = pFeature

pSegment.Circuit = pCircuit


' Store the feature to update the Circuit Annotation Label

pFeature.Store


' Set the direction of flow on the

' individual conductors to be positive

If TypeOf pSegment Is IMOEBank Then


'Get the EID's associated with the feature

Set pNetworkFeature = pFeature

Set pNetElements = pNetworkFeature.GeometricNetwork.Network

Set pFeatureClass = pFeature.Class

Set pEnumNetEID = pNetElements.GetEIDs(pFeatureClass.FeatureClassID,pFeature.OID, EsriETEdge)


' Look through the conductors

Set pBank = pSegment

Set pConductors = pBank.Children

Set pConductor = pConductors.Next


Do While Not pConductor Is Nothing


pEnumNetEID.Reset

For Count = 1 To pEnumNetEID.Count


EID = pEnumNetEID.Next

                                pNetElements.QueryIDs EID, EsriETEdge, ClassID, ObjectID, SubID


                                ' Set the flow to positive

                                pConductor.FlowDirection(SubID) = EFLOWPOSITIVE


Next Count


Set pConductor = pConductors.Next


Loop


End If


End If


' Case 2 - Device

If TypeOf pFeature Is IMOEElectricDevice Then


Set pDevice = pFeature


' Make sure that the association to previous circuits

' is cleared - shouldn't really do this for operating points

' since they can belong to two circuits

pDevice.RemoveFromAllCircuits


' Add the device to the circuit

pDevice.AddToCircuit pCircuit


' When this is an operating point, store this to update

' the tie point annotation

If TypeOf pFeature Is IMOEElectricOperatingPoint Then

pFeature.Store

End If


' If this is a source, set the source property
' on the circuit

If pDevice.Source Then

pCircuit.SourceFacility = pDevice

pCircuitRow.Store

End If


End If


Set pFeature = pEnumFeature.Next


Loop


End If


End If


End Sub
Conclusion
Custom features are the orphan children of the Esri data model. Perceived performance problems and the concern that custom features require using of Visual C++ minimize or prevent the use of custom features in most projects. However, custom features can be a powerful aid toward building a successful ArcGIS implementation. Custom features are significantly beneficial when it comes to application development by insulating the application from the changing physical data model, and by decreasing application development time because of the rich development environment.
Peter J. Quick
Associate Director
SchlumbergerSema
6399 S. Fiddler’s Green Circle, Suite 600
Greenwood Village, CO 80111
Phone:(303) 741-8400
Fax:(303) 741-8401
pquick@slb.com