
John S. Wood, B.S. and Elizabeth Smith, Ph.D.
This paper presents the use of GIS in the study of coastal habitats in the Texas Coastal Bend, USA. Coastal habitats have been converted, degraded, or fragmented from both municipal and industrial growth as well as agricultural and ranching practices. The project focuses on developing a GIS using multiple data sources, including DEMs from the USGS, arc coverages from the Texas Department of Transportation, and TM Land Use Coverages from the Texas Parks and Wildlife Department. Mosaics of as many as 72 quarter-quadrangle DEMs are used for base map and elevation data, and Esri's Water Resources Extension is used to develop stream data and watershed delineation. The GIS is being used to analyze restoration options within a potential mitigation bank site, to educate citizens within the watershed and to develop long-term monitoring strategies. Other uses include identifying riparian habitat restoration options within both a watershed and sub-watershed scale.
The project was developed by the The Center for Coastal Studies at Texas A&M University-Corpus Christi, as part of an initiative on riparian corridor assessment funded by the Coastal Bend Bays & Estuaries Program, Inc. Primary objectives of the project were: 1) was to catalog riparian, wetland and other habitat types in the watersheds and sub-watersheds in the Coastal Bend Area of South Texas; and evaluate areal coverage of riparian habitats by subwatershed. The projected area encompasses over 5400 square km (2100 sq miles) of agriculture, rangeland, and urban landuse areas. Covering such a large area could only be feasibly accomplished by using a combination of remotely sensed land use / land cover data and digital elevation data.
Previous attempts to develop this database involved bringing each quadrangle of Digital Elevation Model (DEM) data into one software package, developing a hill-shade coverage of the data, creating contours in another software package, and then hand-digitizing watersheds and sub-watershed polygons by interpreting the aspect of the contours. Several problems were identified with this approach: there were areas of apparent ‘no data’ between each of the DEMS, presumably a product of their particular projection; and the accuracy of the final product was questionable because of the manual processes used to develop the watersheds and sub-watersheds. Furthermore, the completed watershed/sub-watersheds would then have to be imported into a separate software package to be combined with the land use / land cover data.
The data modeling method developed for this project allows the researcher to accomplish the goals of the project using one software package, using publicly available data, and it eliminates some of the problems encountered in previous attempts.
Development of the GIS portion of the project involved a multi-step process. Data sets were collected from several sources, including Digital Elevation Models from the U.S. Geological Survey, Land Use/Land Cover from the Texas Parks and Wildlife Department, and Highway/Line Features from the Texas Department of Transportation. Each of these coverages existed in different projections and different formats, hence the processing for each of these involved decompressing, converting, and re-projecting the data into a common projection. The projection chosen was NAD 27 UTM Zone 14, with map units in meters. This projection matches that of the USGS DEM GRID files, which are the most difficult to re-project.
In order to keep datasets at manageable sizes, the GIS coverages were divided into three separate areas or zones:
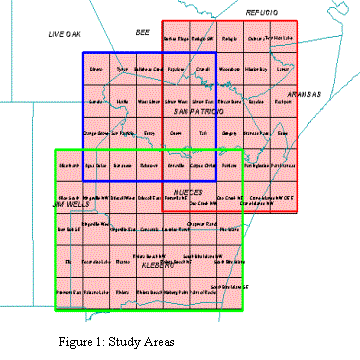
1) The northern zone comprises an area covered by 25 DEMs. The northern zone covers an area from just north of Copano Bay, south to the northern edge of Corpus Christi Bay, west to the Taft area, and north to the east of Beeville, covering an area of approximately 1300 square miles. The major watersheds of the area include the Mission and Aransas rivers and Chilitipin Creek.
2) The Nueces River zone is made up of 20 DEMs and covers the area from the dam at the Lake Corpus Christi to the mouth of the Nueces River in western Corpus Christi. Software requirements for a rectangular coverage dictated that DEMS be assembled for the entire area, which covers approximately 1040 square miles. Major watersheds include the Nueces River and Chilitipin and Petronilla creeks. Note that there is some overlapping of coverage with both the northern and southern zones.
3) The southern zone, which comprised 35 DEMs, extends from east of Corpus Christi south to the northern edge of Baffin Bay, and west to Falfurrias, and north to near San Diego, Texas. This zone encompasses approximately 1600 square miles.
It should be noted that subsequent attempts on computers with faster processors and higher RAM eliminated the need to break the project into these smaller study areas! Today's technology may allow revisiting other research projects that may have failed in the past!
Digital Elevation Model (DEM)the term Digital Elevation Model is used to describe terrain elevation data sets in a digital raster form. The standard DEM consists of a regular array of elevations in a designated coordinate projection system. The DEM data are stored as a series of profiles in which the spacing of the elevations along and between each profile is in regular, whole number intervals. The normal orientation of data is by columns and rows. Each column contains a series of elevations ordered from south to north with the order of the columns from west to east.
The DEM data for 7.5-minute units corresponds to the USGS 1:24,000
topographic quadrangle map series. Each 7.5-minute DEM is based on
30-x-30-meter data spacing with the Universal Transverse Mercator (UTM) projection.
Each 7.5- by 7.5-minute block provides the same coverage as the standard USGS
7.5-minute map series. The USGS has two options for acquiring 1:24,000-Scale (7.5-minute)
Digital Elevation Model data.
1) The original DEM 7.5 minute tiled data available only in Spatial Data Transfer Standard (SDTS) form is available at no cost via downloads from the GeoComm International Corporation at http://gisdatadepot.com/dem.
2) The National Elevation Dataset (NED) is the result of the maturation of the USGS effort to provide 1:24,000-scale Digital Elevation Model (DEM) data for the conterminous U.S. and 1:63,360-scale DEM data for Alaska in a seamless form. Available data formats include ArcGrid, Floating Point, and BILS. For more information see (30m NED button), or go directly to the Seamless Data Distribution System at (Seamless Store).
The DEM files are named after the 1:24,000-scale quadrangles that are located within
the state. For metadata and more information about the DEM Data Set, refer to the
USGS DEM User Guide available at: http://edc.usgs.gov/glis/hyper/guide/7_min_dem
These files are obtained tarred, zipped, and in SDTS (Spatial Data Transfer System) format. Each one must first be unzipped and un-tarred into a separate folder, which yields sixteen files that have a common four-number prefix, ie: 1071xxxx.ddf. These files are then converted using Esri’s (Environmental Systems Research Institute) ‘SDTS Raster to Grid Conversion Utility’. The output from this utility is an Arc GRID file that can be brought into an ArcView project as a GRID file.
Once each of the GRID files has been processed and brought into an ArcView project file, the remaining DEM processing can be done from within the ArcView program. DEMs in a rectangular arrangement are mosaiced (merged) to form one large DEM. This is accomplished using a ‘GRID mosaic’ Avenue script.
In undergoing this process, areas which have no data associated often will occur at the seams of the DEMs. This can create numerous problems with the processing in subsequent steps, and must be eliminated or minimized. A GRID clean-up script, obtained from Esri, was obtained and ran over the assembled DEM, to eliminate these areas.
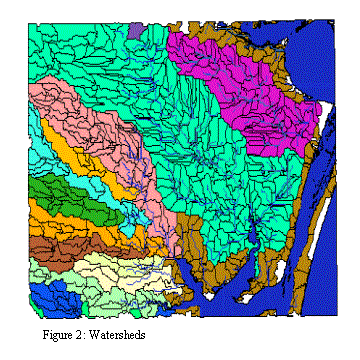
At this point, the DEMs are processed using Esri’s Watershed Delineation extension. This multi-step process is used to fill the sinks, calculate aspects, flow accumulation and direction, define stream segments, and ultimately define the sub-watersheds for the area covered by the DEMs.
The Watershed Delineation extension also includes a polygrid-to-shapefile and linegrid-to-shapefile converter. The DEMs, sub-watershed polygons, and stream themes were converted from GRID files to shapefiles, which can be projected and geo-processed in the ArcView program. Areas of each sub-watershed were calculated using ArcView’s map calculator function.
The Texas Parks and Wildlife Land Use/Land Cover data was supplied as an ‘Image Analysis Data Source’ file. This file was converted to a shapefile, which allows the developer to clip, re-project, intersect, and perform calculations. A legend was developed to correspond to the TPWD standard classifications. The theme was then re-projected with ArcView’s Projection Utility to coincide with the DEMs. One file, containing over 960,000 records, covered the entire project area. The massive size of the file required that the file be split into three separate files, covering the approximate size of each of the areas of study. The area of each LU/LC polygon was then calculated, at the lowest spatial scale.
Texas Department of Transportation Urban Map Files were used to bring line coverage of streets, highways, and water bodies into the project, and to check the validity of the streams and river systems interpolated by the Watershed Delineation Extension. The TxDOT Urban files were obtained through the TNRIS ftp website, http://www.tnris.state.tx.us/DigitalData/TxDOT/txdot.htm, in .e00 (ArcInfo) format.
These coverages each cover a one-county area. They were imported with Esri’s Import71 utility, converted to shapefiles, merged and clipped to cover the study area, and re-projected to coincide with the DEM’s.
A new point theme was created in ArcView, plotting the existing sample points. This theme is used to locate sub-watersheds in which samples have been obtained.
Each watershed theme was split into individual sub-watershed themes, generally by river or creek system. Sub-watersheds that drain directly into the Laguna Madre, Baffin Bay, Corpus Christi Bay, and other large bodies of water were classified as ‘other’.

Areas for each sub-watershed (SWS) were calculated, using ArcView’s Map Calculator function. These smaller themes were each then intersected with the land use/land cover theme, yielding themes containing area data from both the land use/land cover (LU/LC) and sub-watershed information. The area of each land use/land cover polygon was then calculated again. By recalculating the area after the intersection of the subwatershed polygons and the LU/LC coverage, areas for each LU/LC polygon within the SWS polygon were obtained. Thus, the sum of the areas of the LU/LC should be comparable to the area of the sub-watershed. This combined data allows analysis on a sub-watershed level of the area of individual land use/land cover area, in relation to the total area of the sub-watershed. Sub-watershed areas in which sampling had taken place can then be individually accessed and analyzed, using the sample point theme as a guide.

Most of the areal coverage for each of the fifteen watersheds encompassed
the middle and lower portions, with the exception of Nueces River watershed
(lower portion only). However, this coverage allowed a quantitative comparison
among watersheds to compare upland landuse/ land cover as well as riparian
extent and distribution. Nueces River exhibited the largest amount of bottomland/riparian habitat.
Although Petronila Creek upland area was predominantly agriculture
(see figure), this system had the second largest riparian areal coverage, followed by San Fernando Creek and Aransas River.
Nueces River exhibited the largest amount of bottomland/riparian habitat.
Although Petronila Creek upland area was predominantly agriculture
(see figure), this system had the second largest riparian areal coverage, followed by San Fernando Creek and Aransas River.
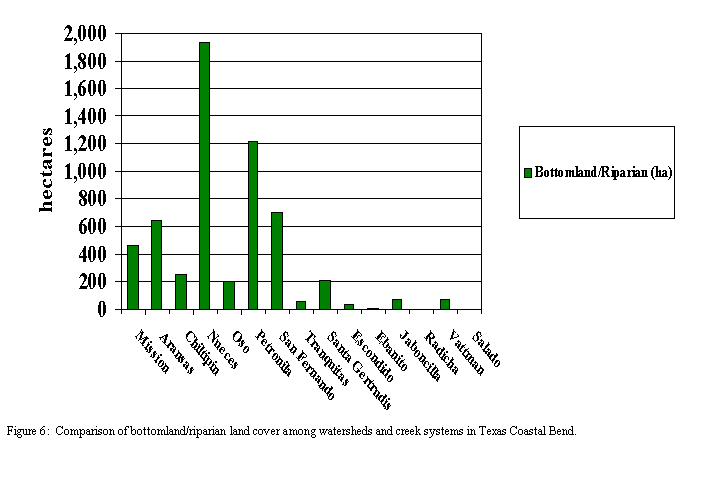 Both Chiltipin and Oso creeks had low
amount of riparian habitat despite fairly similar geomorphologies to Petronila
and San Fernando creeks. The increase in development in the former watershed
has undoubtedly decreased the amount of riparian habitat, in comparison to
leaving riparian buffers in current agriculture practices in the latter
watersheds. Riparian habitat decreased in areal extent in the lower Texas
Coastal Bend, probably as a result of lower average precipitation and higher
evaporation rates and watershed/creek coverage. In all areas, riparian habitat
was calculated as exhibiting a minor amount of coverage. Therefore, the GIS is
being used as a tool to establish priority conservation areas in both rural and
urban areas. In addition, new methods are being developed and employed to
assess degree of connectivity or fragmentation within each watershed. These
evaluations will assist in determining locations where restoration would
improve bank stability, water quality, and wildlife corridors.
Both Chiltipin and Oso creeks had low
amount of riparian habitat despite fairly similar geomorphologies to Petronila
and San Fernando creeks. The increase in development in the former watershed
has undoubtedly decreased the amount of riparian habitat, in comparison to
leaving riparian buffers in current agriculture practices in the latter
watersheds. Riparian habitat decreased in areal extent in the lower Texas
Coastal Bend, probably as a result of lower average precipitation and higher
evaporation rates and watershed/creek coverage. In all areas, riparian habitat
was calculated as exhibiting a minor amount of coverage. Therefore, the GIS is
being used as a tool to establish priority conservation areas in both rural and
urban areas. In addition, new methods are being developed and employed to
assess degree of connectivity or fragmentation within each watershed. These
evaluations will assist in determining locations where restoration would
improve bank stability, water quality, and wildlife corridors.
The project goal of developing a watershed database for the Coastal Bend Region was accomplished with the use of several existing ‘free’ data sets. Each of these data sets lends valuable characteristics to the final product. Combining the data in one software package from various sources into a common format and projection yields a viable product that may be used for a variety of research beyond the goals of this project.
The practice of using GIS and remote sensing in environmental research has existed for a long time; GIS was developed partly as a tool for the Landscape Architecture field. Current trends toward ‘environmental sustainability’, and viewing eco-systems as larger and larger interacting entities will ensure that environmental research using GIS will continue to reach new horizons. Data sets such as those from the U.S. Geological Survey, Texas Parks and Wildlife, and Texas Department of Transportation used in this project are increasingly available. Developments in GIS and computer technology enable researchers to manipulate and interpret larger and more complex data. The demand for information such as that produced in this project is increasing as environmental regulations and concerns grow. As the demand for this information grows, and data sources and the technology to assemble it improve, GIS and environmental research will continue to be a valuable combination.
Smith, Elizabeth H., Ph.D., Suzanne J. Dilworth and Amy E. Koltermann, Center for Coastal Studies, Texas A&M University-Corpus Christi.
Hay, Rick, Research Associate, Center for Water Supply Studies, Texas A&M University – Corpus Christi. Technical advice and assistance.
Pulich, W., Jr. and J. Hinson 1996. Data sets on Land Use/Land Cover. Coastal Studies Technical Report No. 1, Texas Parks and Wildlife Department, Resource Protection Division, Austin, Texas.
a. Available at - http://www.gisdatadepot.com/dem//
b.Data set description & Metadata - http://edcwww.cr.usgs.gov/glis/hyper/guide/usgs_dem
c.Each DEM should be downloaded into its own folder. Folder names must be DOS compliant; no spaces or capital letters. These files are received in SDTS compressed format. Winzip will generally unzip most of the files, however, I found that some files would not convert with the SDTS conversion utility unless they have been uncompressed with the Unix system. I ftp’ed the file to our Unix system, g-unzipped it, untarred with the tar –xvf command, and then ftp’ed the resulting files back to my Windows computer. The ‘ucomments’, 'readme', and zipped files may be deleted after decompression.
a. Start the SDTS-to-Raster Conversion Utility, located under the Esri start menu (ArcView 3.2a)
b. In the first text-box, labeled 'Input prefix', enter the full path name, followed by a slash, and the first four letters or numbers of the files in the folder. For instance, if the files from the decompression process were placed in C:/my_dems/dem1, and each file had the name 1074xxxx.ddf, 1074yyyy.ddf, etc., the input box would contain 'C:/my_dems/dem1/1074'. This may be easily accomplished by calling up the folder in Windows Explorer, copying the path from the address box, and appending the /1074.
c. The second box, labeled 'Output Grid', should be filled with the path, and the name you wish to give the file, such as ' C:/my_dems/dem1/dem1'. All other options can remain unchanged.
d. This will yield a file named dem1 and an 'info’ file in the C:/my_dems/dem1 folder. All other files may be deleted.
a. The 3D Analysis Extension must be selected.
b. The DEM files may now be brought directly into ArcView in the Add Theme Window as a GRID file.
a. Specify input and output themes
b. Specify the name and location for saving the filled GRID
c. Copy filled GRID to permanent directory.
a. Specify input and output themes
b. Specify the name and location for saving the Flow Direction GRID
a. Specify input and output themes
b. Specify the name and location for saving the Flow Accumulation GRID
a. Specify input and output themes
b. Select number of cells to initiate a stream
c. Specify the name and location for saving the stream GRID
a. Specify input and output themes
b. Specify the name and location for saving the stream link GRID
c. Convert Stream Link GRID to shapefile and copy to permanent directory.
a. Input Flow Direction GRID
b. Input Stream Link GRID
c. Specify Watershed GRID name
a. Save in permanent directory.
b. Delete temporary directory.
a. [Area] = Shape.returnArea
v = av.getactivedoc
themes = v.getthemes
gthms = list.make
for each t in themes
if (t.is(gtheme))
then
gthms.add(t)
else
continue
end
end
if (v.getactivethemes.count < 1)
then
msgbox.info("Active theme must be a Grid
theme","")
exit
end
g1 = v.getactivethemes.get(0)
if (g1.is(gtheme).not)
then msgbox.info("Active theme must be a Grid
theme","")
exit
end
gthms2 = gthms-{g1}
mrglist = msgbox.multilist(gthms2,"Pick grid(s) to merge with"++g1.getname,"Create
Grid Mosaic") if (mrglist= nil) then exit end
thegridlist = list.make
for each gt in mrglist
gr = gt.getgrid
thegridlist.add(gr)
end
outgrid = g1.getgrid.mosaic(thegridlist)
newtheme = gtheme.make(outgrid)
v.addtheme(newtheme)
v.invalidate
From: Tom
Whitenack [mailto:twhitenack@Esri.com]
(NOTE: result from mosaic is g1)
([g1].isnull).con([g1].focalstats(#GRID_STATYPE_MEAN, NbrHood.MakeRectangle
(5, 5, false),false),[g1])