Greg Thomas
Robert Shankman
ABSTRACT
This presentation discusses how Fairfax County, VA, has streamlined and integrated its parcel update and data management system throughout its operations. Fairfax chose Esri's Arc8 and ArcSDE software in combination with NovaLIS' Parcel Editor and GATE. This complete solution enabled them to achieve their goal of updating parcel data and address information. This gives Fairfax a transaction based updated parcel fabric accessible to its corporate users via SDE and the ability to create their legislated tax maps with ArcMAP.
Background
Where We Were Prior to Digital Data
Fairfax County is an established county in the United States. It is located just outside of Washington, D.C. in northern Virginia. Fairfax County encompasses 399 square miles of area and is home to more than 900,000 people residing on 330,000 parcels of land. The Fairfax County GIS and Mapping Department must manage all the parcel changes in the county and maintain them on maps. These maps are used in approximately 80% of the operations that go on in the County. Therefore, it is very important to have this information up to date and available to staff and citizens in Fairfax County at any time.
Up until January 2000, the parcel data was maintained with ink on mylar at a scale of 200 feet to the inch. There was one mylar for the property lines, another for the zoning lines and yet another for the street name overlay. There are 8 GIS technicians that maintain the GIS database. These technicians are responsible for entering the graphic and attribute data into the database and ensuring that it is correct. There is also a supervisor that manages the quality control of the data and ensures that the processes are done correctly.
Changes used to be recorded by hand on a paper "revision sheet". When a certain number of revisions had been added to a sheet then a technician would transfer all the revisions to the mylar map sheet. This would typically be done at the end of the year when all mylars needed to be up to date for printing. Each year in January the annual printing of the map books would be started. The department of Tax Administration would roll over the tax roll and the map sheets would be caught up to that date and then frozen for printing. Map books would be printed at a scale of 500 feet to the inch. There would also be a small number of map books printed at 200 feet to the inch. The whole process would be completed by around June of that year. This means that the maps that people would use were anywhere from 6 to 18 months out of date.
The goal of this project is to have a consistently up to date database that combines an edit database and a view database into a single, enterprise-wide system. Using Esri's Spatial Database Engine (SDE) and NovaLIS' GATE product this was accomplished. All of the data are stored in centralized tables. When an edit needs to be performed, a work area is selected and a subset of the database is created for editing. The view database is maintained with a combination of batch processing and real-time updating from the central tables.
County Statistics
Database
The Fairfax County GIS database is approximately 375 GB in size. There are about 350 GB of color digital orthoimagery and 25 GB of vector data. The data is housed in the SDE database on an IBM AIX Server. The County uses Oracle 8.1.6 and SDE 8.0.2.
There are approximately 200 layers of data that the county stores and maintains in the SDE database. This data includes 4000 scale source data such as the magisterial districts, school attendance boundaries, and public facility locations. It also includes 200 scale source data such as the property and zoning data. There is also planimetric and contour information stored in the database as well. Features types include point, line, polygon, regions, and annotation.
Software
Fairfax County uses Esri products for almost all of its GIS work. Arc/Info is the professional software that is used in the GIS office for maintaining all of the data layers and performing advanced spatial analysis. Most clients use ArcView to perform queries against the database and produce map products. Map Objects is being used as an integration tool to implement GIS into business processes. Internet Map Server technology is being used to disseminate GIS information throughout the County and its citizens using the internet/intranet.
Typically, the GIS department supports County agencies with development of software applications for GIS. Some agencies are starting to hire staff that are more proficient in GIS and are able to take some of the work off the GIS staff's hands and let the GIS department deal with countywide initiatives. The GIS department has developed several applications for other agencies to easily access the GIS. One application is housed in ArcView. It already has many of the popular data layers loaded into the project and users can tailor their projects to their own needs. Another application that was developed is map objects based. This has a smaller footprint than the ArcView project. People can use it to select the layers they want to view, they are added to the view, and then they can zoom, pan, query and make simple output products. Several agencies have taken this application and extended it to meet their specific needs.
Users
There are approximately 200 GIS users in Fairfax County that are broken down into 4 classifications. First, there is the casual user who uses web-based applications and typically just view the data. County citizens also use these web-based applications as well. Second, there are application specific users. These users work with custom applications written specifically for a function within their department. Third, there are ArcView power users. These users use ArcView software to view, query, analyze, and print the spatial data. They can use ArcView without any customization. The fourth level is the professional user. The people that use the high-end GIS software such as ArcInfo do analysis, develop custom applications, maintain data, develop databases, and support all levels of users within the county.
Transactions
The growth rate of Fairfax County has slowed a bit since the late 80's, early 90's when there were about 12,000 new parcels annually. However, there is still quite a bit of development that is going on in the county. Fairfax County still sees about 5,000 new parcels every year. There are also other transactions that do occur including road-takings, acts of condominium, address changes, and simple lot reconfigurations. These transactions add up during the course of a year.
Maintaining the Data
In early 2000, the conversion of all property and zoning data to digital was completed. The data had been loaded into the SDE database so that users could access the data. Prior to the completion of the data conversion, we knew that we would need to have some way in which we could maintain this data. In early-1999 we started on the road to developing an application for this purpose.
We knew that the data was going to be housed in SDE. We had tried the coverage based storage mechanisms but they did not prove to work well in a large multi-user environment. Therefore, we wanted an application that worked with the SDE database, not just with coverages or shapefiles in Librarian or AcrStorm.
Build Application "In-House"
One option for developing this application is that we could build something in house. The benefits of this were that we would have full control over all aspects of the application. If we wanted to make any changes we would be able to just make them. Another benefit is that we could work on our own schedule and perhaps get things done ahead of time as opposed to waiting for some contractor's schedule. This option seemed very appealing to us for these reasons. We also thought that since we have 4 GIS developers that we could easily take on this challenge of creating data maintenance application.
Purchase Commercial Off the Shelf (COTS)
Another option for developing this application is to purchase a piece of software that was already developed. The benefits to this are that someone else has developed this application and many people have tested it. This could also mean that we could have software even sooner because it is already developed. There would also be someone maintaining it constantly so that we would not have to use our time in maintenance. The down side to this is that a commercial product almost surely will not fit an existing data model and something will need to be changed, either the software or the data model or both.
"In-House" vs. COTS
"In-House"
With the determination that an application was necessary for the update of our cadastral data, we then started to explore the requirements for this application. One of the first assignments that we under took was the determination of the tasks that were involved for the manual update of the maps. As we discussed the tasks, we tried to keep the descriptions in the context of digital data so that we could easily take this task list and use it to determine the scope of the new application. To make sure that we didn't miss any task, we made it a point to involve all of the data editors in describing the tasks that they had to do to accomplish the edit manually. The tasks that we determined to be necessary for the update of our maps are as follows: capture of all parcel modifications, block modifications, subdivision modifications, notation of illegal parcel divisions, capture of all right of way takings, addition of all street centerlines, modification of all zoning boundaries, capture of all pending zoning boundary changes, addition of all symbology and capture of all text changes associated with any edit. Once these tasks had been determined we had to make sure that all of the edits that we performed manually were accounted for in the digital process.
Issues
While looking at this, we encountered some issues that would be a factor throughout the development process. Ground control, for example, was an issue because there would be little or no control points on any given page of a plat or zoning change. This meant that alternative methods for fitting the plats into the data needed to be worked out. There is no way to correct this situation at this time.
Another issue that was uncovered at this time was the submitted data did not have to be projected. Currently we are allowing submissions to be in any projection including none. However most submittals are in NAD27, our database is in NAD83. We have begun the process to change the requirements so that all submissions must be in NAD83. However, this process will take some time so the application must be able to handle all projections until such a time where all data will be submitted in NAD83.
One of the things that we see as an issue but are not in the position to change it at this time is electronic plat submission. In the future plats and subdivision plans may be submitted in digital form such as DXF, DWG or DGN. In order to accommodate this the application must be able to handle these file formats and more if possible.
The last issue that we came across early in the process was the creation of some proposed layers to handle the capture of the planimetrics. These layers will have the same properties as the photo verified layers that currently exist in the database but will contain only planimetric features that have not been photo verified or accepted by the county. Some examples of these layers would be Proposed Major and Proposed Minor Transportation, Proposed Street Centerline, Proposed Building Footprints and Proposed Hydrologic Features. Once the data has been verified or accepted it would then need to be migrated from the proposed layer to the corresponding verified theme and then removed from the proposed theme.
Another item that we had thought about was that we wanted to have version control of the database. Every feature that was created would have a date associated with it to know when it was created, every feature that was deleted would have a deletion date associated with it, and it would not be deleted. This meant keeping track of all features and comparing them to see if they have been deleted or not. This would allow us to see how the parcel and zoning layers looked at any point in time.
Property Edit Functions
To create a list of all of the function associated with property, we took a sample of all of the data (mostly hard copy) that comes into the parcel update process and noted what layers would have to be updated to make sure that we tested the update of every layer. The first item that we looked at was a recorded plat, since this was the most common type of update. If we hit some major problem, it was best to find it early in the process instead of later where we would have already spent many hours on the application.
Recorded Plat
The capture of a recorded plat involves the update of the parcel, block, subdivision, right of way, easement, street centerline, common area, floodplain and annotation themes, but could also involve the update of the cartographic features. Not all of these features would be modified in every case but we wanted to make sure that the application was able to update the affected layers. We also wanted it to be able to tell which themes had been modified. One of the biggest concerns for this layer was the fact that there was no required control to tie the data to the ground.
Road Taking
For the road taking edit, it was determined that it could involve parcels, blocks, subdivisions, rights of way, easements, street centerlines, common areas and annotation of all themes involved, but could also involve the update of the cartographic features. Not all of these features would be modified in every case but we wanted to make sure that the application would be able to update the effected themes. We also wanted it to be able to tell which themes had been modified in this type of edit. Another concern for this theme was the fact that there was no required control to tie the data to the ground.
Site Plans
When it came to the capture of the site plans, we hit a small snag in the process. In the manual process the capture of a site plan would involve the capture of some of the planimetric information like building foot prints, edge of pavement including parking lots, and hydrographic features. This caused us to rethink our process and come up with something that would enable us to come up with the same product as in the manual method. What we came up with was "proposed" themes or themes where we could put the planimetric site plan information stored and would be accessible to the editors and the users, these features could then be deleted as they were captured in our planimetric and orthophoto update process. The update of the parcel theme with a site plan would involve the update of the parcel, block, subdivision, right of way, easement, street centerline, common area, floodplain, and annotation themes but could also involve the update of the cartographic features. It would also involve the updating of the proposed themes (building footprint, edge of pavement, street centerline and hydrologic features). Not all of these features would be modified in every case but we wanted to make sure that the application would be able to update the affected themes. We also wanted it to be able to tell which themes had been modified in this type of edit as well. Another concern for this theme was the fact that there was no required control to tie the data to the ground.
Parcel Consolidation
The capture of a parcel consolidation would involve the update of the parcel, block, subdivision, right of way, easement, street centerline, common area, floodplain and annotation themes, but could also involve the update of the cartographic features. Not all of these features would be modified in every case but we wanted to make sure that the application would be able to update the affected themes. We also wanted it to be able to tell which themes had been modified.
Parcel Breakdown
The capture of a parcel breakdown or split involves the update of the parcel and annotation themes but could also involve the update of the cartographic features. Not all of these features would be modified in every case but we wanted to make sure that the application would be able to update the affected themes. We also wanted it to be able to tell which themes had been modified.
Condominium
The capture of a condominium was a very difficult one. How were we to tie the feature to multiple addresses when many people owned the feature? The tax records would have multiple records for the one feature and there needed to be a way to link the feature to all of the existing records. One of the solutions was to take the polygon feature that was going to represent the condominium and create a grid that would have as many cells as addresses. Unfortunately, this would create a problem when locating an address for Fairfax County staff or the public. The reason is that since the match would only link to the cell that matched the address a person might take the location that would be depicted on the map literally and therefore causing confusion. Because of this, we chose to depict condominiums as stacked regions, giving each region its own address and now we were able to match any address to the structure but not positionally within the structure. Although this was not the simplest solution, it was the one that would solve our addressing issues. In order to complete the parcel edit involving a condominium the following themes may have to be edited; parcel, block, subdivision, right of way, easement, street centerline, common area, floodplain and annotation themes, but could also involve the update of the cartographic features. Not all of these features would be modified in every case but we wanted to make sure that the application would be able to update the affected themes. We also wanted it to be able to tell which themes had been modified.
Easements
The modifications of easements were straightforward. However, the number and types of easements that were being modified changed as we continued with this project. Since it was now possible to capture easements that were to small at the manual mapping scale of 1:200 feet we now advised by the Fairfax County Board of Supervisors to capture all easements. By doing this, we tripled the number of easements that we capture and could have more by the end of the project. This will add another dimension to the theme, as it needs to be able to accommodate the creation of new codes as the needs arise. The only themes that may be involved in the update would be easement, floodplain, and annotation but could also involve the update of the cartographic features. Some would be simpler than others and wouldn't require all of the themes to be modified but most of them seemed to require all of the themes to have some sort of change in every case.
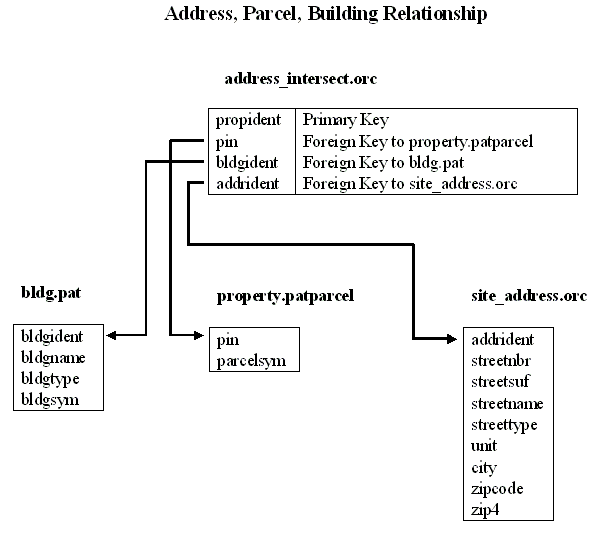
Once all of the themes had been changed, the last thing that needed to be edited was a table that resided in Oracle that provided the linkage between the Parcel Identification Number (PIN) and the street address. Since there could be a one to many relationship between a parcel and addresses the editor would need to modify the table to add all of the addresses. This was not as easy a task as it seemed at first. The reason for the complexity was that there were two tables involved with the address update. One was the "Address_Intersect" table and the other was the "Site_Address" table. Both were stored in Oracle but in order to create the link from the "Site_Address" table to the newly created/deleted parcels you needed to go through the "Address_Intersect" table. Figure 1 shows the relationship between the building, parcel, and address tables.
Figure 1: Address, Parcel, Building Relationship
With this complexity, it was decided that we would try to make this update as automated as possible. There were too many places where human error could arise and the process to track down the error would be very time consuming. At this point, we thought that it would be no problem to incorporate this function into one of the final processes so we put the rest of this function on hold.
Zoning Edit Functions
We then went on to the zoning section of the application. Since the manual process was so different from the manual process of updating parcels, we thought that this would take as much if not more time than parcels, but we found that this was not the case. After looking into the types of edits that are done within zoning modifications we found that they were very similar to that of parcels.
The process of a zoning application is first an application is submitted and we display this on the map. Then the application is either amended, granted with or without caveats, withdrawn or dismissed. All of this has to be tracked within the database and be able to be queried by any user with access to the database.
Zoning - Application
In order to capture the area that has a pending zoning application, the only themes that would have to be edited are pending zoning, annotation and any cartographic features. The reason that we decided to put the pending zoning on its own layer was to simplify the zoning layer. If we had put both the pending and the legal zoning boundaries on the same theme it would have caused some of our users to become very confused. Although it is easy to create standard legends and virtual themes, it seemed simpler for both the editor and the users to keep the pending zoning changes on a separate layer.
Zoning - Amendment
If the case were amended then all that would have to be changed would be pending zoning, annotation and any cartographic features. This is one of the simplest edit to do for the zoning. However, this is one that happens often so we wanted to make sure that is was easy to edit the pending zoning layer.
Zoning - Granted
If the case was granted, then there was a little more to this edit than just a simple update. Now the technician had to take the granted zoning change and apply it to the current zoning theme. Then they would have to go to the pending theme and change the status to granted so that it would not be confused with any of the currently pending areas. At this point, some discussion occurred as to whether or not to keep the granted area in the pending theme or not. The conclusion was that we should so that we had the ability to recreate what the zoning would look like from any given date.
Zoning - Withdrawn
If the case were withdrawn then all that would have to be changed would be pending zoning, annotation and any cartographic features. This is another simple edit done for the zoning. This happens almost as frequently as granting since most of the applications are put in several times in slightly configurations so that the builder has at least one of them approved. Because of this, many of the subsequent applications may be withdrawn after the granting of an application. The themes that may have an edit in this situation are pending zoning, annotation and any cartographic features.
Overlay Districts Edit Functions
Overlay district are areas of the county that have special attributes, such as Airport Noise Impact areas, Highway Corridors, Historic Districts, Natural Resource Protection areas, Sign Control areas, Water Supply Protection areas and Heritage Protection areas as well as others. The process for changing an overlay district is the same as zoning. Therefore, we needed to create themes that will capture the changes to all of the overlay districts.
All we receive for the Overlay district changes are the accepted changes. The case at this point has been granted, therefore there was a little more to this edit than just a simple update. Now the technician had to take the granted overlay district change and apply it to the current overlay district theme.
Application Overview
We then started to determine the process path for this application. We started to work out some flow charts of the processes that would be involved in this updating application. As we did this we started to come up with what we determined would be our Systems Requirements Flow Chart. This document grew rapidly from the first day. Figure 2 shows the top level of this chart for the Parcel Maintenance application.
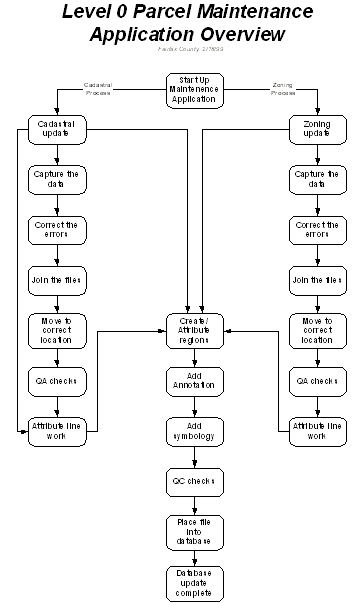
Figure 2: Parcel Maintenance Systems Requirements Overview
At first glance, it still looked possible to create this product with our own staff but we began to see that this project was more involved than we had initially anticipated. As we started to break down each task into its components, it became increasingly evident that we were getting into something that was larger than originally conceived. For example, the first task that we started to break down was the start-up process. While doing this we saw that there was going to be an issue with how we were going about the task determination. Since we had been going about it by determining the task by name and not by the processes involved we had made it harder to design the application but made it easier on the technicians that would be using the application. However, we continued with the process of creating this application on our own, but the realization that this may take quite a while to create was becoming more evident.
We were also running into another constraint, staff resources. We had the application development under control and were moving ahead, however staff hours were becoming increasingly slim as the project required more time from all that were involved with the project. The frequencies of meetings for the development were increasing rapidly and we could see that this was not going to end for quite some time. We had been putting other projects aside to aid in the development time of this project.
Since there were only four development staff at that time, development time and resources were at a premium. We were under a directive from the Fairfax County Board of Supervisors to aid as many departments within the county with the implementation of GIS. So while we were working on our own major application we were trying to create many applications for other departments, stretching our resources to the point where things were being rushed and very little testing was being accomplished. This was painful for the development staff but necessary. Luckily, most of the applications developed during this time were fine and had no major problems.
Even with these constraints, we started to move ahead in the determination of the development language for this application. We had started to explore the possibility of creating this application on our own, and at first we felt that there were not that may issues that we couldn't handle. We also felt that we could create this application in a reasonable amount of time and could save money. All of the developers in the department (four at the time) were experienced in programming in Arc Macro Language (AML) and Avenue, however none of the developers were that comfortable with developing in Visual Basic (VB).
One of the next challenges was the choice of language to develop this application. On one hand we were able to create this application in a number of languages yet on the other hand we wanted to make sure that we would be developing something that we could use for years to come. This created hours of discussion within the staff, because at this time Esri was releasing the "pre-release" version of Arc 8. We had determined that we were going to go in this direction, so we needed an application that would utilize the functionality of Arc 8. We also knew that ArcMap did not handle polygon topology very well. This eliminated the use of both Avenue and AML forcing us to go with VB. This was not a bad thing; it was just that our development staff at the time was not well versed in programming major applications such as this in VB. This final item pushed us to determine that we were not going to be creating this application from scratch. We now started looking for development partners of Esri to aid us in the creation of this product. While this was going on, we continued to develop the Systems Requirements and Process Flowchart documents.
Application Development
After receiving bids from several contractors, we brought a contractor on board for the development of the application. With the contractor the process seemed to move along faster than with our own development staff. However, this abruptly changed when we arrived at the point in the process where the data was to be edited, what we called the "Check-out and Check-in" procedures. Luckily this was early in the process, since it had been determined that editing a SDE theme was not going to be an option at the time. At this point, we had decided upon, and started the migration process to, Esri's Spatial Database Engine (SDE). All of the data needed to be modified through layers stored in SDE. The contractor could provide us with the GUI's showing us how this was going to be accomplished but when they tried to develop the procedures they consistently ran into problems both with the code as well as with the stability of the "pre-release" version of the software. At this point, we took a break in the development process and waited to see when the final version of Arc 8 would be scheduled for delivery.
During this break, we continued to work on the design documents. Not knowing when Arc 8 would be delivered, we didn't want to lose any time. As we continued to wait, we started to get a little concerned with the time that was left to create this application. The time frame had not been a concern in the past since we were doing the work ourselves. Now that we were dependent on a contractor, we had a budget, and a need to get this application in place as soon as possible so that we could catch up with the edits that had started to accumulate over the conversion process. We had received hundreds of updates over the 3 year conversion process and we needed to get out from under this backlog of work. With this concern of not getting the product in time, we started actively searching for a Commercial Off the Shelf Software (COTS) product that could do what we needed and would be available for use within the time frame that we had.
Commercial Off the Shelf Software
What we found was astonishing. Over the course of several weeks, we looked for the software that we thought would fit our needs. We searched at conferences, on the World Wide Web and everywhere we thought there might be a vendor and every time we came up with the same conclusion. There were only two vendors for software that would do what we were looking for. Of these two one was not going to sell their product anymore and was going to become a re-seller of the second vendor's product. The vendor that was selling their product for editing parcels in Arc/Info format was NovaLIS from Nova Scotia. We contacted them at both the Esri conference and the URISA conference and we received a trial copy of their software. The software was then tested to see if it would satisfy our requirements.
When we first received and loaded the software we noticed that it seemed very simple to use. As we progressed through the exercises, we found the program to work very smoothly and edit the sample coverages well. After running through the sample exercises, we then used the program to edit one of our coverages that we had on our system. It worked without any problems in both the edit functionality as well as the creation of a new coverage. We did find that it would need some customization. For example, we would have to create some template files so that the technicians would not have to add features every time they went to create a new coverage. Some tools would aid in the attribution of our data that were not in the software, so we would have to create them. The software generally could do what we wanted with some minor modifications and since the software was customizable with VB, we felt that this was a viable solution.
Testing the Software
With the software loaded, we created a testing team from the future users of the software and some of the managers of the project. The tests that were run were based on the processes that we had determined earlier. The tests were run as if we were in production to make sure that the editing of the coverages could be accomplished exactly as we would like it to happen. We started with the most frequent edit, which was determined to be an addition of new parcels. We were able to use a digitizing table as well as Coordinate Geometry (COGO) to create a coverage. With this new coverage, we were able to merge the two coverages together and have a new coverage with the new parcels as part of the master coverage. This test was run only a few times but was run for all of the edit types that we had agreed upon. With the software able to perform most of the edits, the decision seemed very clear. We needed to combine Parcel Editor with some of our own customization (done with VB and AML). With this ability, we would be able to perform all of the edits we needed as well as creating some custom tools to make the editing process easier for the technicians that would be working with the software. There was one thing that this software and any modifications that we would make could not accomplish, and that was the editing of an SDE theme which was where all of our data would eventually be stored.
We made some inquires to NovaLIS and were pleased to find out that they had a product called GATE that had the ability to "Check out" and "Check in" data from SDE and convert it into a coverage for Parcel Editor to edit. After finding out what the cost of the software packages were, we felt that this was a good direction for us. This would allow us to better allocate our resources. With these two products, it seemed like this was a viable solution so we halted production of our "In-House" product being built by a contractor and went with the customized COTS combination of Parcel Editor and GATE. The next step was to find out how much customization would be required and who would do the customization. In order to figure this out it was determined that a Joint Application Determination (JAD) session was to be held and that during this week log JAD we would discuss all the changes to the database and processes that were necessary.
Joint Application Determination
For the JAD, NovaLIS sent two staff to work with the Fairfax County staff. As the JAD started it was apparent to all the Fairfax County staff involved that this was going to be a larger project than was originally anticipated. In the first day alone we discussed the reduction of the 11 region subclasses that were in the original data structure to 4 in the property coverage. This was a major database redesign, however after the discussion it was clear to all that not all of the features needed to be stored as regions, they could be stored as attributes on the poly layer. This new data structure would aid in the coding of all the features as well as reducing the confusion with regions for the technicians. This was a major problem in the beginning of this update process. Most of the technicians caught on quickly and some took longer. However, if we reduced the amount of regions we hoped to reduce the learning curve that would be necessary in this phase of the project.
We then looked at other feature types that could be combined to aid in the editing of the themes. Annotation was one that had 15 subclasses that was reduced to 8. Some of the other feature types on layers could also be reduced, so over the weeklong JAD we went theme by theme and looked at each to see which subclasses could be combined into the poly layer. We looked at the region subclasses and determined if there were going to be any overlapping features or disjointed features. If not then the region subclass attributes could be moved to the polygon level. By doing this, we could reduce the complexity of the theme and therefore make it easier to edit.
For the next day or two we went over the processes involved in manually editing the maps. From there we decided how to modify the existing process to closely replicate the manual process. We went over every process one at a time to determine the new digital process. The purpose of these information exchanges was two-fold. One was to show the staff from NovaLIS our data and apprise them of the manual methods that we were currently using as well as the thoughts that we had as far as the new digital method. The second reason for this meeting was for the Fairfax County staff to learn a little more about the software and how it worked and what we had to look forward to in the future as we went forward in the process.
The last few days were spent learning the methodology that was used to create our maps and how this could be best replicated within the software process to create the digital product that we were looking for. This included showing the NovaLIS staff the manual process and giving them samples of most of the types of edits to take back with them.
Process Models created in the JAD
This section outlines the process models that were determined in the JAD. A diagram and a text description explain each process from beginning to end.
Simple Edit Cycle
Update via the Parcel Editor follows two alternate workflows; a simple edit cycle and a complex edit cycle. The simple edit cycle is used for basic maintenance; an area is extracted from the database using the GATE, the extracted area is edited, then the edited area is committed back to the GATE. Coordinate geometry and graphic edits are done directly on the extracted coverage(s); no other data set is involved. Figure 3 shows the process for a simple edit cycle.
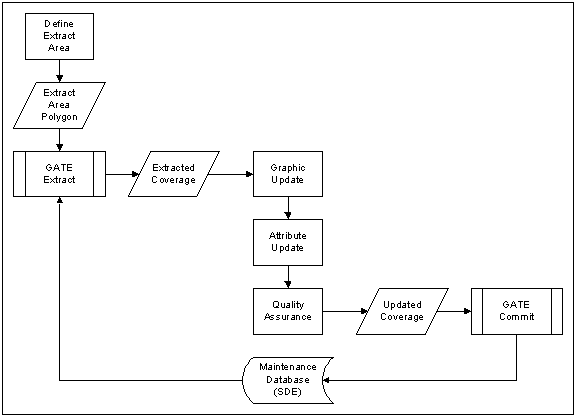
Figure 3: Simple Edit Cycle
Complex Edit Cycle
For more complex edits, e.g., a large subdivision plat, it's more effective to create an entirely new coverage. New data is entered using the COGO spreadsheet or via table digitization, or imported from a DXF file. Once the data set is complete and topology is clean, it is merged with extracted data in the area to create an updated data set. This updated data set is committed back to the GATE. Figure 4 depicts the process for a complex edit cycle.
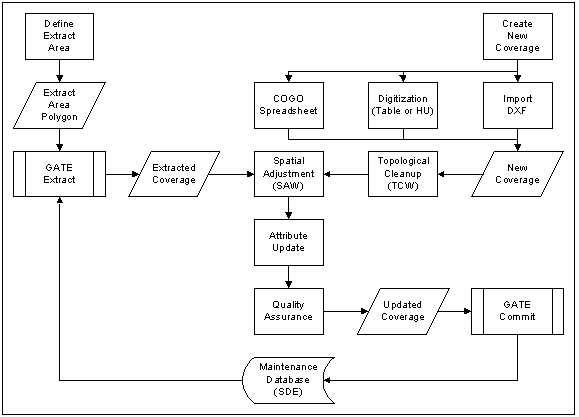
Figure 4: Complex Edit Cycle
Recorded Plat
A recorded plat consists of 1 or 2 to hundreds of parcels. A recorded plat generally occurs where lots are less than 5 acres or more than 5 lots are being created. Update via a recorded plat updates Property, PropMisc and PropPlan (street centerlines). Because of the nature of recorded plats (more complex than simple parcel breakdown), updates will follow the complex edit cycle. There is also the possibility of electronic submission (via a DXF file) or COGO entry (via the COGO spreadsheet) in the future. Figure 5 depicts the process for a recorded plat.
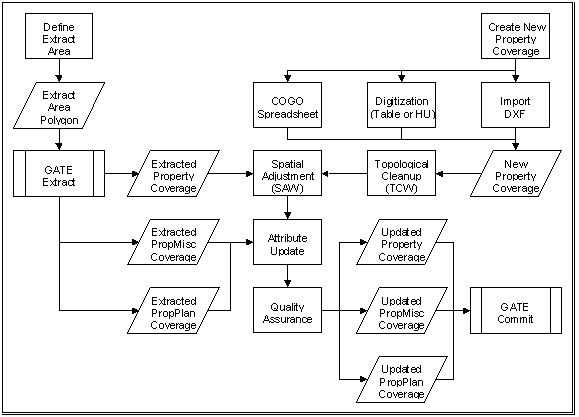
Figure 5: Recorded Plat
Road Taking
Road takings consist of a widening of a right of way. Road takings update Property and PropMisc. Since road takings involve a parcel severance, updates will follow the simple edit cycle. Road taking will extend the right of way polygon, and shorten the abutting parcels. Updates consist of the Parcel Split Wizard applied to the polygons, and then merging the widened areas with the road polygon (automatically removing these from the parcels). Figure 6 depicts the process for a road taking.
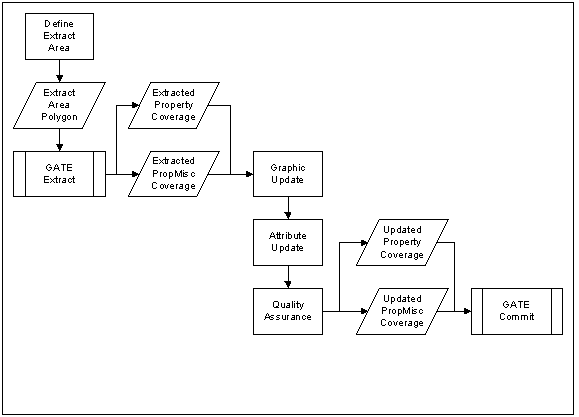
Figure 6: Road Taking
Parcel Breakdown
Parcel breakdowns are similar to recorded plat but less complex. Parcel breakdowns update Property and PropMisc. Parcel breakdowns utilize the Parcel Split Wizard for graphic update and hence, follow the simple edit cycle.
Parcel Consolidation
Parcel consolidations are the opposite of parcel breakdowns. If the parcel is consolidated then the interior lot lines are moved to PropMisc, otherwise the parcel is vacated and the lines are deleted. Updates involve the Parcel Merge Wizard and follow the simple edit cycle.
Site Plan
Site plan edits occur for commercial rental complexes and high density residential. No recorded plat exists for this update, so addresses must be assigned at this stage. Each rental unit must be assigned an address; this is done by stacking multiple "address-parcels". Proposed buildings are added to PropPlan, but proposed buildings are not assigned an address. Site plan updates follow either the simple or complex edit cycle, and updates Property and PropPlan.
Condominium
Condominium edits are similar to site plan, however multiple parcels are created, one for each unit. Condominiums update Property and PropMisc and potentially PropPlan. If the condominium is a conversion, the one to many parcel to address stack needs to be converted to many one to one parcel to address regions. Condominiums also update common area polygons and block regions in Property.
Easement
Easements update the easement region subclass of property. Easements appear on the recorded plat, as an extension to a flood plain study or specified on a deed by legal description (metes and bounds). Easements follow the simple edit cycle or are a part of a recorded plat, parcel breakdown, parcel consolidation or road taking edit.
New Address
New addresses are added during the site plan process. See site plan.
Zoning
Zoning updates update only the zoning coverage. New zoning applications are added to the Case region subclass. Zoning follows the existing parcel boundaries, so property may be used as a reference. Zoning typically follows the simple edit cycle. In the case that the zoning change comes in before the parcel edit has been accomplished the complex edit cycle is used and then the linework created by the zoning edit is used for the property edit.
Application
For a zoning application, a new case is added to the Zoning coverage and the status is set to PENDING.
Amendment
For a zoning amendment, an existing case is altered and the status is set to AMENDED.
Grant
For a zoning grant, an existing case is changed to GRANTED. In this case, the Zoning polygon extent is changed. If a new zoning area is created, the zoning identifier is set to null or zero.
Denied
For a zoning denial, an existing case is changed to DENIED
Withdrawn
For a zoning withdrawal, an existing case is changed to WITHDRAWN.
Dismissed
For a zoning dismissal, an existing case is changed to DISMISSED.
Overlay District
Overlay district update is similar to zoning however it is captured at the time it is granted. Overlay districts update will follow the simple edit cycle and update the Odist region subclass. If a new overlay district is created, the overlay district identifier is set to null or zero.
The Data Model
In this section, the data model that had to be developed to work with the data maintenance software is described. An overview of the original data model will be provided as well as the new data model encompassing the internal, edit and view structures. There will also be a description of the differences between the original and the new data model and how the users were affected.
Original Data Model
The original data model that Fairfax County was using was simply a view data model in SDE and an edit data model in coverages. Once the coverages had been updated, the data was reloaded into the SDE database so that users could view the new information. This was tedious because there was constant reloading of data into the database. On larger layers, such as parcel it could take several hours to reload. In addition, during the load process, the data layers were not available to the users.
This model only dealt with the view and edit aspects. It only required that the coverage data be loaded into SDE and each feature class (line, polygon, annotation, region subclass, etc.) was it's own layer. This was great for viewing the data, which was the only thing that was happening to the data in the beginning. However, editing the data was not handled well in this data model.
New Data Model
The new data model consists of three components of the database. There is an internal database representation for maintenance (the maintenance database), the external database representation for graphic and attribute query (the view database) and the update transaction representation for Parcel Editor maintenance (the transaction dataset).
Figures 7, 8, and 9 document the design for the data structure of the database. The far left column shows the transaction dataset in coverage format. The far right column documents the view database in SDE layers or SDE views. All the tables and views in between make up the maintenance database.
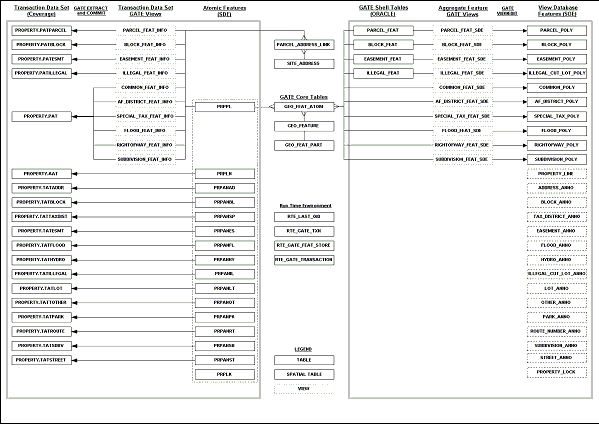
Figure 7: Property Database
Figure 8: Property Miscellaneous and Zoning Databases
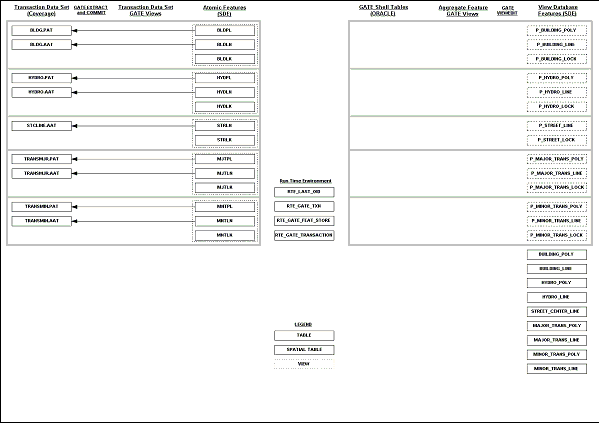
Figure 9: Proposed Planimetric Databases
Maintenance Database
The maintenance database is made up of the tables storing the atomic features in SDE, the core GATE tables, and the GATE shell tables, which are site specific. The maintenance database is depicted in figures 7, 8, and 9 by the middle 3 columns.
The GATE shell tables contain attribute information for complex features. These tables were created directly from the source coverage data. In figure 7, the shell tables include PARCEL_FEAT, BLOCK_FEAT, ILLEGAL_FEAT, and EASEMENT_FEAT. The information stored in these tables is the attributes for the parcels, blocks, illegally cut lots, and easements. These features could have overlapping or disjointed features.
The GATE core tables contain the information for storing unique geographic features over time and for storing the spatial relationships between features. These tables include GEO_FEAT_ATOM, GEO_FEATURE, and GEO_FEAT_PART.
The atomic SDE layers store the spatial features directly accessed during the GATE extract / commit cycle. For simple feature types, e.g., lines, points, polygons and annotation, the atomic layer can serve as both the maintenance and view parts of the database. Atomic layers can contain any other attributes. These attributes are carried with the layer and are updated on Commit. Active features have a null expiration date and retired features have an expiration date of the day they were deleted.
View Database
The view database is a combination of SDE layers and SDE views. The simple features, such as annotation and polygons, could just be created from a view of the atomic features. The atomic layers are updated from the transaction dataset whenever an edit occurs and then the views are automatically updated when the atomic features are changed.
As for the complex features, such as regions, there has to be a transaction that occurs that updates the layers. Essentially, when the transaction is run, the data is updated through GATE processes that identify new and deleted features. All the new features are added to the view database while all of the deleted features are expired from the view database.
This database is the primary view database that all users in the County access. These views can be set up so that users only see the current data or provide them with the ability to view the data between any date ranges.
Transaction Dataset
The transaction dataset is the coverage model that is used in Parcel Editor for editing. When a technician selects an area to be edited, the checkout process constructs this dataset for editing. Features are loaded into the appropriate feature classes (polygon, region, annotation, line) and a coverage is created. Figure 10 shows the extract dataset as seen from Parcel Editor. The extracted features are editable as coverages.
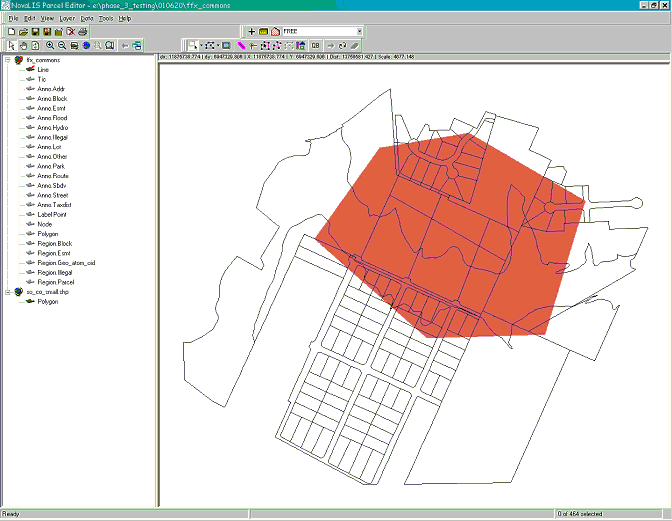
Figure 10: The extracted dataset as seen from Parcel Editor
There are 8 different coverages that can come out of the database for editing purposes. These include property, property miscellaneous, zoning, proposed building, proposed hydrography, proposed street centerline, proposed major transportation, and proposed minor transportation.
Once the data is in the transaction dataset, technicians then use Parcel Editor to edit the data. It is in a familiar format so the technicians were easily able to transition from working with the old data model to using the new data model.
While the area is extracted for editing, a lock is put on all the features. No other person can edit those features that have been extracted until the data has been committed back into the database or the transaction has been released. This does not affect the view database at any time, but a user can see where all the locks are by viewing the lock layer for the dataset. Figure 11 shows a view of the parcel lock layer in ArcView. Each dataset has a lock layer that contains the area that is locked, who has it locked, and when the lock was created (when the area was extracted.) When an area is committed back to the database the lock is assigned an expiration date and the lock is expired but not deleted. When an area is released, the lock is really deleted. This allows us to see when all the edits occurred and who did them.
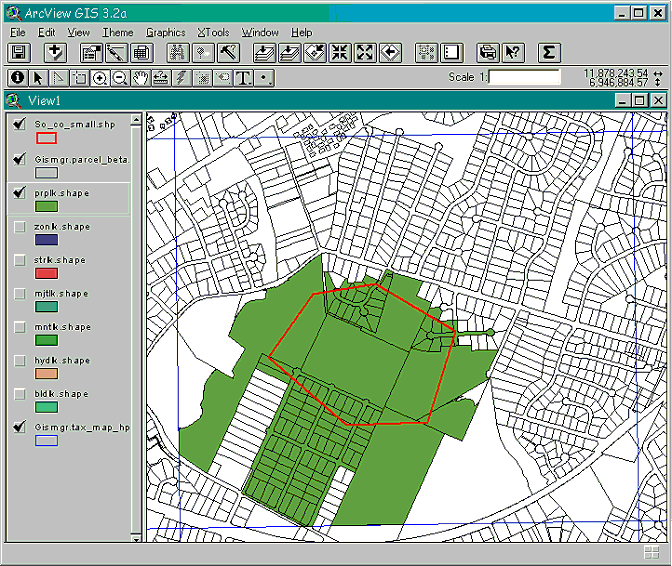
Figure 11: Viewing the locked areas for parcels
Differences between data models
The most obvious difference between the original and the new data model is the fact that we have the maintenance database with the GATE tables. This is very beneficial. Now only the updated area is loaded back into the database instead of having to reload the entire database. Users can view the updates within one day of having the update committed into the database, whereas before users wouldn't see it but every 6 months.
Another difference is the fact that some of the region subclasses have moved down to the polygon level as an attribute. Some of the region subclasses in the original data model were never going to have overlapping features or disjointed features. This led us to move them to the polygon layer. This change also meant faster extract times for the features from the maintenance database.
A very important difference is now versions are being managed. All features are being date stamped so the data can be analyzed at any point in time. The temporal aspect of GIS is a very powerful tool for analysis and it is now being tracked in the database. Users can view the property and zoning information as it was in any point in time.
The GATE Product
What Does The GATE Do
The GATE is the Geographic Transaction Engine built by NovaLIS Technologies. It is made up of tables and transactions that are stored and managed in the Oracle database. The GATE performs the extract and commit functions with regard to the transaction dataset. The GATE also maintains the relationship between the atomic features, the attribute tables for complex features, and the view database.
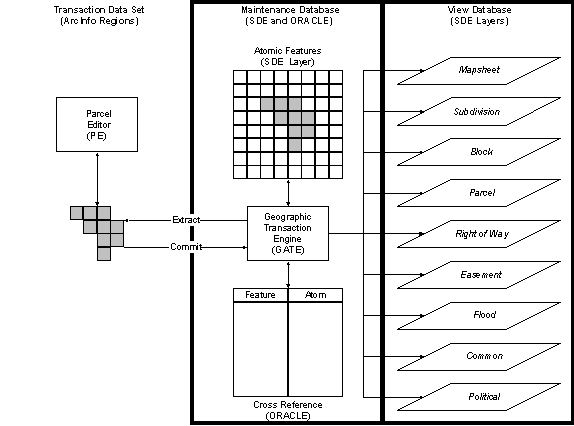
Figure 12: GATE Conceptual Representation
The above diagram is a conceptual representation of the GATE. Each of the three tiers represents a different view of the database; the internal database representation for maintenance (the maintenance database), the external database representation for graphic and attribute query (the view database) and the update transaction representation for Parcel Editor maintenance (the transaction dataset). The data model defines the central and right tier of the conceptual model.
Processes
The GATE performs the extract, commit, release, copyout, and viewedit processes. These processes are all functions dealing with the three tiers of the database. The extract process takes the data from the maintenance database to the transaction dataset. The commit process takes the data from the transaction dataset to the maintenance database. The release process releases the lock on the maintenance database for a specific transaction. The copyout process copies data out of the maintenance database into the transaction dataset but does not create a lock. The viewedit process updates the view database based on changes to the maintenance database.
Extract
The extract process is performed when an extract is requested from an application such as Parcel Editor. To execute an extract process the technician first needs to determine the area that will be extracted. In Parcel Editor, the technician simply creates a polygon on a temporary coverage that is the boundary of the extraction. This polygon is then used to overlay on the layers to select the features to be extracted. Figure 10 shows the users selection polygon highlighted over the extracted parcel features in Parcel Editor.
When an extract is requested GATE reads the transaction process for the type of extract that was requested and generates a transaction dataset. The different types of extract transactions at Fairfax County include property, property miscellaneous, zoning, and proposed planimetry of which there are five layers including buildings, hydrography, street centerlines, major transportation, and minor transportation. Depending on which one is requested, the transaction dataset is created by reading the atomic features and creating the necessary lines, polygons, region subclasses and annotation subclasses.
Another function of the extract process is to create a lock feature on the lock layer. The lock layer is used to prevent other technicians from performing edits on the same area. Every type of transaction dataset has its own lock layer. The lock feature contains the date that the lock was created and the owner of the lock. At any time, any user can view the lock layers as a standard SDE layer and see where all the current locks exist.
Commit
The commit process is performed when a commit is requested from an application such as Parcel Editor. The commit process takes the data from the transaction dataset and loads it into the maintenance database. The process performs any quality control functions that have been developed to ensure that both the geographic and attribute data is correct. The commit process also checks the existing data and compares it to the new data. Any new features are assigned the current date as the effective date and any deleted features are assigned the current date as the expiration date.
The commit process also stores the atomic features in the cross-reference tables for the complex features, such as regions. The cross-reference tables are updated with the newly created features and the deleted features. This process also expires the lock for the area so that other technicians can then edit in that area. The commit process also updates tables for the viewedit process. The viewedit process will be explained in a later section of this document.
Release
The release process is performed when a release is requested from an application such as Parcel Editor. The release process essentially expires the lock for the area and actually deletes the feature on the lock layer. The lock feature is actually deleted because when a release occurs, no commit transaction has been performed so this was not something that was necessary to be tracked historically. The release process is used if an incorrect area was extracted or if an error occurred during the edit of the transaction dataset and the technician would like to start over with a new extract of the area.
Copyout
The copyout process is performed when a copyout is requested from an application such as Parcel Editor. The copyout process acts the same way as the extract process, however, a lock feature is not created and a commit cannot be performed to update the maintenance database. This process is used mainly to extract data into the transaction dataset format for sharing with other users or performing tests on the data.
Viewedit
The viewedit process is slightly different from the previous processes. The viewedit process updates the view database based on changes to the maintenance database. Most of the layers in the view database are just SDE views of the atomic feature SDE layers. The layers that represent the complex features are actual SDE layers that need to be updated from the atomic feature tables. The viewedit process uses core GATE tables, which contain a history of changes, to compare the atomic feature layers to the view layers. Any features that have been newly created or deleted are updated in the view layers to match the maintenance database. This process is run in batch mode as a nightly process.
Quality Assurance
The GATE performs several quality assurance checks upon committing updates to the maintenance database. These checks include edge match checking, topology verification, and any other customizable data validation. The quality assurance is built into the transactions that are stored in the database and executed whenever a commit process is executed.
For edge match checking, all the edges are checked to ensure there have been no changes to the linework at the edge of the extracted area. If the edges of the extracted area have been altered in any way, the commit will not succeed. To avoid this problem the technicians must be sure to extract a large enough area to encompass all changes that need to be performed.
The GATE also checks the topology of the transaction dataset. If the topology is not complete or is non-existent then the commit will fail. It also makes sure that the data is in the correct format. A template coverage is used to create any new data, such as a new subdivision, with the proper feature classes already existing. This helps to ensure that the proper feature classes are already in existence and that the information will be more likely to be committed into the database.
The GATE can also perform any custom quality assurance data checks. These checks can be constructed in PL/SQL and stored in the database. They are executed at commit time. If something fails the data validation check then the commit fails and the technician can review log files to determine the problem. There can be tables that are referenced with lists of valid values that verify the values of attributes. There can also be cross checking of the information from one layer to another to verify the values. This is a very customizable and powerful option.
Testing & Acceptance
Testing the functions of GATE and Parcel Editor
Once the GATE installation was complete, it was time to begin testing. All of the testing needed to be completed by July 2001 because the final acceptance is scheduled for the end of July 2001. All of the errors found in the tests will have to be dealt with either before the final acceptance of the GATE software. In order to ensure that all processes were checked a matrix was created, that tests all of the process three times. The matrix had all of the types of edits; Simple Edits, Recorded Plats, Road Takings, Parcel Breakdowns, Parcel Consolidations, Site Plans, Condominiums, New & Updated Addresses, Zoning-Applications, Zoning-Amendments, Zoning-Granted, Zoning-Denials, Zoning-Withdrawn, Zoning-Dismissed, Overlay Districts-Granted and View Edit. The matrix was constructed to have all of the items for all of the checks on every type. In order to get a better grasp of the magnitude and quantity of all of the checks a sample of the Simple Edit is described below.
Simple Edit Extract
Each step is checked and logged into the spreadsheet. Once the GATE extract was executed, the location and creation of the proper coverage are checked. Once this verification is complete, the lock is viewed to make sure that that process is working and after each extract a second extract is attempted to make sure that not only was the lock present but that it would prohibit another user from copying out the same or overlapping area. After the lock is verified, the content of the extracted coverage is verified. The desired results are already on the check sheet so only the items missing or extra items needed to be noted. The attributes that had been extracted with the coverage are then validated. Edits are also made to the coverage to make sure that the expired function is working.
|
SIMPLE
EDITS (Test 1)
|
||||
| Test | Desired Result | Pass/Fail | File name if "Failed" test | Comments |
| Extract | ||||
| Review content of extracted coverage - were all features extracted | Property.patparcel | |||
| Property.patblock | ||||
| Property.patesmt | ||||
| Property.patillegal | ||||
| Property.pat | ||||
| Property.aat | ||||
| Property.tataddr | ||||
| Property.tatblock | ||||
| Property.tattaxdist | ||||
| Property.tatesmt | ||||
| Property.tatflood | ||||
| Property.tathydro | ||||
| Property.tatillegal | ||||
| Property.tatlot | ||||
| Property.tatother | ||||
| Property.tatpark | ||||
| Property.tatroute | ||||
| Property.tatsbdv | ||||
| Property.tatstreet | ||||
| Propmisc.aat | ||||
| Propmisc.pat | ||||
| Propmisc.tathblock | ||||
| Propmisc.tathlot | ||||
| Zoning.patodist | ||||
| Zoning.patcase | ||||
| Zoning.pat | ||||
| Zoning.aat | ||||
| Zoning.tatodist | ||||
| Zoning.tatpending | ||||
| Zoning.tatzone | ||||
| Zoning.tatcase | ||||
| Bldg.pat | ||||
| Bldg.aat | ||||
| Hydro.pat | ||||
| Hydro.aat | ||||
| Stcline.aat | ||||
| Transmjr.pat | ||||
| Transmjr.aat | ||||
| Transmin.pat | ||||
| Transmin.aat | ||||
| Creation of the proper transaction workspace | GATE will create a temporary workspace for tracking and logging the extracted data | |||
| Creation of the proper coverage | Coverage with all of the themes is present on the local drive of the editor's machine | |||
| Presence of corresponding lock feature on the designated lock layer | Viewable through ArcView and Parcel Editor. Cannot checkout any data with a locked feature | |||
| Lock feature on the designated lock layer prohibiting adjacent extract | Parcel Editor returns message not permitting the user to extract that area. Cannot checkout any data with a locked feature | |||
| Graphic update of feature(s) | Feature is modified (NOTE: change in the comments section) | |||
| Attribute update of features | Attribute has been changed (NOTE: change in the comments section) | |||
| Review the status entry for the transaction | Check status tool to make sure that it is "Extract Completed" | |||
Simple Edit Copyout
From this point, the test changed to the copy out function. This provides the editor a mechanism to get data out without creating a permanent lock. All of the same checks are performed for this function since the coverage is the same. The only the option not available with this function is the ability to check the data back in after an edit. It is easier to validate the copyout feature. Since there is no lock created, the validation could be done and then the test for the extract could be accomplished without having to go and release the lock.
Simple Edit Release
To verify that this process was functioning it is necessary to run the extract process. Then it is possible to execute the test to see if the lock was deleted after the release option was chosen. In order to make sure that this function is operating correctly it was necessary to create an ArcView project to view the locks and make sure that they were being modified correctly. In all cases, the expiry date is checked and locks that had been released are checked to make sure that they are attributed correctly.
|
SIMPLE
EDITS (Test 1)
|
||||
| Test | Desired Result | Pass/Fail | File name if "Failed" test | Comments |
| Release | ||||
| Lock feature on the lock layer is expired | EXPIRY_DATE attribute is deleted | |||
| Status of the transaction should be correct | Status should be "RELEASE" | |||
Simple Edit Commit
Once all of the edits to the coverage have been completed, which included changes to linework, polygons, regions and annotation, the coverage had to be returned to the maintenance database. Tests are done to verify that if an edit occurred that changed the topology in any way on the edge of the area checked out that the GATE would not allow this dataset to be committed. This could allow slivers in the database. If the commit is successful, the new area is viewed in ArcView to make sure that all of the old features had been expired and that the new features were coded correctly. Then the locks were checked to make sure that the lock associated with this edit had been expired and attributed correctly.
|
SIMPLE
EDITS (Test 1)
|
||||
| Test | Desired Result | Pass/Fail | File name if "Failed" test | Comments |
| Commit | ||||
| New features are loaded and verified into the SDE maintenance layer | Modifications done in the extract function are present in the SDE theme (viewable through ArcView or Parcel Editor) | |||
| Associated attributes properly updated and verified | Modifications done in the extract function are present in the SDE theme (viewable through ArcView or Parcel Editor) | |||
| Deleted features are given proper attribution | EXPIRY_DATE attribute is populated with current date | |||
| Lock feature on the lock layer is updated correctly | EXPIRY_DATE attribute is populated with current date | |||
| Status of the transaction should be correct | Status should be "RELEASE" | |||
As we the 48+ tests continue, we are finding that there are some minor issues on how we need to handle coding and the fact that items could be left blank and accepted into the database. This has made us aware that we may need to create some rules for GATE to do some validation on the new items and thus ensure the quality of the data. We are also looking into creating some QA/QC plots so that linework can be checked by other staff. This is a necessary step since we are now capturing many more features than in the manual process. However, with all of the QA/QC staff in place we plan to be able to be within 2 weeks current with all of our parcel and zoning edits.
Lessons Learned
As a conclusion to this paper, some of the benefits and drawbacks that we have experienced should be addressed. Here are some of the lessons that we have learned during this project.
Benefits of the System
Drawbacks
Greg Thomas
Database Administrator
Fairfax County Government
GIS & Mapping Services
12000 Government Center Parkway
Suite 117
Fairfax VA 22035
703.324.2283
703.324.3937 (fax)
Gregory.Thomas@co.fairfax.va.us
www.co.fairfax.va.us
Robert Shankman
GIS Spatial Analyst
Fairfax County Government
GIS & Mapping Services
12000 Government Center Parkway
Suite 117
Fairfax VA 22035
703.324.3516
703.324.3937 (fax)
Robert.Shankman@co.fairfax.va.us
www.co.fairfax.va.us