VSMOKE-GIS was developed to help prescribed burners in the National Forests of the Southeastern United States visualize smoke dispersion and plan prescribed burns. It contains a graphical user interface written in ArcInfo Arc Macro Language (AML), which is linked to a FORTRAN computer program. VSMOKE-GIS is a graphics display of a forest and a dashboard with five icons. When appropriate files are created, more than one smoke plume can be viewed at once and different aspects of the forest, such as stands of trees, rivers, or soil types, can be viewed together or separately. These different views of the forest will aid the study of fire location and its effects. Icons help users to define the fire parameters, view the resulting plume, and perform utility operations.
The VSMOKE-GIS system was developed to assist with planning prescribed burns in the National Forests of the Southern United States. Because prescribed burning is essential to the health of forest ecosystems in the South, the need for it will increase as federal land managers embark on ecosystem management policies. Such an increase, however, requires continual improvement of smoke management practices. Using VSMOKE-GIS, a user can plan one or more prescribed fires and view the resulting smoke concentration pattern.
Based on VSMOKE, a steady-state Gaussian plume smoke dispersion model (Lavdas in prep.), the VSMOKE-GIS system integrates a process model, VSMKGS, with a geographical information system (GIS), ArcInfo. A user interface was developed in ArcInfo to collect the necessary input data to run VSMKGS. The input is passed on to VSMKGS, which runs external to the GIS. VSMKGS calculates isopleths of equal smoke concentration, which are passed back to ArcInfo for display.
Many of the challenges encountered involved the plume definition window -- the primary input gathering mechanism. The remaining dashboard choices largely depend on the plume definition window and are less complicated. The view option allows the user to visually study plumes created in the plume definition window. The tools option consists of several actions that can be performed on those same plumes. Finally, the help option provides information and the quit option ends a session.
The major concern in designing the VSMOKE-GIS system involved successfully merging VSMKGS with the forest GIS. Data referenced to the Universal Transverse Mercator coordinate system (from VSMKGS) and the polyconic coordinate system (from forest GIS) had to be converted to one coordinate system for map display. One coordinate system, therefore, had to be converted into the other. Additional activities included implementing the functions in the tools window; communicating among ArcInfo, its modules, and UNIX; and keeping the overall design and operation user friendly.
For our work, the Francis Marion National Forest (Francis Marion) of South Carolina provided the test data. The Francis Marion coverages were on the polyconic coordinate system. VSMKGS, which produces the coordinates for the smoke plumes, was on the UTM coordinate system, the most suitable for the mathematical calculations involved.
Several different approaches to integrating the two coordinate systems were studied, including projecting the smoke plumes into polyconic to match the forest and projecting the forest into UTM to match the smoke plumes. Both worked equally well in the dashboard view window, but polyconic was selected because the forest was of primary importance. The UTM coordinate system was chosen for the plume definition window because it is associated with VSMKGS processing. The tools window could use either coordinate system because its operations automatically became compatible with the existing coordinate system or display.
We also had to choose between temporary and permanent map projections. Temporary and permanent map projections were produced of all coverages in both coordinate systems and tested for ease of use with the icons. Temporary map projections must be processed repeatedly for every display because they disappear when the display disappears, leaving the original coverages and coordinate system unchanged. With permanent projections, a durable coordinate system is produced and retained throughout the application, in addition to the original coverages. Any coverage can then be displayed without intermediate processing. Permanent projections, however, require increasing amounts of disk space because both UTM and polyconic versions of the forest and smoke plume coverages become permanent files. Temporary map projections were chosen because disk space was limited.
Temporary projections of both UTM and polyconic coverages were necessary for accurate input coordinates and views. Change in projection is unnecessary at the start of a VSMOKE-GIS session because only the forest is displayed. With no UTM smoke plumes to project, and no polyconic conversions to process, the forest could be displayed quickly. The temporary projections plotted slowly on the screen because of coordinate system conversion.
Another activity in merging VSMKGS with the forest GIS involved implementing the functions in the tools window. Some of the functions were direct ArcInfo commands, such as finding the length of a plume and deleting a plume; however, the print option required the use of UNIX and X11 Windows. For example, to receive a printed copy of any VSMOKE-GIS view, a screen dump had to be created and then sent to the plotter. Creating a permanent map composition was not feasible because VSMOKE-GIS displays are not static. Different smoke plumes are always being created, displayed, and studied from many different angles. Permanent map compositions would use up limited disk space.
The remaining tools window functions -- pan, zoom-in, and zoom-out -- were the most difficult to implement because they required manipulating the map extent of the forest. The coordinate locations clicked on by the user were an essential part of the calculations for the new map extent. Pan, zoom-in, and zoom-out all required different calculations to suit their purpose.
The VSMOKE-GIS system must be tailored to each location. Users must have a workstation environment with at least version 6.0 of ArcInfo software installed and access to a FORTRAN compiler. They must decide which forest coverages and text should appear on all the displays. They must also provide specific information about the geographic location of their forest. Relative to the forest coordinate system and to the UTM coordinate system of the smoke plume, parameters such as the units of measure and map zone may be required. This information enables the accurate display of the UTM smoke plumes in perspective and location.
At the start of a VSMOKE-GIS session, the forest is displayed in an ArcPlot window and the dashboard appears. In the case of the Francis Marion, the roads and stands of trees are displayed. Any of the five dashboard icons may then be selected.

Typically, users would choose the identify (plume definition), view, and tools icons in that order, and the help icon as needed.
The heart of the VSMOKE-GIS system is the plume definition icon or window.
The order of input follows the flow of planning a prescribed fire. Users may use data from burning plans or previous burns or enter their own test data. After all the variables are entered, they are read into the formatted file that provides the input to VSMKGS.
When the plume definition icon is first selected, the forest is always redrawn to ensure that all the burn locations chosen from the screen will use the UTM coordinate system. Before the forest is actually displayed, users have the option of displaying any number of existing smoke plumes in selected colors. Plume names and color selections appear in popup windows. By displaying existing plumes, users can better define and locate plumes to be created. After the forest and selected plumes are displayed, the plume definition window appears.
The first selection in the plume definition window is the view button. It allows redisplay of the forest and any plumes as often as desired. This button is especially useful for viewing a plume just created. The question mark icon at the bottom of the window may be clicked on for help at any time. The popup window that appears explains the plume definition entries, including definitions, ranges, and defaults.
The next selection is the zoom-in button, which allows enlargement and close examination of an area of interest. Users may display as many plumes as needed; however, these plumes must be in the part of the forest displayed.
The user points and clicks the mouse on the display map to locate the preferred planned burn site. The UTM x, y coordinates are saved when the user clicks on the display location. This location will always be in UTM rather than in screen coordinates. The zoom-in button is helpful in locating specific burn areas. The user must always choose a burn site because no default coordinates exist.
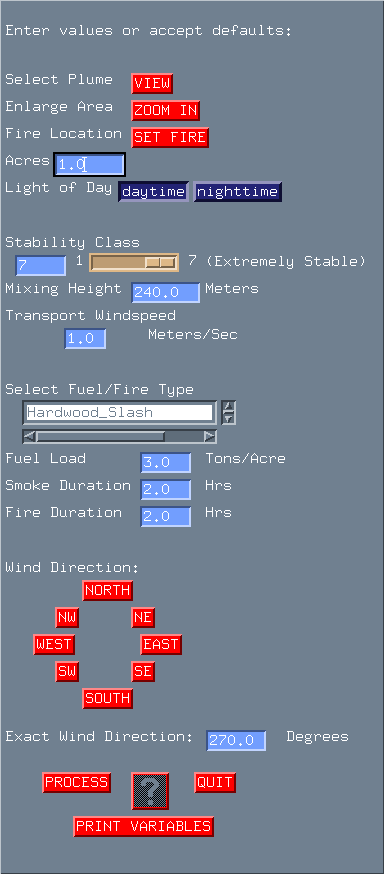
The number of acres to burn and the time of day, a logical value of day or night, are then chosen. Here, and throughout most of the window, default values will be accepted if the user does not make any choices.
Stability class is entered next. An estimate of the rate of atmospheric dispersion, stability class ranges from extremely unstable (1) to extremely stable (7). This selection affects the width of the smoke plume. An extremely unstable class will produce the widest plume, while an extremely stable class will produce the narrowest plume. Stability is entered on a slider bar of values from 1 to 7 or as a number from 1 to 7 in the input box.
The mixing height, entered in meters, refers to the depth of atmosphere available for the smoke. The transport windspeed, entered in meters per second, refers to the average windspeed in the mixing layer.
For the fuel/fire type selection, a list of fuel and fire types are displayed, one at a time, in a scrolling list. When a type is selected, it is matched with an emission factor (EPA 1990). This emission factor and fuel load, entered in tons per acre, determine the mass of smoke generated by the fire. Smoke duration, entered in hours, is used to calculate smoke emission rate. Fire duration, entered in hours, and fuel load are two of the variables utilized to calculate heat emission rate. These input variables provide further detail to the plume shape and definition.
For wind direction, users select one of eight directions, associated with numerical constants. The value represents the direction from which the wind blows the smoke. The plume will grow in the opposite direction. For greater precision, users can enter a wind direction constant in degrees.
After all variables are entered or defaults accepted, users should check all entered values for accuracy. To change a value, the user positions the mouse cursor on that entry and reenters the value. To exit without accepting any of the values, the user presses the quit button and returns to the dashboard. If satisfied with the values, the user clicks on the process button, and the new plume is formed with the given data. These variables, and constants further defining the plume, are written to a formatted file. The file is input to VSMKGS. The VSMOKE-GIS system and ArcInfo relinquish control to the operating system so VSMKGS can be executed with its new input file. An output file consisting of x, y coordinates is built to create the new smoke plume. A popup window appears during processing and requests a name for the smoke plume. The system checks for name duplication, and a message will appear requesting another name if the entered name has already been used. With this aid, users can keep track of plumes.
Control is then returned to ArcInfo and VSMOKE-GIS where a coverage is created from the data output from VSMKGS. Topology is constructed. The full system is brought back to the screen, including the plume definition window, the dashboard, and a blank ArcPlot window. Users may now view the smoke plume either with the view icon at the top of the plume definition window or on the dashboard. By remaining in the plume definition window, users can easily create another smoke plume.
After clicking on the process button and before exiting the plume definition window, the user can print a list of the variables entered to create the smoke plume. The quit button returns the user to the dashboard.
Users may also view a newly created smoke plume and any others by selecting the view icon from the dashboard. They can then click on the name of the new plume from the popup window that appears. The whole forest and the plume are displayed as a temporary polyconic projection.

More smoke plumes may be chosen for display when the plume window reappears. This popup window is a scrolling list of coverages from the plume workspace. Users must select one of 10 colors from the popup window that appears after each selection. The first plume is always displayed in the default color red, but when more than one smoke plume is displayed, different colors distinguish each plume.
Some of the smoke plumes may end abruptly with flat margins. The data that form the smoke plumes are processed in VSMKGS. Any data that extends beyond the limiting distance of 100 kilometers are cut off and the plume generated becomes flat. Without this end range, the plumes could continue out of bounds and double back on themselves, producing incorrect results.
The tools icon of the VSMOKE-GIS dashboard provides a set of utilities that can be performed on the plumes, the forest, or both. The pan button shifts the display to show an area that is out of range on the current display. For example, a smoke plume may be so large that all of it can not be displayed in the ArcPlot window. Pan can shift and redisplay the forest so the complete plume is visible. With the zoom-in button, the user can examine the plume more closely.
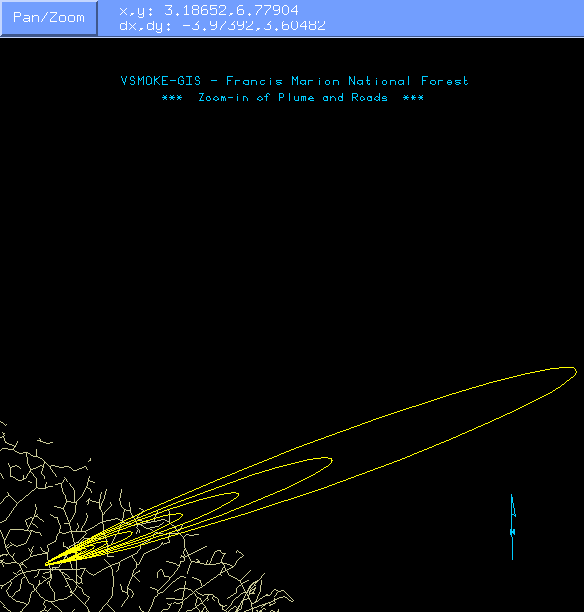
Close examination is useful when viewing the origin of the fire relative to forest features such as a particular road or stand boundary. The zoom-out button presents a smaller, more complete picture of the display. If a smoke plume is too large to view in its entirety, this function can reduce the scale until the plume and the whole forest are displayed. These three functions are best used as a group, manipulating the display until the desired views are achieved.
Users can create their own views in the tools window. Before each display they can choose any number of forest and smoke plume coverages and display them in an array of colors using the forest and plume name and color popup windows. In the Francis Marion, the smoke plumes were often displayed against the roads coverage alone, because including the stands coverage added too many confusing lines.
The length button provides length measurements of any section of the forest, such as road distances and smoke plume lengths. By clicking the mouse on the beginning and end of any line segment on the map display, the user obtains a length estimate. The measurement in map units (meters) and page units (inches) pops up in a window. General information, such as the map units, map scale, and map extent, is also displayed in the Arc window.
By selecting the print button, users can print any of the views created in a VSMOKE-GIS session. A window appears asking for the title of the view to be printed. After entering a descriptive title and clicking on the display, users receive the printed copy with the title. This copy helps record specific details about a plume or an area in the forest and facilitates comparisons with other views.
Users can eliminate plumes they no longer need or have created by mistake by selecting the delete plume button. From the scrolling list of plume coverages, the user selects unwanted plumes. Plumes may only be deleted one at a time. After a plume name is clicked on, the current map display, tools window, and main dashboard disappear. When the plume and all related files have been deleted, a verification message appears in the Arc window. The tools window, a blank ArcPlot display, and the VSMOKE-GIS dashboard reappear. The question mark icon at the bottom of the tools window may be clicked on at any time for helpful instruction in using any of the tools utilities. Finally, the quit button returns the user to the dashboard.
The help icon of the VSMOKE-GIS dashboard is a popup window describing each of the dashboard components. Users can easily find desired information in this formatted text file.
The final dashboard option is the quit icon. This selection ends a VSMOKE-GIS session and returns the user to the Arc prompt.
Error checking is provided throughout the system. Entered numbers must be within the ranges of possible values and windows must be properly initialized. Error messages will appear at the bottom of the active window if an invalid value has been entered. If a smoke plume could not be generated because values were incorrect or incompatible, an error message will display in a popup window.
The VSMOKE-GIS system was developed for field unit use. It has continuously evolved, especially as more National Forests and field units have become interested. In our most recent VSMOKE-GIS meeting, groups from several southeastern National Forests enthusiastically endorsed the system and suggested improvements. Many of these suggestions have been implemented. Copies of the VSMOKE-GIS software have been installed at several National Forest sites across the country, and The Ultimate Guide to VSMOKE-GIS (Harms in prep.) has recently been written. VSMOKE-GIS has withstood rigorous testing, and with the publication of the user's manual, it is rapidly becoming a mature and refined product.
We thank William Jackson for helping initiate the project; USDA Forest Service, Region 8 Soil, Water, and Air for providing funding; and USDA Forest Service, Francis Marion National Forest for providing data.
Lavdas, L. In prep. Program VSMOKE -- User's Manual, Southeastern Forest Experiment Station. Asheville, N. C.
U. S. Environmental Protection Agency. 1990. AP-42 Compilation of Air Pollutant Emission Factors, Supplement C, Office of Air Quality Planning and Standards. Research Triangle Park, N. C.
Harms, M. In prep. The Ultimate Guide to VSMOKE-GIS, Southeastern Forest Experiment Station. Asheville, N. C.
Leonidas G. Lavdas
Same address
James M. Saveland
USDA Forest Service
14th & Independence Avenue
P. O. Box 96090
Washington, D. C. 20090
Telephone: (202) 205-1561