by Stephen P. Phipps, GIS Project Manager, Woolpert, Dayton, Ohio
Clarence Robbins, Professional Hydrologist and Manager of Water Resources,
Woolpert, Charlotte, N.C.
ABSTRACT
For years engineers have run hydrologic and hydraulic models such as HEC-1 and HEC-2 to support the dynamic task of basin master planning. But now engineers are finding many ways to apply ArcInfo GIS software to enhance the modeling application. For example, by using both standard and customized ArcInfo GIS techniques, engineers can now collect, store, analyze, and combine the vast amounts of data needed for modeling; moreover, ArcInfo can be applied to generate much of the additional, geographically referenced data needed to feed the modeling programs. ArcInfo routines can also be tailored to verify the accuracy of modeling inputs so that modeling results are based on the best data possible. This paper will discuss the ArcInfo techniques and tools engineers can use for storm water inventory development, hydrologic modeling, and hydraulic modeling for basin master planning.
INTRODUCTION: APPLYING ArcInfo AS A MODELING TOOL
For years engineers have run hydrologic and hydraulic models such as HEC-1 and HEC-2 to support the dynamic task of basin master planning. But now engineers are finding ways to use ArcInfo GIS software to prepare for hydrologic and hydraulic modeling. In addition, they are integrating ArcInfo with models such as HEC-1 and HEC-2 to produce better, more accurate modeling results.
These “enabling technologies,” which depend on ArcInfo’s spatial GIS capabilities, produce consistent modeling inputs as well as continual quality control before, during, and after the modeling process--benefits nearly impossible to obtain using spreadsheets or other nongraphic methods of data organization. Moreover, once data is available in ArcInfo, it can be extracted, combined with other data, reformatted as needed for various modeling processes, and even used to generate other inputs needed by the models.
The enabling technologies presented in this paper--which include both standard ArcInfo tools and customized techniques developed by Woolpert--are most useful to engineers modeling 2-through 100-year storm events for applications such as floodplain management and storm water infrastructure design.
CREATING THE ACCURATE BASE MAP
To lay the foundation for detailed modeling, accurate GIS base mapping is required. Creatingdigital orthophotos--and, at the same time, collecting a Digital Terrain Model (DTM) suitable for modeling--is the preferred approach for communities without an accurate GIS base map.
The digital orthophoto base provides an accurate, up-to-date raster “picture” of the area to be modeled and is the foundation for associating storm water graphic and nongraphic data. The DTM is required for storm water modeling so that accurate, hydrologically correct surface models can be generated. (A surface model is a digital 3-D representation of the ground surface.)
Contours are usually needed at either 1-foot intervals (generating accuracies of plus or minus « foot for modeling the 2-year flood), or 2-foot intervals (generating accuracies of +/- 1 foot for modeling high recurrence interval floods). Having a topographic coverage within ArcInfo has proven to cost-effectively streamline the modeling process because the GIS can be used to calculate model parameters, cut channel cross sections, and perform tasks that otherwise must be done manually.
Once the base map, DTM, and contours are produced, the next step is applying ArcInfo to help develop an accurate storm water inventory needed for modeling.
USING ArcInfo TOOLS AND TECHNIQUES FOR STORM WATER INVENTORY DEVELOPMENT AND QUALITY CONTROL
The preferred approach for developing a storm water inventory needed for hydrologic and hydraulic modeling involves using Global Positioning System (GPS) satellite surveying techniques in conjunction with a specially programmed, menu-driven data recorder to pick up the locations and attributes of storm water drainage structures such as streams, open channels, culverts, pipes, manholes, and catch basins.
GPS field crews often choose to make two passes of the area to be inventoried. During the first pass, the x,y coordinate of each structure is obtained; this coordinate becomes the structure’s ID number. Structure locations that cannot be obtained using GPS--those obscured by tree canopies or tall buildings--are usually collected with a total station and data recorder.
Structure locations can then be downloaded from the data recorder into ArcInfo and plotted with their ID numbers on maps showing stream centerlines, digitized from the accurate base map. During the second pass in the field, a data-collection crew uses a data recorder, along with these plots as a reference, for collecting the appropriate attributes for each structure located.
Detailed modeling requires that different attributes be collected for the various structure types (see Table 1):
|
Table 1: Recommended Attributes for Storm Water Modeling | |
|
Structure Type |
Recommended Attributes |
|
Streams/Open Channels (linear) (for generating stream centerline data) |
ID Number (data key item) Manning’s Roughness Coefficients Right and Left Overbank Slope Typical Channel Geometry Up Invert Elevation Down Invert Elevation Depth of Channel Top Width of Channel Bottom Width of Channel Up Node ID Number Down Node ID Number |
|
Culverts and Pipes (linear) |
ID Number (data key item) Size (height and width) Shape Material Rim Elevation Up Invert Elevation Down Invert Elevation |
|
Manholes (node) |
ID Number (data key item) Depth of Structure Size (radius) Rim Elevation |
|
Catch Basins (node) |
ID Number (data key item) Depth of Structure Size (radius) Rim Elevation |
To avoid collecting incorrect attributes for a structure, it’s important to plan attribute associations carefully. Once attribute associations are determined, menus in the data recorder must be programmed accordingly to guarantee that the proper attributes are associated with the proper structures. (For example, invert elevations collected during the inventory of manholes should be associated with linear structures such as culverts and pipes--not with manholes.)
The design of the menu interface ensures that data-collection crews are prompted to input the correct attributes for each structure and that all collected data is organized appropriately in an ASCII file for later downloading into ArcInfo. If data-recorder menus are not programmed correctly, the data may not translate in the format needed by ArcInfo. Consequently, attribute data could end up being “garbage” to the ArcInfo system, and attribute data collection in the field would have to be repeated from scratch.
Both hydrologic and hydraulic modeling require network connectivity among the storm water structures inventoried. Again, the data recorder’s menu interface is key to ensuring thisconnectivity--that the right pipe segment is connected to the right manhole. For example, data recorders can be programmed to prompt the survey crew member for either the downstream node or upstream node--preferably both--for features such as streams, open channels, culverts, and pipes. Having these nodes attached to these linear features assures network connectivity; moreover, an appropriately programmed data recorder allows the locations of points and lines to be “connected”--as they are downloaded into ArcInfo.
The accuracy of the storm water inventory determines the accuracy and usability of the final modeling results. Using GPS technology and programmed data recorders--rather than hard-copy maps and attribute data-collection forms--not only improves the positional accuracy of the resulting data but also limits the potential for errors during attribute data collection.
Nevertheless, quality control of data collected in the field is critical to ensure the quality and usefulness of the GIS data being produced. ArcInfo routines can be used to perform quality control on inventory data collected. For example:
1. ArcInfo can be used to verify network connectivity
Before full data collection begins, ArcInfo can be used to test network connectivity on inventory data collected for a small area. First, the ASCII file containing the x,y locations and attributes for all storm water structures in the test area can be downloaded into ArcInfo; structures can then be plotted on the base map. By reviewing the plot, the engineer can determine at a glance whether structures are connected properly in the GIS. In addition, this ArcInfo routine can be used to verify connectivity by checking for orphan nodes and flagging blank attribute fields.
2. ArcInfo can be used to ensure data has been collected correctly
Before nongraphic storm water data is translated and attached to graphic data, a rules-based C program developed by Woolpert can be run in ArcInfo to identify potential errors. This routine scans each structure within the ASCII file to determine, for example, whether manhole attributes are associated with manholes and stream attributes are associated with streams. Error flags will be reported for any data incorrectly collected so that data-collection crews can resolve discrepancies during another visit to the field.
Once the storm water inventory is complete and quality control performed, data collected in the field can be downloaded, translated into ArcInfo, and overlaid and linked with the accurate base map.
APPLYING AND INTEGRATING ArcInfo WITH HYDROLOGIC MODELING
Woolpert has used both standard and customized ArcInfo GIS techniques to analyze and combine storm water inventory data needed for the HEC-1 model. Woolpert has also applied ArcInfo to generate additional, geographically referenced data needed to feed the HEC-1model. These routines replace manual calculations or the use of complicated spreadsheets for organizing and generating the data required for modeling.
First, ArcInfo can be used to produce watershed, basin, and subbasin boundaries needed as a reference for both the HEC-1 and HEC-2 models. ArcInfo then uses these boundaries to either generate or perform quality control on the following data needed for the HEC-1 model:
•Soil Conservation Service (SCS) runoff curve number, which indicates runoff potential for a particular area based on land use and hydrologic soil groups;
•Time of Concentration, the time required for water to flow from the hydraulically most remote point in a subbasin to the subbasin outlet; and
•Lag Time, a calculation derived from the Time of Concentration.
1. Using ArcInfo to automatically delineate watershed, basin, and subbasin boundaries
In the past, engineers delineated these boundaries subjectively based on the topography and a general idea about how the area should be “divided up” for modeling. Now, these boundaries can be automatically and consistently determined with ArcInfo’s GRID module, which produces a 3-D lattice surface model developed from the DTM. Watershed, basin, and subbasin boundaries are then delineated based on elevations and drainage patterns within the surface model. ArcInfo can then be used to calculate subbasin areas, needed for the HEC-1 model input file.
2. Using ArcInfo to calculate SCS runoff curve numbers
In the past, SCS runoff curve numbers were produced by manually relating land uses and hydrologic soil types within particular areas and performing calculations. Now, using the ArcInfo UNION command, engineers can combine each subbasin polygon with the appropriate land use and hydrologic soil-type polygons to create a new ArcInfo coverage showing the combinations of various land uses and hydrologic soil types as new polygons within the subbasin.
ArcInfo uses the land use, hydrologic soil type, and area of each new polygon to calculate an SCS runoff curve number for that combination of land use and hydrologic soil type. Each SCS runoff curve number, attached to its associated land use/hydrologic soil-type polygon within the subbasin, is then used to calculate a weighted SCS runoff curve number for the subbasin, which will be accessed during generation of the HEC-1 input file.
Results can be plotted graphically, with different colors used to identify the different land use/hydrologic soil-type polygons within the subbasin; SCS runoff curve numbers can be viewed in a separate window.
3. Using ArcInfo to calculate Time of Concentration
Calculating Time of Concentration first requires determining a flow path for water to flow fromthe hydraulically most remote point in a subbasin to the subbasin outlet. The route of this path is based on parameters such as type of surface (parking lots, grassy areas, etc.); type of flow (sheet flow, shallow concentrated flow, or channel flow); and topography.
In the past, an engineer selected flow paths after gathering hard-copy maps and aerial photographs, studying the parameters mentioned above, and determining how and where these parameters changed throughout the subbasin. The selected flow path, hand-drawn by the engineer on a hard-copy base map, was then input by a computer operator so that Time of Concentration could be calculated and results returned to the engineer. If the resulting Time of Concentration seemed inaccurate, the engineer would have to review the various parameters to uncover errors, or check to ensure the computer operator didn’t make input errors.
By using ArcInfo, engineers can now digitize the flow path as they study the parameters and make the engineering decisions needed to determine the proper flow-path segments. Woolpert’s technique involves a menu-driven interface in ArcInfo that prompts the engineer with questions about the parameters such as:
•What type of surface?
•What type of flow?
•Up elevation?
•Down elevation?
•Slope?
The engineer then inputs these values directly into ArcInfo to determine and then digitize the various flow-path segments; at the same time, the values are attached to each flow-path segment as attribute data. This technique eliminates the need to prepare a hard-copy map with flow path lines and attribute data. Once the flow path has been determined, the Time of Concentration is automatically calculated within ArcInfo.
This technique gives the engineer a new tool for decision making and data input, thereby increasing the accuracy and speed of calculating Time of Concentration. If the Time of Concentration seems inaccurate, the engineer can review a synopsis of each flow-path segment within ArcInfo and automatically edit any attribute necessary to “correct” the flow path so that a revised Time of Concentration can be calculated.
4. Using ArcInfo to perform quality control on Lag Time calculations
After Lag Time for each subbasin is calculated (based on Time of Concentration), ArcInfo can be used to produce a scatter diagram comparing the Lag Time and acreage of all subbasins to ensure that Lag Time calculations fall within acceptable ranges. This diagram can be used as a quality control tool to prompt the engineer to choose a subbasin for review and update. Once a subbasin is chosen, the ArcInfo routine displays the subbasin outline, flow path, and attributes attached to each flow-path segment so that edits can be made if necessary. Any changes will automatically update the Time of Concentration so that Lag Time can be recalculated.
By plotting Lag Times in an ArcInfo scatter diagram, engineers can see potential errors at a glance and make changes to subbasins immediately before proceeding further with the modeling process.
5. Using ArcInfo to prepare the HEC-1 input file
Subbasin areas, SCS runoff curve numbers, and Lag Times--data made available in ArcInfo and needed to run the HEC-1 model--must now be properly formatted before the model can be run.
A customized ArcInfo routine developed by Woolpert combines all this data into an ASCII file formatted as a HEC-1 input file. The HEC-1 input file feeds the model, which produces runoff hydrographs for each subbasin--the volume of water produced by a particular storm event over time. The HEC-1 model can then be calibrated and its output used for hydraulic modeling.
APPLYING AND INTEGRATING ArcInfo WITH HYDRAULIC MODELING
Before using the calibrated HEC-1 output file as input to the HEC-2 model, additional data and other calculations are required. For example, channel geometries must be reviewed, cross sections must be generated, and a HEC-2 input file formatted and produced. Woolpert has been able to link ArcInfo storm water GIS databases to the HEC-2 hydraulic model to automate all three of these tasks. By linking ArcInfo with HEC-2, engineers can verify the quality of modeling inputs, improve modeling accuracies, and automate time-consuming calculations.
1. Using ArcInfo to refine the surface models of channels
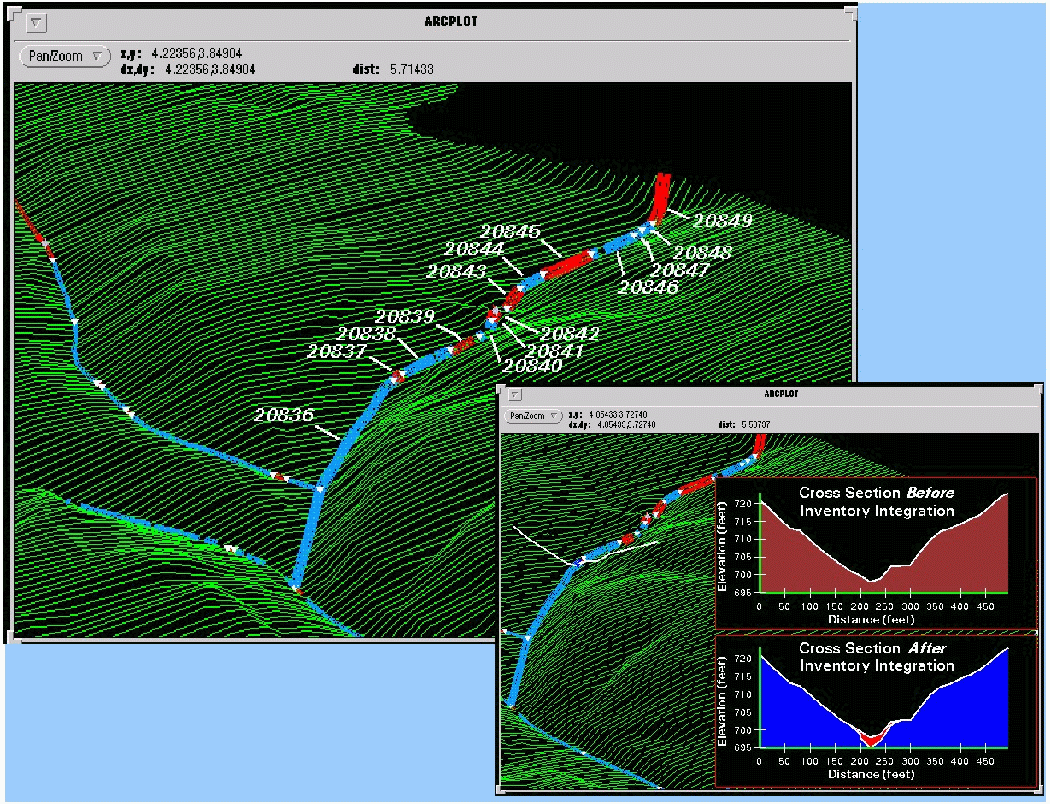
Accurate modeling of a 2- or 5-year recurrence interval flood profile requires considering the channel flow area beneath the surface of a stream--data not available from the surface model produced using photogrammetric methods. In the past, determining total channel flow area involved contour interpolation, field reconnaissance, and careful manual calculations. An ArcInfo routine developed by Woolpert can be used to extract three attributes collected during the storm water inventory--estimated bottom width, estimated top width, and channel depth--so that this portion of the surface model can be redrawn and revised in ArcInfo. This revised portion of the surface model can then be “cut and pasted” into the overall surface model of the channel so that the correct channel flow area can be calculated.
These true channel dimensions are needed later so that ArcInfo can determine accurate channel cross-section coordinates needed by the HEC-2 model.
Figure 1. Screen shots demonstrating the inventory integration concept.
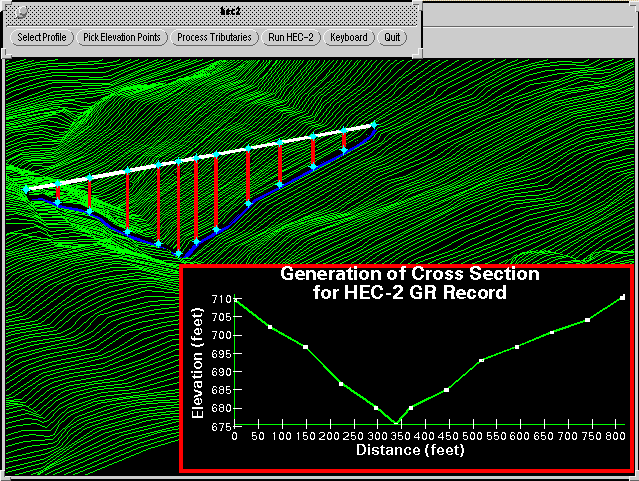
2. Using ArcInfo to generate cross sections
Generating cross sections for each channel reach is one of the most important--but timeconsuming--tasks required before running the HEC-2 model. For a creek six or seven miles long, as many as 800 cross sections might need to be generated. Cross sections are needed because they indicate the volume of water a particular area can hold along various stations of the cross section; HEC-2 uses these cross sections to calculate water surface elevations produced by various recurrence interval storms.
In the past, engineers were forced to draw cross sections and select station coordinates for each cross section by hand. Cross sections were usually drawn at unique locations along a stream, at 200- or 300-foot intervals. Cross-section ID numbers, river-mile station numbers, and station/elevation numbers were then input into the HEC-2 model.
A semi-automated routine in ArcInfo can be used for cross-section generation as long as data has been collected and formatted properly. One approach developed by Woolpert uses an elevation grid or lattice generated from the DTM. This approach lets the engineer decide whether to generate cross sections based on defined breaks in topography or a defined distance between cross sections, such as every 50 feet.
Engineers can then begin inputting cross sections for each channel reach using the method chosen. Having a hydrologically correct surface model lets ArcInfo automatically cut channel cross sections needed by the HEC-2 model by “feeling” the digital topography. The resulting channel profiles show graphically how much storm water the channels can handle before flooding occurs.
This ArcInfo routine also attaches a tributary name and cross-section ID number, assigns station numbers (based on the station’s distance from the tributary’s confluence), and determines station/elevation coordinates. As each cross section is digitized into ArcInfo, the routine builds a related station table that stores station numbers and station elevations. Cross section data generated during this routine is used to create the HEC-2 input file.
Figure 2. Screen shot depicting the user interface graphic for cross section generation.
3. Using ArcInfo to extract attributes needed for the HEC-2 input file
In the past, creating the HEC-2 input file meant time-consuming keyboard entry of numerous data. But inventory attribute data available in ArcInfo can easily be included in the HEC-2 input file to eliminate much of the data entry required. For example, attributes such as Manning’s roughness coefficients, right and left overbank slope, and upstream and downstream nodes, which were collected and tied to streams and open channels during the storm water inventory, can be extracted from ArcInfo, formatted, and automatically included in the HEC-2 input file. Only bridge and culvert cross-section data must still be entered via keyboard.
Required attributes, cross section data, refined surface models, and the HEC-1 output file are then combined to produce the HEC-2 input file, which is used to feed the HEC-2 model.
4. Using ArcInfo to display HEC-2 modeling results
Once the HEC-2 model is run, ArcInfo can be used to graphically display modeling results. For example, a 3-D model can be produced showing the extent of flooding for 2-, 5-, and 10-year flood events. Or, channel cross-section locations and the 2-, 5-, and 10-year frequency floodplains and flooded structures--delineated in different colors--can be plotted along with base mapping data.
HEC-2 modeling produces a wealth of results ready for analysis and interpretation. By creating GIS coverages that depict modeling results, engineers and managers can see impacts graphically instead of reviewing pure numbers in tabular form. This is even more important for decision makers with no background in engineering or model data interpretation.
CONCLUSION
Detailed modeling is the best way to get a handle on a community’s storm water management needs. No other alternative to modeling provides such a comprehensive look at the workings of the storm water system. Detailed modeling helps communities zero-in on problem areas and run what-if scenarios to determine the impact of potential designs on the overall system.
The linkage of ArcInfo with the HEC-1 and HEC-2 models gives engineers a brand-new toolbox with new tools to support the dynamic task of basin master planning. The linkage not only makes collecting, storing, analyzing, and combining modeling inputs easier and quicker than ever before but also produces continual quality control before, during, and after the modeling process--benefits nearly impossible to obtain using spreadsheets or other nongraphic methods of data organization.
Stephen Phipps
Project Manager
Associate Partner
Woolpert
409 East Monument Av..
Dayton, Ohio 45402
Voice 513.341.9335
FAX 513.461.0743
Internet steve.phipps@woolpert.com
Clarence Robbins
Manager Woolpert Water Resource Division
Associate
Woolpert
8731 Red Oak Boulevard, Suite 101
Charlotte, North Carolina 28217-3958
Voice 704.525.6284
FAX 704.525.8529
Internet clarence.robbins@woolpert.com