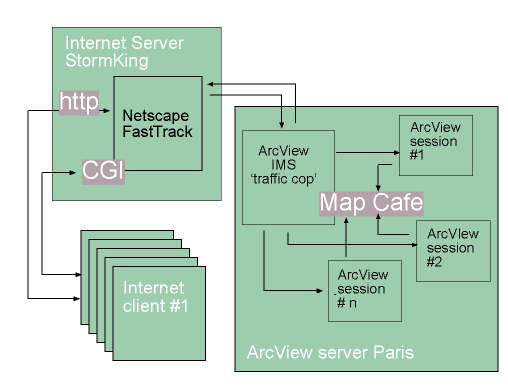
Figure 1
System Architecture for ATLAS IMS
DISTRIBUTING AN INTERNET-BASED GIS
TO
REMOTE COLLEGE CLASSROOMS
Abstract
Teachers in many parts of rural Colorado have an
interest in adopting GIS technology but lack technical resources and expertise
to set up and maintain the application software. This paper reports a campus
showcase project to implement Internet-based GIS training modules for distance
learning. The modules are embedded with online assessment tools, allowing
a dual project focus on GIS content and on strategies for automated user
assessment. The modules are delivered on an Internet Map Server, and will
be assessed in lower and upper division college classes. The paper will
report on the mechanics, the module content and the assessment strategies.
Introduction
Teachers in many parts of rural Colorado have an interest in adopting GIS technology but lack technical resources and expertise to set up and maintain the application software. The University of Colorado at Boulder has initiated a campus-wide initiative. The Alliance for Technology, Learning and Society (ATLAS, http://www.colorado.edu/Committees/ATLAS/) has the intention of utilizing information technology generally, and the Internet specifically, to deliver educational resources and services to the community. The term 'community' in this context is writ large. For example, communities may be local neighborhoods or K-12 schools, the Boulder or Denver business community, or the community of Colorado citizens who might attend or send their children to the University. One primary service includes distance learning.
This paper reports an ATLAS Showcase Project to implement Internet-based GIS training modules for distance learning. This is a one-year campus project, demonstrating how GIS can be delivered to any computer running Netscape or another Internet browser. Additional impetus for the Showcase Project driven by a growing on-campus demand for access to GIS software for classroom use by faculty in Anthropology, Environmental Biology, Geology, and other earth science departments. These faculty want to incorporate GIS into their classrooms, but lack have departmental resources to administer a large GIS software package. The campus Computing Center lacked staff expertise to install distributed GIS services. The Showcase Project implements a prototype, concurrently developing distance learning content and demonstrating the mechanics of how to deliver this content via the Internet.
Three GIS course modules are designed to teach Physical
Geography undergraduates where their drinking water comes from, using ArcView
GIS. The faculty teaching these modules do not have to install or manage
a large GIS software package, and can focus their teaching on a topical
domain (in this case, mountain hydrology). Faculty will be able to create
their own modules and submit them to the IMS site, to tailor exercises
to their own class material. The modules are designed and ready to be tested
in undergraduate Hydrology and GIS classes this fall. Following the testing
cycle, arrangements will be made to incorporate these and other GIS modules
into rural Colorado classrooms.
ATLAS IMS Website and Architecture
The architecture includes three components, including an Internet Server, which is Netscape FastTrack, running on a Sun Ultra 2 with dual 200 mHz processors and Solaris 2.5 UNIX operating system, http protocols and CGI utilities. The IMS server is a Gateway 6000 platform running multiple ArcView 3.1 sessions on a 266 mHz Pentium II processor and Windows NT 4.0 oeprating system. Multiple sessions were found to speed performance when more than three users accessed the IMS server concurrently. Clients could operate Netscape 4.5 or Internet Explorer 4.0 on Macintosh, Windows, AIX or UNIX platforms. (Subsequent to the research reported in this paper, the client browsers have been updated.)
Figure 1
System Architecture for ATLAS IMS
The ATLAS IMS Website (http://stormking.colorado.edu/atlas) includes numerous components. The Internet Server component (running oon Stormking) actually serves the Web pages, responding to client requests. Each Internet Client component is running an Internet Browser, in which a Web page is visible that looks like an actual ArcView session. The user clicks on a button inthe ArcView session window. This sends an http "GET" request back to the Internet Server, which passes the IMS requests over to the ArcView server (running on Paris). The ArcView Server contains a delegating mechanism (commonly referred to as a "traffic cop") which mediates multiple requests to multiple ArcView sessions. The request is delegated to the proper ArcView session, which performs the actual ArcView command, which changes the appearance of the view window (a zoom, or a pan, or an identify function is performed). MapCafe then generates a new version of the ArcView window in http protocol, and the 'traffic cop" sends it back to the INternet server, which passes it back to the client. CGI protocols are necessary for any client requests (such as comments, or requests for online help) that requre html forms.
The complexity of our set-up was mandated in part
because of our aim to demonstrate to the campus Computer Center that an
IMS server could be installed using their hardware and selected software.
Another reason for the complexity is that the IMS architecture requires
an Internet and an ArcView server. In most cases, these two servers could
operate on a single machine. However, our computer center does not permit
user access to the machines running their Internet servers, so we had to
implement the ArcView server on a separate machine, to preserve our own
control over installing ArcView themes and views. We believe that other
campuses trying to install an IMS system utilizing campus resources will
be in a similar dual-control situation, and therefore it seems informative
to report on our experiences, in the context of lessons learned, if nothing
else.
System Benchmarks
System benchmarks were performed in November 1998,
just after the system came online. Two client environments were tested,
accessing larger and smaller volume datasets (described below). All benchmarks
show substantially slower response times when the client utilizes Internet
Explorer 4.0, and in most tasks, these are unacceptable for preserving
user satisfaction. We found that in many cases, users would terminate the
Map Café JAVA applet before it had completely launched, in some
frustration. Netscape 4.5 shows a faster performance, and this may be due
in part to the fact that the Internet Server was running Netscape FastTrack.
We did not have an opportunity to run benchmarks utilizing a similar Microsoft
Internet Server product.
Table 1
Benchmarks for ATLAS Internet Map
Server (November 1998)
| Task | Netscape 4.5 | Internet Explorer 4.0 |
| Test 1 Colorado Population Density - large volume dataset | ||
| Initiate JAVA applets | 11 sec. | 2 min. 10 sec. |
| Zoom-in | 3 sec. | 1 min. 02 sec. |
| Identify | 0 sec. | 00 sec. |
| Pan | 3 sec. | 1 min. 00 sec. |
| Search Kwd "Boulder" | 1 sec. | 31 sec. |
| Zoom-out | 4 sec. | 1 min. 15 sec. |
| Test 2 Colorado DEM and Rivers - small volume dataset | ||
| Initiate the JAVA applets | 4 sec. | 2 min. 03 sec |
| Zoom-in | 3 sec. | 1 min. 02 sec. |
| Pan | 3 sec. | 1 min. 01 sec |
| Remove theme from View | 2 sec. | 1 min. 01 sec. |
| Reload JAVA applets | 7 sec. | 2 min. 05 sec. |
Platform: 150mHz Pentium II PC with 2MB PCI video
card
Networking: 28800 Modem connection
OS: Windows 95
| Task | Netscape 4.5 | Internet Explorer 4.0 |
| Test 1 Colorado Population Density - large volume dataset | ||
| Initiate JAVA applets | 1 min.09 sec. | 3 min. 01 sec. |
| Zoom-in | 06 sec. | 1 min. 02 sec. |
| Identify a feature | 02 sec. | 02 sec. |
| Pan | 07 sec | 1 min. 02 sec. |
| Search Kwd "Boulder" | 02 sec. | 32 sec. |
| Zoom-out | 09 sec. | 1 min.06 sec |
| Test 2 Colorado DEM and Rivers - small volume dataset | ||
| Initiate the JAVA applets | 23 sec. | 2 min.55 sec. |
| Zoom-in | 13 sec. | 1 min.06 sec. |
| Pan | 12 sec. | 1 min.05 sec |
| Remove theme from View | 12 sec. | 1 min.06 sec. |
| Reload JAVA applets | 23 sec. | 2 min.55 sec. |
At present, three data sets populate the ATLAS GIS Web site. A small-scale Colorado data set (http://stormking.colorado.edu/atlas/co-1/colo1.html) has been provided courtesy of Esri (http://www.Esri.com), and includes seventeen layers of thematic, environmental, and demographic data. Layers include hydrography, transportation, landuse, census demography, recreation, public land ownership, and other information, stored as ArcView layers and shapefiles. A second data set (http://stormking.colorado.edu/atlas/co-2/colo2.html) includes public domain 90-meter Digital Terrain data (DEMs). These data were compiled by USGS (http://www.usgs.gov), and have been imported to ARC/INFO, converted to lattices, and ported over to ArcView. Layers from these two datasets were used in the benchmarks reported above.
The third layer forms the basis for the three GIS modules. These data include GPS readings for snowpack in 1997 and 1998 for the Green Lakes Valley and Niwot Ridge Research Study Areas http://stormking.colorado.edu/atlas/niwot/rockies.html). The study area extends about six kilometers east from the Continental Divide, with elevations ranging from 3,200 meters to
almost 4,100 meters. Data collection includes snow
depth, latitude and longitude (in spherical and UTM coordinates), elevation
in meters, and ancillary field observation of environmental conditions.
These data were provided courtesy of the Niwot Ridge LTER (Long Term Ecological
Research) Project centered on campus (http://culter.colorado.edu:1030/).
GIS Modules
The ATLAS IMS Website (e.g., http://stormking.colorado.edu/atlas/gis/module-1a.html)
has a frame-based design. The ArcView IMS sessions run within a JAVA-based
(MapCafe) frame, surrounded by several html frames providing the assignment
scenario (above the ArcView window), ancillary data windows (to the right)
and a thrid frame (below) where students can ask for help or make comments.
The uppermost (html) frame will incorporate questions that the students
will answer in short essays, via html scrolling form templates. In this
way the assignment can be handed out, completed, handed back in, graded
and returned via the Internet.
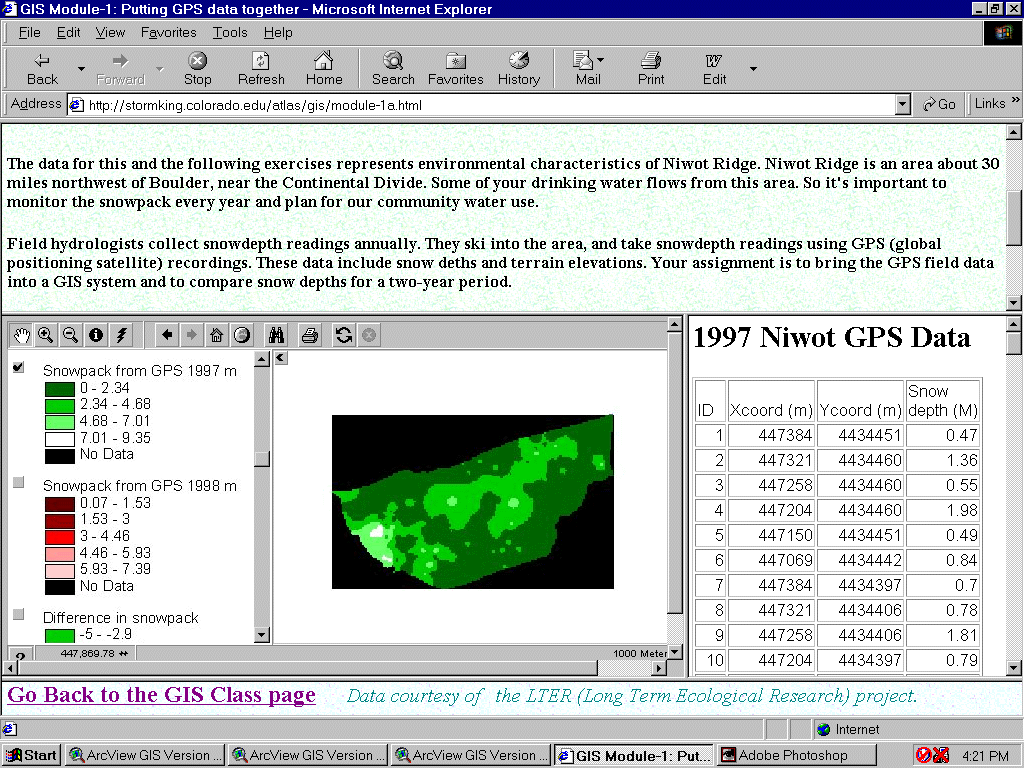
Figure 2
The Look-and-Feel of the ATLAS IMS Website
Three course modules have been implemented to prototype the ATLAS IMS Website. These modules target a lower division (freshman/sophomore) level and assume no prior knowledge of GIS. Students will take a virtual tour of the Niwot Ridge study area before beginning the exercises, visiting Web pages to view maps and photographs of the area.
The three modules follow one upon the other, and
inform students that Boulder's drinking water supply comes from mountain
snowpack, and how to monitor the snowpack depth to predict availability
of drinking water. Students learn how to enter snowpack measurements into
a GIS. Then they learn two GIS methods for generating digital terrain maps
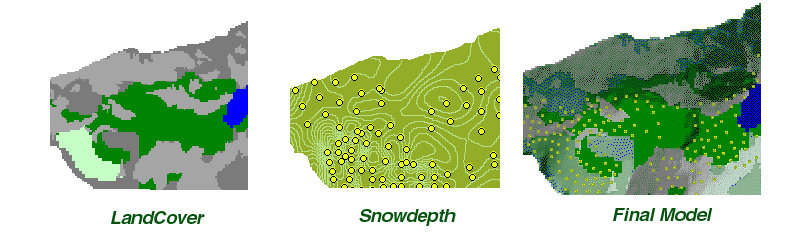
from elevation measurements, and how to determine which method is likely
to be more reliable. Finally, they use GIS to merge the snowpack with the
digital terrain and a landcover data theme to build a model of snowpack
availability. The modules are described below.
Your assignment is to bring the GPS field data into a GIS system and to compare snow depths for a two-year period. You'll inspect the GPS data, enter it (automatically) into ArcView, and map it. Then you'll compare the data you have just entered with a previous year's GPS data. The entire assignment should take about 45 minutes.
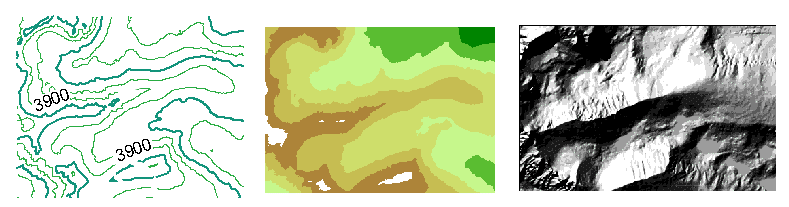
In this exercise, you'll learn how to make a terrain map. Starting with a Digital Elevation Model (a matrix of elevation data) you'll map contours of elevation. You'll make another contour map of elevation taken from the GPS data you entered in Module 1, and compare the two contour maps, and find out where and why differences are evident. Then you'll shade your contour maps hypsometrically, and make a "three dimensional" block diagram, or what is called a hillshade map. This map should look remarkably similar to the terrain you see in the Virtual Tour. This exercise should take about 45 minutes.
In this module you'll learn about how snow depth is associated with terrain and landcover, and make a composite GIS model of all three layers. You'll learn how GIS models are built and tested, and answer a few questions along the way. The exercise should take 45 minutes.
Assessment Tools
Usability testing forms an important component of any online service, and educational materials are especially important to test during and after the design phase (Buttenfield, 1999). These modules will be usability-tested in a Snow Hydrology class and in an Introductory GIS class during Fall semester 1999. Usability testing by hydrology students will evaluate course content, and testing by GIS students will evaluate the interface and delivery mechanisms. Assessment will include several strategies. First, students will be given an entry questionnaire before visiting the Website, to describe their background in hydrologic modeling, in using the Internet, and in working with GIS. During their work with the modules, brief focus sessions will be held where students can describe their experience, critique the Website as a group, share trials and tribulations, and learn from each other how to improve their own performance. At the end of the three exercises, students will be asked to write a short essay describing what they have learned about the source of drinking water in Boulder, what they have learned about learning on the Internet, and whatever comments they have to improve the Website. These essays will be handed in anonymously, to insure open and honest critique.
Second, the Website has three kinds of buttons embedded in each module. The Comments button allows them to ask questions, critique the site or the exercise. It is anticipated that the testing phase will require instructors to hold "online office hours" to answer student questions and respond to comments. A Help button will provide hints and short walk-through tutorials to assist students in using the ArcView GIS tools, and in using their Internet Browser software.
The third kind of button is actually a pair of buttons,
including a Good and a Bad button. Students will be instructed to hit these
buttons respectively if they either like or dislike what they are doing
on the Website. The buttons send a message back to the instructor, alerting
what Web page the student is working on. It is intended that the Good and
Bad buttons will help to refine the Website design. Buttenfield and Kumler
(1996) report on use of a similar tool in evaluating the Alexandria Digital
Library.
Summary
This paper reports on design and implementation of an ArcView IMS site to deliver GIS tools to University of Colorado classrooms. The project was intended to run for a single year, and in planning, it seemed that 12 months would be ample time to deisgn the modules, implement the IMS and other software, and run usability tests in actual classrooms. That timeline has proven inadequate.
In the first twelve months were able only to implement and stabilize the system. Our biggest delays came from integrating system architectures on two separate platforms, and in creating a stable environment. The early implementation crashed repeatedly due to lost network sockets. The problem was eventually solved by moving the ArcView sessions to a larger machine, and by launching multiple ArcView sessions.
A second problem has plagues us throughout the project, namely that the ArcView IMS does not contain the full functionality of ArcView. One can pan, zoom, identify, and toggle theme visibility. To perform any other GIS functions (to bring up a table, for example, or interpolate contours) one must either write the functions using Avenue or MapObjects. We devised an alternative solution, namely to implement a series of buttons on the IMS menu bar. Each button relates to a step in the exercise. The student pushes the buttons in order (left to right). As each button is pushed, a new View is generated, showing results of what the actual GIS commands would have generated. In effect, the student is not learning how to "do" GIS, but rather working through a fixed sequence of operations to see how to "do" hydrologic modeling using a GIS package. Beginning students will probably not know the difference. However, the bottom line is that in current versions, the ArcView IMS is not suitable for teaching GIS skills, as it provides only a slide show capability. Future versions of ArcView IMS are expected to increase user functionality, and it is hoped this limitation will be remediated soon.
We anticipate testing Boulder classrooms this fall,
as we design additional modules, and delivering a redesigned ATLAS IMS
site to rural Colorado classrooms within the coming year.
Acknowledgments
This research forms a portion of the Alliance for
Technology, Learning and Society (ATLAS) Initiative Showcase Project "
Distributing GIS for Environmental Applications: An Internet-Based GIS
for the Rest of Us". Funding from the University of Colorado at Boulder
is gratefully acknowledged. Additional funding for data collection were
provided by The Niwot Ridge Long Term Ecological Research (LTER) Program
(NSF award DEB-9810218), with funding from the National Science Foundation.
References
Buttenfield, B. P. and Kumler, M.P. 1966 Tools for Browsing Environmental Data: The Alexandria Digital Library Interface. Proceedings Third International Conference on Integrating Geographic Information Systems and Environmental Modeling. Santa Fe, New Mexico, January 21-26, 1996. On the Web at http://www.ncgia.ucsb.edu/conf/SANTA_FE_CD-ROM/sf_papers/buttenfield_babs/babs_paper.html.
Barbara P. Buttenfield and Ming-Hsiang Tsou
Department of Geography CB-260
University of Colorado
Boulder, CO 80309
babs@colorado.edu,
tsou@spot.colorado.edu
http://greenwich.colorado.edu