GIS Support of Risk Assessment
for Industrial D Facilities
Disclaimer: This project was funded in part by the EPA Office of Solid Waste. This paper/presentation has not been reviewed by them nor does it necessarily reflect their views or opinions.
Table of Contents: Section 1.0 --- Overview of the HWIR Risk Assessment Project Section 2.0 --- Soils and Landuse data Section 3.0 --- Watershed and Waterbody Data Section 4.0 --- Human and Agricultural Receptor Data Section 5.0 --- Ecological Receptor Data Section 6.0 --- References
Section 1.0 --- Overview of the HWIR Risk Assessment Project
Research Triangle Institute was contracted to provide
data collection support to the U.S. Environmental Protection Agency's (EPA's) 1999
Hazardous Waste Identification Rule (HWIR) multimedia, multiple-exposure pathway, and
multiple-receptor risk assessment (3MRA). The goal of this HWIR risk assessment is to help
identify wastes currently listed as hazardous that could be eligible for exemption from
hazardous waste management requirements.
The 3MRA model was designed to estimate potential risks from the long-term
management of exempted waste. To provide data for the model, the HWIR data collection effort
centered around the collection of site-based data for industrial nonhazardous waste management
sites representative of those that could manage HWIR-exempted wastes. National and regional
data were also collected as necessary to complement the site-based data set. This data
collection effort was limited to information that could be obtained from readily available,
existing data sources. More extensive data collection activities, notably door-to-door or
telephone surveys and contacts with facilities, vendors, or state or local governments, were
determined by EPA to be beyond the scope of this data collection effort due to resource
limitations.
1.1 Background
The HWIR risk assessment was designed to estimate potential human and ecological risks
from the long-term management of industrial waste in waste management units (WMUs) not
subject to Resource Conservation and Recovery Act (RCRA) hazardous waste regulations. It
employs an integrated, multimedia, multiple-exposure pathway, and multiple-receptor risk
assessment model (the 3MRA model) to evaluate risks that may occur from the long-term
multimedia release of a chemical from such WMUs.
The 3MRA model contains 18 media-specific pollutant release, fate, transport, exposure,
and risk modules. The modules have varying data requirements covering a wide range of general
data categories: WMU characteristics, waste properties, meteorological data, surface water and
watershed layout and characteristics, soil (vadose zone) properties, aquifer (saturated zone)
properties, food chain or food web characteristics, human and ecological exposure factors, and
the types and locations of human receptors and ecological receptors and habitats surrounding a
WMU.
1.2 Approach
The HWIR 3MRA is a national-scale risk assessment that evaluates human and
ecological risks that may occur from the release of a chemical from WMUs typically expected to
handle exempted wastes. Although EPA implemented the assessment on a national scale, the
analysis is based on a regional, site-based approach, in which risks are evaluated at a number of
representative individual nonhazardous industrial waste management sites across the country. To
collect data for model implementation, three data collection approaches were employed (in
order of preference):
- Site-based - input data are collected and passed to the model for each site
- Regional - the nation is divided into regions of similar characteristics, data are collected to characterize the variability within each region, and each site is assigned to a region
- National - distributions or fixed values are collected for inputs that characterize the nation as a whole
Selection of the data collection approach was based on the preference for site-based data, data availability, and the level of effort for data collection. In other words, regional data (e.g., meterological and aquifer data) and national data (e.g., exposure factors, waste properties, chemical-specific data) were collected to satisfy the data requirements of the 18 3MRA model components when site-based data were not readily available. Table 1-1 shows the data collection approach by data type.
Please click on image to see full view...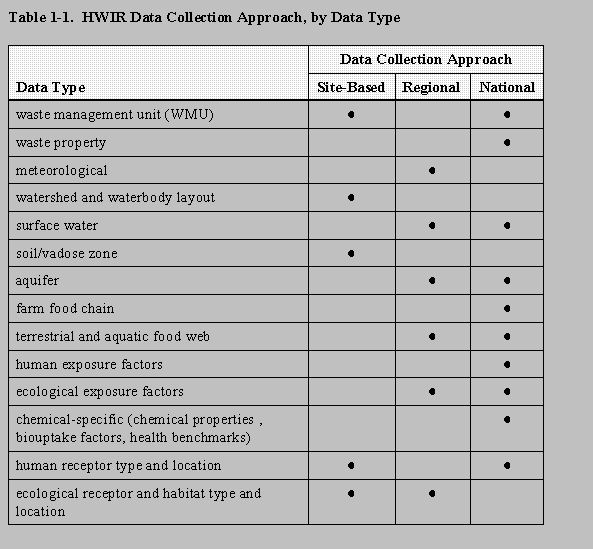
Table 1-1.
1.3 Sites, Settings, and Area of Interest
To represent nonhazardous industrial waste management across the United States, EPA
selected 201 industrial waste management sites from its 1985 Screening Survey of Industrial Subtitle
D Establishments (Westat, 1987) that had one
or more of four types of waste management units (landfill, waste pile, land application unit,
and surface impoundment).
 EPA selected the sample of 201 facilities to represent the types and geographic locations of
WMUs currently accepting exempt waste. The locations of
these facilities determine the sites where the 3MRA is implemented, and the
screening survey data determine which type of WMUs are present at a particular site. At each site,
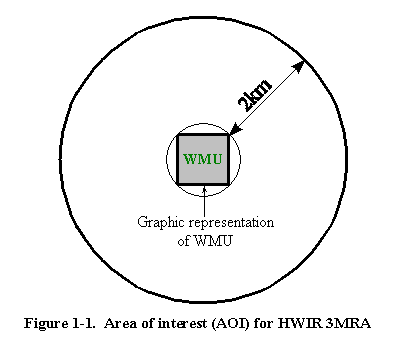
the area of interest (AOI) for the HWIR 3MRA is the WMU area plus the area encompassed by a 2-km
radius extending from the corner of the square WMU
(Figure 1-1). The AOI is the spatial area within which data are collected and risks are estimated.
EPA defined this radius based on air and groundwater modeling results, which show risk levels
flattening out at and beyond 2 km from the edge of the WMU.
EPA selected the sample of 201 facilities to represent the types and geographic locations of
WMUs currently accepting exempt waste. The locations of
these facilities determine the sites where the 3MRA is implemented, and the
screening survey data determine which type of WMUs are present at a particular site. At each site,
the area of interest (AOI) for the HWIR 3MRA is the WMU area plus the area encompassed by a 2-km
radius extending from the corner of the square WMU
(Figure 1-1). The AOI is the spatial area within which data are collected and risks are estimated.
EPA defined this radius based on air and groundwater modeling results, which show risk levels
flattening out at and beyond 2 km from the edge of the WMU.
1.4 Methodology
The HWIR data collection effort was limited to information that could be obtained from
readily available, existing electronic and published data sources. The strategy for collecting data to support the HWIR 3MRA included both automated and
manual collection methodologies, as follows:
- Automated methods - electronic processing of data using geographic information systems (GIS) technology and a combination of GIS and conventional electronic databases.
- Manual techniques - desktop analysis, such as literature reviews and analyses.
Data availability, accuracy, sample coverage, and available resources were considered in
developing collection methodologies for particular data types. In general, automated methods
were preferred; in many cases, hybrid methods involving some manual interaction with data
collection or processing programs were used.
Figure 1-2 provides an overview of the HWIR 3MRA data collection process, showing
data sources, primary processing components, and final files supplied to the 3MRA model:
- Data sources include both conventional databases and GIS coverages (spatial data), as well as published literature and professional judgement.
- Data processing includes using both GIS software and more conventional database programs.
- Final data files were exported to the 3MRA system in American Standard Code for Information Interchange (ASCII) format (meteorological data) and Microsoft Access databases.
Please click on image to see full view...
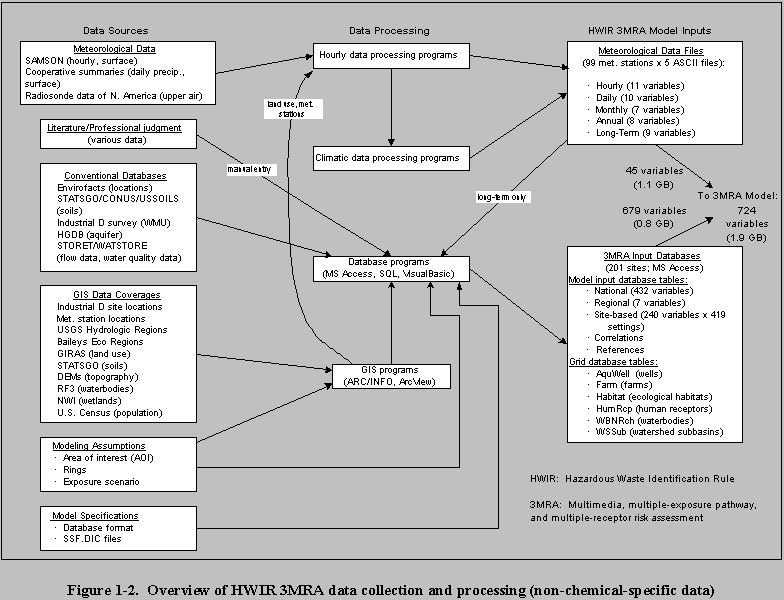
Figure 1-2.
1.4.1 GIS Data Collection and Processing
A GIS was selected as the platform for collecting much of the site-specific data for the HWIR risk analysis because it can be automated and can perform spatial overlay of georegistered data. Most of the GIS processing was conducted using ARC/INFO for UNIX workstations; some processing occurred in the PC environment with ARC/INFO and ArcView. The term GIS "program" is used throughout this document to refer to arc macro language (AML) scripts, a batch-process scripting language used with the ARC/INFO GIS software. The term "coverage" refers to a GIS map layer (e.g., geographically referenced digital points, lines, or polygons with attached data).
Figure 1-3 shows an example of a site with GIS data layers using a custom "Site View Tool." This ArcView tool was deleveloped in Avenue for non-GIS and GIS staff as an easy way to view GIS data during the data collection and model development process.
Please click on image to see full view...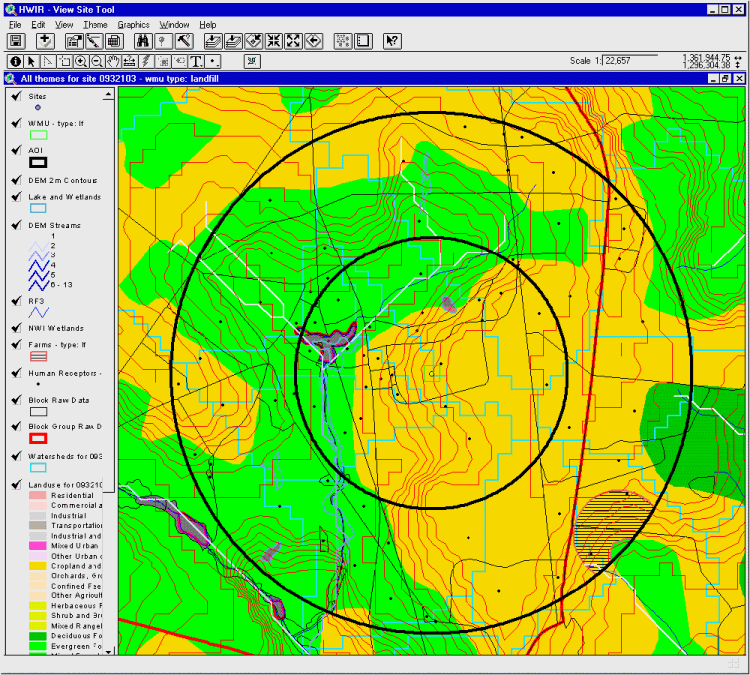
Figure 1-3. Example of GIS Data and "View Site Tool."
The GIS programs provided three primary data coverages for this risk analysis:
- Soil and land use data (Section 2.0)
- Waterbody and watershed layout (Section 3.0)
- Human receptor locations, including farms and residences (Section 4.0)
- Ecological habitats and home ranges (Section 6.0)
GIS processing was also conducted to assign sites to meteorological and hydrologic regions and to accurately locate facilities. In general, these GIS methodologies combined automated and manual techniques.
Section 2.0 --- Soils and Land Use Data
Site-specific soil data were collected for all 201 sites, largely using automated methods. GIS programs were used to identify and extract, for each Industrial D site modeled for the HWIR, soil map units and map unit areas by watershed subbasin and by waste management unit. Database programs were used to extract soil data from the underlying databases by these map units and process them to generate soil properties by watershed for surface soil and by the WMU for the entire soil column (vadose zone or subsoil). Surface soil is defined as the top 20 cm within the HWIR modeling system. Vadose zone soil extends from the ground surface to the water table. Depending on the property, average (area- and depth-weighted) or predominant soil properties were derived for the soil depth zone of interest across each watershed subbasin or WMU.
2.1 Data Sources
2.1.1 Soils Data
The primary sources for site-specific soil properties were the State Soil Geographic (STATSGO) database maintained by the U.S. Department of Agriculture (USDA, 1994) and two GIS-based compilations of STATSGO data, USSOILS (Schwarz and Alexander, 1995) and the Conterminous United States Multi-Layer Soil Characteristics (CONUS) data set (Miller and White, 1998). USSOILS, maintained by the U.S. Geological Survey (USGS), averages STATSGO data by map unit, with depth-weighted averages to the water table. CONUS, created by Pennsylvania State University, averages by STATSGO map unit and converts STATSGO soil layers into a set of 11 standardized soil layers extending to a depth of 2.5 m (60 in).
Refer to metadata available on the Internet at http://www.ftw.nrcs.usda.gov/stat2.html (USDA, 1994) for greater detail on STATSGO.
Metadata on USSOILS can be found at: http://water.usgs.gov/lookup/getspatial?ussoils.
Additional information on CONUS can be found at: http://www.essc.psu.edu/soil_info/index.cgi?soil_data&conus.
2.1.2 GIRAS Data
Geographic Information Retrieval and Analysis System (GIRAS) (U.S. EPA, 1994) provides comprehensive land use data, in digital GIS format, for the conterminous United States. This spatial data set represents digital data originally collected by the USGS and then converted into the ARC/INFO GIS format by EPA. These digital coverages are available from EPA by 1-degree quadrangles (1:250,000 scale). This information was extracted from metadata available on GIRAS. The full metadata record may be found at http://www.epa.gov/ngispgm3/nsdi/projects/giras.htm (U.S. EPA, 1994).
2.2 Methodology
A largely automated methodology was employed to collect soil data for HWIR. Figure 2-1 shows an overview of this methodology, which employs both GIS and conventional database processing to collect soil property data by map unit for watershed subbasin or WMU. Because GIS spatial soil data coverages were available for the entire United States, site-specific data were collected for all 201 HWIR sites. For a particular spatial area of concern (e.g., watershed subbasin or WMU), STATSGO map units were obtained using GIS. Map unit data were then passed to a Microsoft Access database containing soil data by map unit from STATSGO, USSOILS, and CONUS, along with lookup tables for the nationwide relationships. Similarly, GIRAS coverages for the areas surrounding each site were used to obtain site-specific land use data, which were passed to the data processor to generate land use-based inputs.
Please click on image to see full view...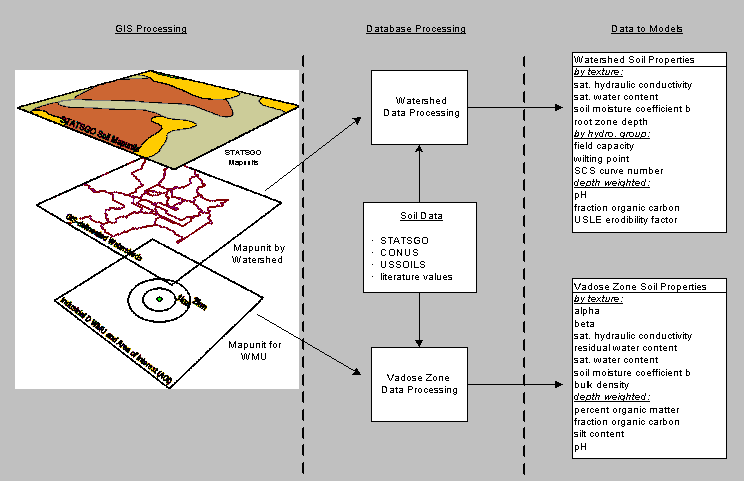
Figure 2-1. HWIR soil data collection overview.
Database query programs processed the soil data by watershed or WMU to generate the HWIR model inputs shown in Figure 2-1.
2.3 STATSGO GIS Processing
Soil map unit data contained in STATSGO were downloaded as a single national ARC/INFO coverage. A soil polygon coverage was overlaid with the regional watershed subbasin coverage to identify map units within the subbasins; it was also overlaid with the WMU to identify map units within the WMU (Figure2-2). For each watershed subbasin and WMU, GIS was used to calculate the area of the subbasin or WMU that was covered by the map unit.
Please click on image to see full view...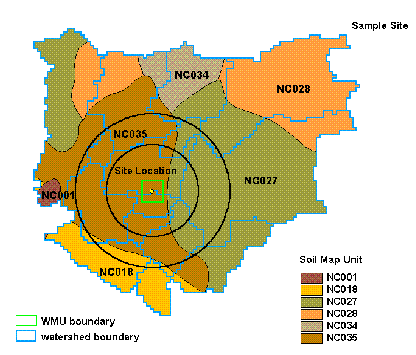
Figure 2-2. HWIR soil data example.
2.4 GIRAS GIS Processing
The GIRAS coverages were downloaded from an EPA Web site as ARC/INFO coverages. GIS was used to overlay the regional watershed coverage with a nationwide coverage of all the GIRAS quadrangle names. Each quadrangle that touched a watershed subbasin was then combined to create one coverage (Figure 2-3). The GIRAS coverage was then clipped to the regional watershed boundaries. GIS identified all land use types (lucode) within the watershed subbasin and calculated their areas.
Please click on image to see full view...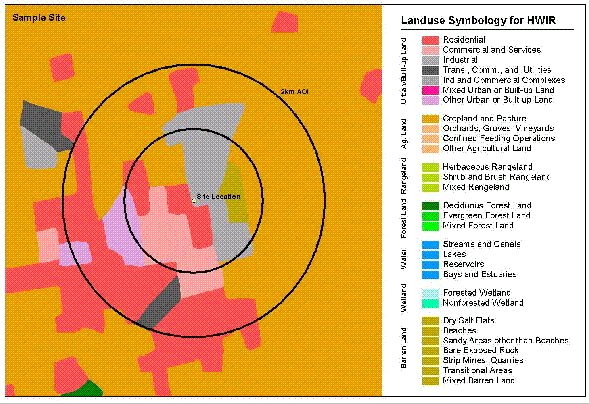
Figure 2-3. HWIR GIRAS land use data example.
Section 3.0 --- Watershed and Waterbody Data
To develop the HWIR 3MRA watershed/waterbody layout, GIS programs were used to compile available hydrologic, digital elevation model (DEM), land use, and wetland data sets; extract site-specific data from these data sets; delineate the watershed subbasins, waterbodies, and local watersheds; and export the resulting spatial parameters in data tables for further processing. Database programs were then used to perform the necessary calculations and relationships to create the input data sets for the 3MRA model. Most of the data processing was automated, but the GIS delineations required manual interaction.
The data sources used for delineating waterbodies and watersheds were:
- Reach Files, Version 3 (RF3)
- One-degree DEMs
- National Wetlands Inventory (NWI)
- GIRAS land use
3.1 Overview of Methodology
Data collection of the regional and local watersheds and waterbodies was conducted concurrently and based on a 2km-radius Area of Interest (AOI) that corresponded to the largest WMU at each HWIR site. Figure 3-1 is a brief overview of the data collection methodology used for watersheds and waterbodies. The watershed and waterbody layout data required GIS processing to delineate the watersheds and waterbodies and to obtain spatially related parameters (Steps 1 through 8). Further database processing of the GIS data was required to provide the exact data and format for the HWIR 3MRA model (Step 9).
Please click on image to see full view...
Section 3.2 describes GIS data collection and processing. To obtain the available data coverages for each site, coverages were first gathered on a national scale (Step 1) and then the coverages around each site were extracted from them (Step 2). Using these site-based data coverages (Figure 3-2), watersheds and waterbodies were delineated by manual and automated processes (Steps 3 through 7). The GIS data were passed as a set of data tables for further processing to create the model input data set (Step 8). The Input Data Integrator and Processor (IDIP), comprised of multiple databases and SQL (structured query language) and VBS (Visual Basic Script) script files, was designed to integrate collected data from multiple sources, perform any necessary calculations, and format the data as the 3MRA model input variable database (Step 9). This paper will examine Steps 1 through 7 only because they were the only steps relevant to the GIS processing of the sites.
Please click on image to see full view...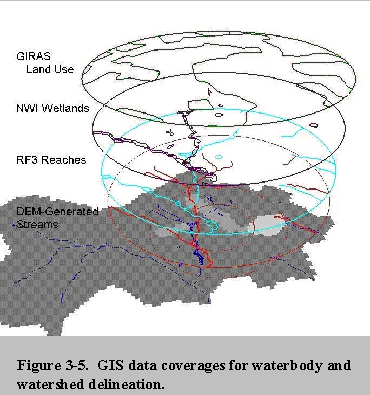
3.2 GIS Processing
All of the processing took place within the framework of a series of AML macros.
3.2.1 Step 1: Preprocessing of National and Regional Data
The first step was to gather all the neccesary input data needed for the project and store it on an RTI computer system. This included downloading all the DEMs, NWI and GIRAS quadrangles, and RF3-Alpha CUs necessary for the project.
3.2.2 Step 2: Process Site-Specific Input Data
Step 2 was an automated step in which site-specific input tables and coverages were prepared that were used in later steps to process model inputs. This step involved two AML macros, one that created the Universal Transverse Mercator (UTM) zone coordinates table for each site and another that prepared each site for processing. The order of implementation was important because the square WMU was needed to create the AOI coverage, which, in turn, was needed to create most of the other files (except the UTM coordinates table).
The following are the list of GIS data layers that were prepared in Step 2:(1) UTM Coordinates Table--UTM coordinates were generated for each site using the projection command in ARC/INFO. A coverage of site locations was overlaid with a UTM zone coverage, and a UTM zone field was added to the attribute table of the HWIR site point file. Then, each point was projected according to the proper UTM zone where it was located. These values were then stored in a table for use later in the processing.
(2) Models of the WMU--Using the area for each WMU type at the site, a square and a circular WMU were created.
(3) AOI--Watersheds and waterbodies were delineated with a ring 2,000 m (2 km) from the corner of the largest WMU at a site (assuming a square WMU). A second, smaller ring extending 1,000 m from the corner of the square WMU was used to help define smaller watershed subbasins close to the WMU.
(4) Elevation Grid--To define the watershed subbasins in the 2-km-radius AOI, it was necessary to combine several DEM quadrangles for most sites. First, the AOI was overlaid with a map containing the hydrological unit boundaries (HUCs). Each HUC that intersected the AOI was then overlaid with a national 1:250,000 DEM coverage. The DEM grids that overlaid these HUCs were appended together to form one composite elevation model for each site, hereafter called the elevation grid.
Once the elevation grid was created, it was clipped by a coverage of the US coastline to delete unnecessary elevation values over the oceans and lakes. This was done because the software is unable to generate a stream network over a water surface.
(5) RF3-Alpha Streams for Site--A coverage of all the RF3-Alpha regions in the United States was overlaid with the boundary of the DEM elevation grid. Stream arcs located within the outline of the DEM grid were appended to make one RF3-Alpha coverage for the site. This coverage was then clipped by a 30-km2 box around the site.
(6) DEM-Generated Hydrography Model--A DEM-generated hydrography model was used as the stream model for sites where relief was adequate to generate a reasonable DEM stream network. RF3-Alpha coverages are at a larger scale than the DEMs used in the study, are not well-registered with the DEMs, and could not be used in conjunction with the DEMs to delineate watersheds. A macro created by the University of Texas at Austin, agree.aml (Hellweger, 1997), was used to recondition the DEM so that it better modeled the RF3-Alpha stream network.
The agree.aml macro performs the reconditioning by
- Dropping/raising the elevation of the cells corresponding to the vector lines a certain amount (smoothdist)
- Buffering the vector lines
- Assigning elevation to the cells inside the buffer so that there is a straight-line path from the vector line to the original elevation just outside the buffer
- Dropping/raising the elevation of the cells corresponding to the vector lines a certain amount (sharpdist) (Hellweger, 1997).
More information on agree.aml is available online at http://www.ce.utexas.edu/prof/maidment/GISHYDRO/ferdi/research/agree/agree.html.
All nonlinear features were excluded from the RF3-Alpha coverages before being used as input into the agree.aml macro. The buffer distance was set either to 100 or 1,000 m, depending on the elevation change at the site. The 1,000-m buffer was used at sites with greater relief and the 100-m buffer was used at sites with less relief (flatter sites). Elevation was dropped by 10 m in cells corresponding to the RF3-Alpha stream arcs. Figure 3-3 is a visualization of the steps performed by the agree.aml macro in reconditioning the elevation grid. The fourth step, which allowed the cells corresponding to the stream arc to be further raised or dropped, was not needed to produce the DEM stream network for the HWIR sites.
Using the reconditioned elevation grid, a stream network was generated in the ARC/INFO Grid module. The headwater criterion was set to 70 cells (or 700,000 m2). The headwater criterion was used by the GIS in delineating stream reaches. It specified to the DEM where, in a headwater area, a stream (i.e., a defined drainage channel) starts and sheet flow ends. The 70-cell headwater criterion produced good agreement between the DEM-generated headwater streams and those in RF3-Alpha for most sites.
Please click on image to see full view...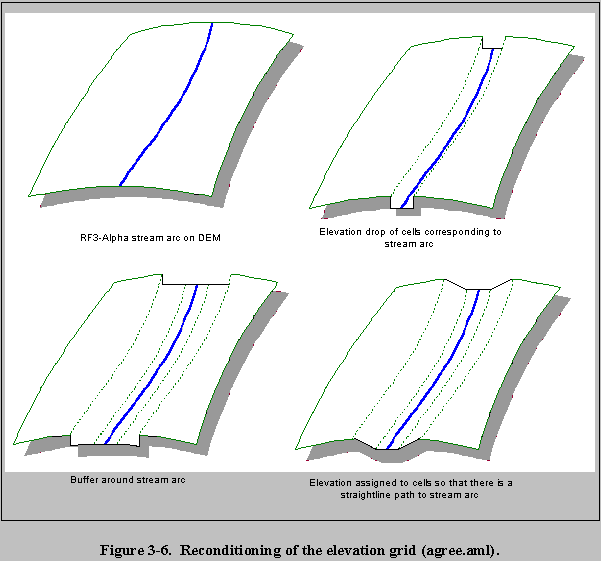
Stream order was assigned based on the Strahler method (Strahler, 1957). Figure 3-4 represents the process used to delineate a DEM stream network in ARC/INFO.
(7) Flow Accumulation and Flow Direction Grids--Using the reconditioned elevation grid, a flow accumulation grid and a flow direction grid were created in ARC/INFO Grid. These grids, which provide information on elevation-based flow direction, were used to create the stream order grid that was subsequently used to create the DEM stream coverage. Also, the flow direction grid was further used in fractioning the runoff from the watershed subbasins.
Please click on image to see full view...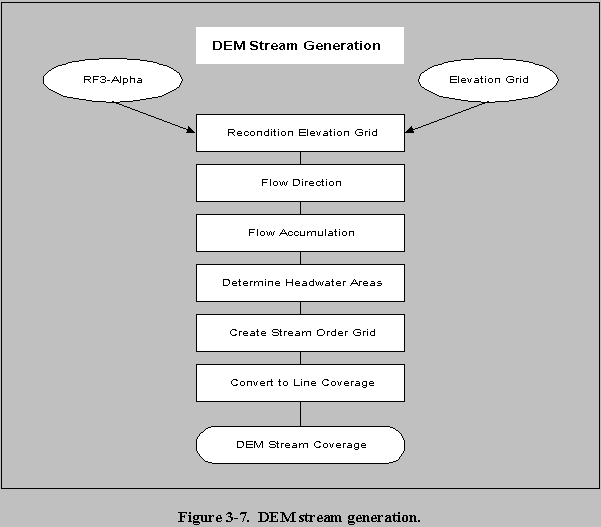
(8) National Wetlands Inventory--To create the NWI coverage for the site, the available NWI quadrangles were identified for a particular site by overlaying a status map with a 3-km-radius circle around the WMU allowing a 1-km buffer around the AOI to avoid truncation of features only partially inside the AOI. Of the 201 sites, only 100 had an NWI feature within the 1-km buffer. For sites with an NWI feature, the 1-km buffer of the AOI was clipped out of each quad to create one coverage of the NWI for the site. Features that extended beyond the 1-km circular buffer of the AOI were truncated, leaving only the portion within the buffer in the coverage.
The NWI feature codes were examined to determine whether, based on the code, the feature was always hydraulically connected to the waterbody, sometimes connected, or never connected. The basic decision tree used in the GIS can be seen in Figure 3-5. Lakes and permanantly-flooded wetlands were always connected to the waterbody network. Rivers and riverine wetlands ('r' features) were connected implicitly by connecting the corresponding RF3 or DEM features (i.e., the 'r' NWI features were not directly used in the analysis). Estuaries were connected to the network, given reach numbers, and passed to the waterbody model as a bay/estuary waterbody type; however, they are not modeled by the 3MRA model. Nonpermanently flooded wetlands were included in the model later in the process if they were located along an RF3-Alpha stream reach.
Please click on image to see full view...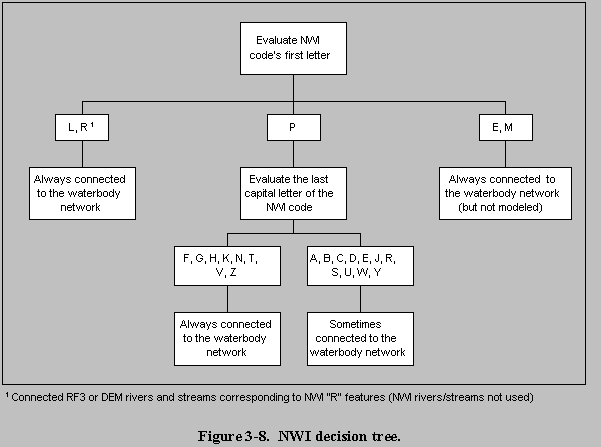
(8) GIRAS & RF3 Lakes and Wetlands Coverages-- As in NWI processing, we clipped the regional GIRAS and RF3 coverages with a 3-km radius buffer around the site. Then we extracted the lake and wetland features and put them into a GIRAS_WET coverage and a RF3_WET coverage. We assumed that all features in these coverages should be connected to the waterbody network and, therefore, unlike NWI, did not do any further processing on the two coverages.
3.2.3 Step 3: Method Determination Step
Step 3 was a semiautomated step that allowed each HWIR site to be reviewed in order to check its location and make a preliminary decision concerning the appropriate delineation method - DEM or manual. Coverages created in the previous step were examined visually in ArcView during this review.
First each site was checked to see if its location was appropriate based on the coverages prepared. If a more appropriate location could be found, then the site was moved to that location and Step 2 was repeated.
Once the site location was finalized, each site was visually checked using the following general criteria to determine whether the semiautomated DEM process could be used to delineate the site:
- Does the DEM stream network closely resembled the RF3-Alpha network? If the DEM streams showed significant differences with, or were too complex compared to, the RF3-Alpha streams, then the watersheds were delineated manually. One common problem encountered at relatively flat sites was that sometimes DEM streams were represented with several parallel arcs, resulting in bowling alley-shaped watersheds one-grid-cell wide. Most sites of this type were manually delineated.
- Can the lakes and wetlands be modeled using the DEM streams? Because the DEM stream network does not model lakes and wetlands (polygon features), lakes and wetlands had to be accounted for by manually placing the features in the hydrography network (see step 5). As a practical issue, sites with many lakes and wetlands from NWI, GIRAS, or RF3-Alpha sources were manually delineated. Using the DEM method to delineate the sites would have required many manual fixes (altering watershed boundaries to account for the lakes and wetlands) to bring the lakes and wetlands into the stream network.
DEM watershed delineations were performed for 132 sites while 69 sites were delineated manually.
3.2.4 Step 4: Delineate Watershed Subbasins
Step 4 created the delineation files for the regional watershed subbasins. It was a semi-automated step that required manual input. Watershed subbasins were either delineated using GIS (semiautomated watershed delineation) or manually delineated (manual watershed delineation) based on the decision in Step 3. After subbasin delineation was complete using either method, the watershed subbasins were numbered and attributed. The resulting coverage was used as input to the next steps in the process.
(1) Semiautomated Watershed Delineation--For 132 of the 201 HWIR sites, the DEM elevation grid was used to determine watershed subbasin boundaries. This process was semiautomated and required manually choosing pour points along a DEM-generated stream. A pour point was defined as a selected drainage point through which all upstream drainage must flow with the point represented by a single grid cell. The software generates a subbasin by determining, based on elevation difference, which cells flow into the pour point cell, then which cells flow into those cells, etc.
Guidelines for picking pour points aided subbasin delineation. The decision guidelines were designed to enable the model to have a higher degree of detail for the area within 1 km of the WMU than for the area between 1 and 2 km from the site, and to include only necessary parts of subbasins outside of the AOI. This was necessary because of the tradeoff between the potential for averaging away high soil concentrations with larger watershed subbasins versus the additional data and model runtime requirements for smaller, more numerous watersheds. The guidelines were developed to give higher resolution (i.e., smaller watershed subbasins) within the 1-km radius, where areal soil concentration gradients are likely to be steepest. In general watershed subbasins were defined at junctions of streams and the intersections of the stream with the 1- and 2-km-radius circles. Basins for first-order streams were delineated only within the 1-km area around the site, unless a subbasin delineation was necessary to ensure coverage of the entire 2-km AOI. When possible, individual basins were delineated for lakes and permanently flooded wetlands by picking pour points upstream and downstream of the waterbody feature.
Following pour-point selection and automated subbasin delineation, individual subbasins were merged to create a single regional watershed coverage. Then subbasin boundaries could be altered to adjust for large waterbodies and problems in the software's delineation of subbasins. When a large lake or wide river was the subbasin boundary, GIS staff would use lines from one of the lakes and wetlands base files: NWI, GIRAS, or RF3. Any DEM-delineated lines located within the large lake or river were deleted. In some cases, DEM-generated subbasin boundaries had to be extended or altered in some way to account for a large waterbody.
(2) Manual Watershed Delineation--A total of 69 sites were determined in Step 3 to be inappropriate for DEM watershed delineation and were manually delineated. Hand-delineations were drawn for each of these sites using many of the same coverages as the DEM delineations: RF3-Alpha, GIRAS, NWI, and DEMs. The DEMs were used to create 2-m contour lines for the site. The entire GIRAS land use coverage, not just the lakes and wetlands coverage, was used in delineating these sites. This expanded GIRAS coverage was helpful for sites in urban and industrial areas, where drainage occurs through underground culverts.
Please click on image to see full view...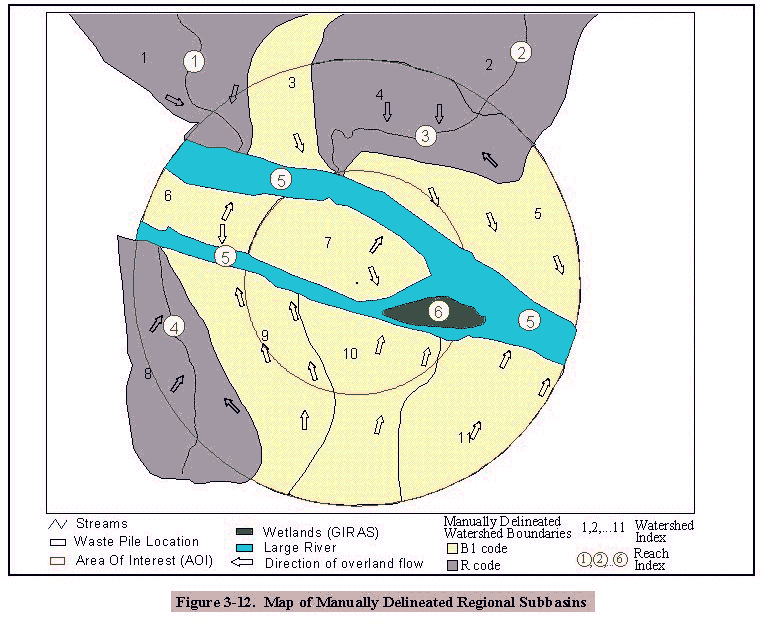
Once the hand-delineations were completed, the maps were screen-digitized in ArcView 3.1 and stored as ArcView shapefiles. Boundaries of large rivers, lakes, and wetlands were brought into the subbasin shapefile where necessary.
Once the boundaries were digitized, the ArcView shapefiles were converted into ARC/INFO coverages. Only minor alterations of the coverages took place after the conversion from shapefiles to ARC/INFO coverages. In most cases, this alteration consisted of correcting minor digitizing errors such as sliver polygons.
Figure 3-8 represents a manually delineated regional watershed coverage. GIRAS features (in blue and green) and RF3-Alpha streams (in dark blue) were used to delineate the watersheds. Subbasins 3, 5, 6, 7, 9, 10, and 11 are one-sided subbasins that flow into the GIRAS river, which was designated as a single reach. Subbasins 1, 2, and 8 flow into RF3-Alpha stream reaches 1, 2, and 5. Portions of subbasins outside of the AOI whose waterbody was not being modeled were deleted. Figure 3-10 shows a completed regional watershed coverage for a site. The boundaries are squared because the watershed boundaries were done in ARC/INFO GRID, a raster-based GIS module, and then converted into vector lines.
Please click on image to see full view...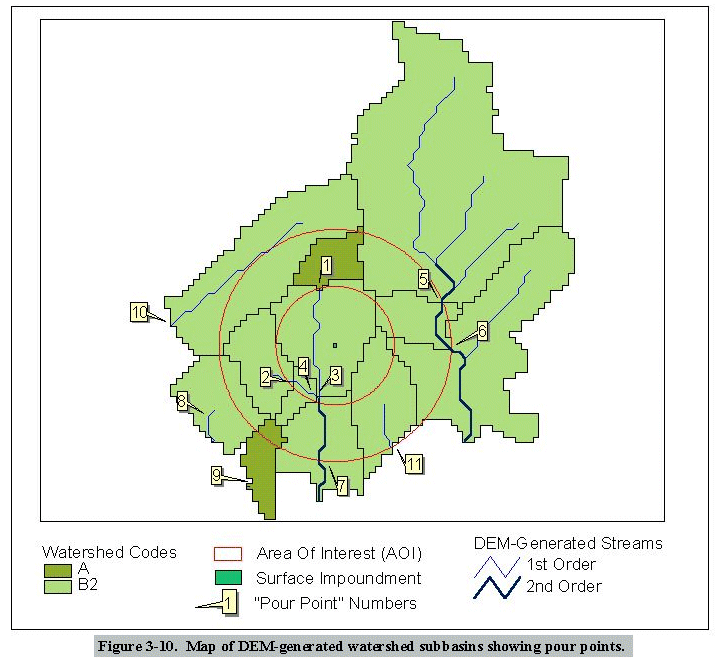
Figure 3-10.
Figure 3-7 is an example of a site with a wide river. The GIRAS feature representing the wide river was substituted in the waterbody network for the seventh-order stream that was identified in the DEM stream network. Pour points were chosen along the seventh-order stream, and watershed boundaries were generated based on those pour points. The GIRAS feature was then inserted into the regional watershed coverage, and all of the arcs located within the river were deleted. The result was a regional watershed coverage with several pseudo or one-sided subbasins representing drainage into the river.
Please click on image to see full view...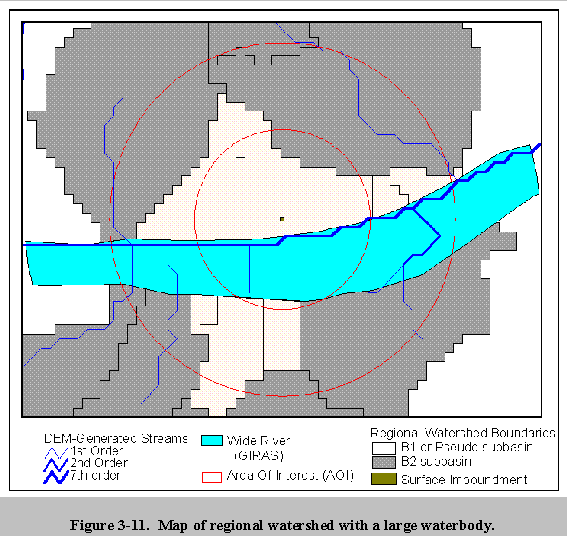
3.2.5 Step 5: Delineation of Waterbodies
Step 5 was a semiautomated step that was performed using two AML macros: one that created a lakes and wetlands coverage, attributed it, and created a data table describing the coverage; and another that created two data tables that were used to define the reach connectivity in the regional watershed.
First, GIS staff would create a lake and wetlands coverage from the site-specific base coverages created in Step 2. NWI was preferred as a source for this coverage due to its detailed attribute information. However, GIRAS or RF3 could be substituted for NWI in cases where an NWI coverage did not exist for the site or the NWI was too complicated to be used at the site.
Next, all the streams, lakes, and wetlands were given a waterbody number and referenced to their corresponding subbasin(s) and to its place in the waterbody network.
Figure 3-8 shows a finished watershed/waterbody layout.
Please click on image to see full view...
3.2.6 Step 6: Delineation of Local Watershed
A local watershed is a drainage basin that contains the WMU, or portions thereof, and is subject to direct runoff and erosional processes from the HWIR site. A local watershed is composed of up to three subareas: the WMU, any land area upslope of the WMU extending to the drainage divide, and the downslope buffer zone between the WMU and the first waterbody encountered. If the WMU overlapped a drainage divide, then multiple local watersheds could result. For modeling the local watershed, the coverage was represented as a rectangle that extended from the upslope drainage divide downslope to the first defined drainage channel, lake, or pond. Figure 3-9 shows a completed local watershed coverage.
Please click on image to see full view...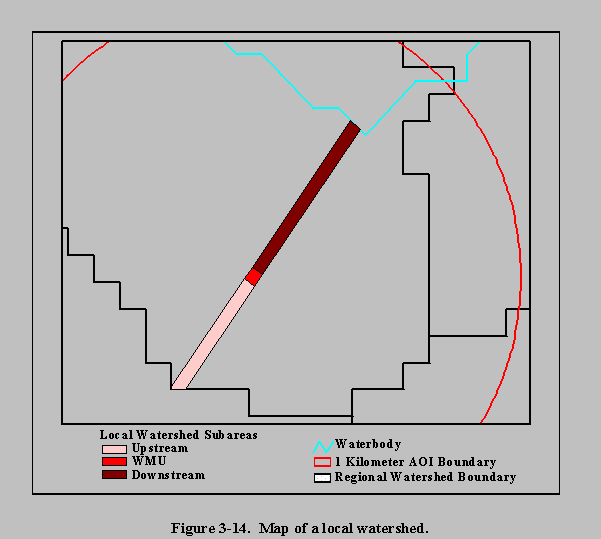
3.2.7 Step 7: Create the UTM Reference Grid
In an earlier step, a UTM reference grid for the HWIR analysis was created based on the largest WMU area for the entire project (see Section 2.0 for procedures on creating the UTM reference grid for the HWIR 3MRA). This grid was copied to the site location and centered on the x,y coordinates of the site using the UTM coordinates for each site created in Step 2 (Section 3.2.2). The x,y coordinates for each grid cell were attributed with the ADDXY command in ARC/INFO and referenced to the cell address number of the grid.
The watershed and waterbody coverages that were created in the above steps were then projected into the same UTM coordinates and overlaid with the grid. All the spatial data for the HWIR layout was passed to the model by grid cell address in a Microsoft Access database.
Section 4.0 --- Human and Agricultural Receptor Data
Human receptor points, which include residences and farms, are one of the primary spatial data layers in this analysis. They enable human risk to be calculated spatially around a site where people are likely to be located. A GIS was used to locate these points and collect human receptor numbers and characteristics (e.g., receptor types, age cohorts) for the 201 study sites. This will allow the HWIR risk analysis to develop individual risk distributions around a site that are weighted by population.
With a GIS, different data layers can be used together even though they may be at different scales (e.g., county-level agricultural census data, census block group data, census block data, and land use data). For HWIR, resident human receptor points were located and populated by census block. Farms were located and populated using census block group boundaries, subdivided by farm land use, along with county-level agricultural census data. Figure 4-1 illustrates these primary spatial data layers used in the collection of human receptor data.
Please click on image to see full view...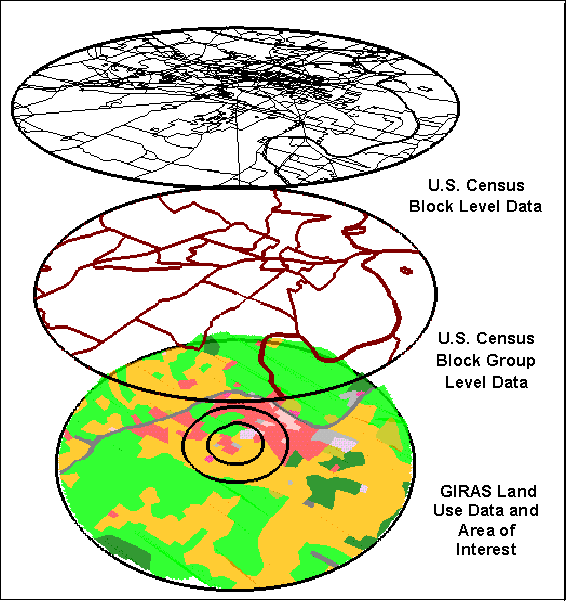
Figure 4-1. Primary spatial data layers for HWIR human receptor data.
4.1 Parameters Collected
The HWIR analysis calculates human exposure and risk for three concentric rings selected by EPA and defined by their distance from the WMU boundary: 500 m, 1,000 m, and 2,000 m. For residents, the following receptor types were selected by EPA to characterize residential exposure and risk:
- Residents
- Resident home gardeners
- Resident recreational fishers
- Resident home gardener/recreational fishers.
For exposure and risk to farmers, the following receptor types were selected, depending on whether they were present in the county agricultural census:
- Beef farmers
- Dairy farmers
- Beef farmer/recreational fishers
- Dairy farmer/recreational fishers.
For each of these eight receptor types, these five age cohorts were selected by EPA for use in the HWIR risk analysis:
- Child1 (infant): younger than 1 year
- Child2: 1 to 5 years
- Child3: 6 to 11 years
- Child4: 12 to 19 years
- Adult: 20 years or older.
This results in a total of 40 receptor type/age cohort combinations for the HWIR risk analysis.
Human receptor data were collected on a site-specific basis. Although site-specific
data are available for most of the receptor types and land use information
necessary to delineate and populate these areas, certain receptor type information
(e.g., data on beef and dairy farmers, data on recreational fishers) were
available only on the county or state level; these regional data were applied to the
site-specific population and land use data to estimate receptor type/age cohort
percentages for each subarea (as described in Section 4.3).
4.2 Data Sources
4.2.1 1990 U.S. Census STF 1B Attribute Data
Summary Tape File 1B (STF 1B) is a national data set of 1990 population data
collected by the U.S. Bureau of the Census (U.S. Bureau of the Census, 1992).
This STF 1B production process focused on the block level for the United States.
(STF 1B data are available online at
http://www.census.gov/mp/www/rom/msrom6ac.html.)
4.2.2 1990 U.S. Census STF 3A Attribute Data
Summary Tape File 3A (STF 3A) is a national data set of 1990 population and housing data collected by the U.S. Bureau of the Census (U.S. Bureau of the Census, 1992). It consists of approximately 70 tables of data for states, counties, county subdivisions, places, census tract/block numbering areas (BNAs), and block groups. This STF 3A production process focused on the block group level for the United States. Subject matter of the data covers population items such as age and citizenship, as well as housing items such as rent, age of householder, and number of rooms. (STF 3A data are available online at http://www.census.gov/mp/www/rom/msrom6ae.html.)
4.2.3 1990 U.S. Census TIGEr/Line Block and Block Group Coverages
The BL90 and BG90 layers in the EPA Spatial Data Library System (ESDLS) provide block and block group boundary coverages based on U.S. Bureau of the Census 1990 TIGEr/line data in a polygon ARC/INFO coverage (U.S. EPA, 1995a,b). The 1990 TIGEr/line data provide digital data for all 1990 Census map features and boundaries, the associated 1990 Census final tabulation of geographic area codes (such as 1990 Census block numbers), and the codes for the January 1, 1990, legal and statistical areas on both sides of each line segment of every mapped feature. (Additional information is available online at http://nsdi.epa.gov/nsdi/projects/bl90.htm and http://nsdi.epa.gov/nsdi/projects/bg90.htm.)
4.2.4 Census of Agriculture
The Census of Agriculture provides periodic and comprehensive statistics about agricultural operations, production, operators, and land use. It is conducted every 5 years in years ending in 2 and 7. Its coverage includes all operators of U.S. farms or ranches (Division A, SIC 01-02) that sold or normally would have sold $1,000 worth of agricultural products during the census year.
(Additional information is available online at http://www.census.gov/econ/www/ag0100.html). Census of Agriculture data used for the HWIR analysis included county-level data on beef and dairy farms. For consistency with the 1990 population census data, data for 1987 and 1992 were averaged.4.2.5 National Survey of Fishing, Hunting, and Wildlife
The National Survey of Fishing, Hunting, and Wildlife presents microdata records (with any information that might identify a specific person or household removed) on individuals involved in fishing, hunting, and other wildlife-associated recreational activities such as wildlife observation, photography, and feeding. Available data include the state in which these activities occurred; number of trips taken; duration of trips; and expenditures for food, lodging, transportation, and equipment. The U.S. Census Bureau conducted the survey for the U.S. Fish and Wildlife Service (FWS), Department of the Interior (DOI), which prepares printed reports in this field. (Additional information is available online at http://www.census.gov/prod/3/97pubs/fhw96nat.pdf).
4.3 Methodology
Human receptor points and farm data were placed and processed within one AML batch process program for each site/WMU setting to aid in processing efficiency and speed. In the following descriptions, GIS files are referred to as "coverages", the proprietary GIS file format used by ARC/INFO GIS software. Coverages are self-contained GIS layers that hold graphic spatial information (points, lines, polygons) as well as attribute information. Figure 4-2 charts how farm and human receptors are placed around each of the 419 HWIR WMU/site settings and attributed with the information necessary to calculate exposure and risk in the model.
The programs used to process block and block group census data assume that census data are uniformly distributed across a given block or block group area. They use area-weighting to calculate the census item numbers that fall within the AOI study area for a site. For example, if the AOI boundary clips a block group so that only 10 percent falls within the AOI, then the total for all census items for that block group is multiplied by 0.1. This area-weighting method was used to calculate census numbers within the study area for both block and block group data.
Similarly, because Census of Agriculture data are available only at the county level, the analysis assumes that the ratios of specific farm types to total farms at the county level apply uniformly across the entire county. This assumption allows the trends in specific farm family ratios (e.g., the percentage of farm families that are dairy farmers) to be applied to the portions of the study area that fall within a given county. In addition, the Census of Agriculture data from 1987 and 1992 were averaged together to best match the 1990 U.S. Census population data.
Please click on image to see full view...
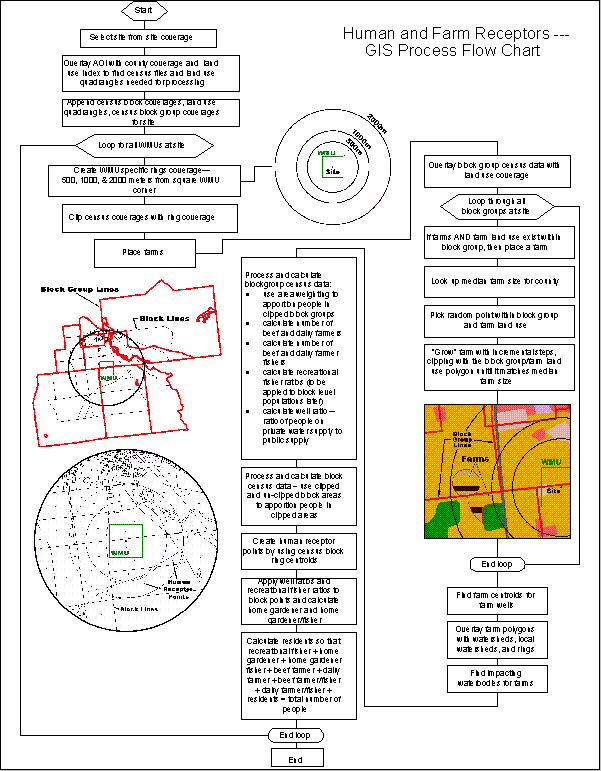
Figure 4-2. Human and farm receptor GIS process flow chart
The following is a simplified outline of the human/farm methodology:
- Compile all data needed for processing
- Place and attribute farms at site
- Overlay block group census data with land use coverage
- If farms AND farm land use exist within block group, then place a farm
- Pick a random point within block group and farm land use
- "Grow" farm
- Overlay farm polygons with watersheds, waterbodies, rings, and grid
- Place and attribute human receptors
- Process and calculate block group census data:
- Beef and dairy farmers
- Recreational fishers
- Beef and dairy farmer recreational fishers
- Well ratio - ratio of people on private water supply to public supply
- Create human receptor points by using census block / ring centroids
- Apply well ratios and recreational fisher ratios to block points
- Calculate home gardener and home gardener fisher
- Output data tables to Access data for delivery
4.3.1 Methodology - Detailed Version
The following sections describe the preprocessing and AML program steps used to place and process human receptor points and farms.
4.3.2 GIS Data Preparation/preprocessing
Data preparation and preprocessing included the following steps:
- Download and process needed block and block group coverages. Census coverages are kept by county and were downloaded from EPA's "valley" server. Census GIS coverages come with census data in separate tables and have no attributes attached, only a unique identifier for each polygon. Part of the preprocessing of the census GIS coverages included attaching the census items needed for processing to the GIS coverages. This was done with automated AML programs.
- Create AOI and WMU coverages for each site/WMU setting using automated AML programs.
- Create a lookup table from averaged 1987 and 1992 Census of Agriculture data that includes the median farm size and beef and dairy farm ratios for each county.
- Create a lookup table from the National Wildlife Survey (NWS) that includes the percentage of residences with recreational fishing licenses in urban, rural, and rural farm areas by state.
- Import watershed and waterbody coverages (see Section 3; note that all watershed and waterbody processing must be complete before processing a site).
4.3.3 Human Receptor and Farm Placement and Processing
This program was designed to process all or a subset of all 201 HWIR sites one site/WMU setting at a time. A master point coverage of all 201 HWIR sites is maintained and holds the location of the site as well as information about the WMU sizes and types at the site. Initial steps include the following:
- Select a site from the site coverage.
- Use AOI coverage to find which census coverages and land use quadrangles were needed for processing. The AOI coverage was overlayed with the counties for the United States and an index of land use quadrangles. The selected counties and land use quadrangle identification numbers written to a list.
- Use census coverages and land use quadrangles to create data layers for a site. The needed census block, block group coverages, and land use coverages were merged together to create seamless GIS data layers for the site.
- Create ring coverage for the site/WMU setting. Rings were created at 500 m, 1,000 m and 2,000 m, starting from the diagonal corner of the square WMU and indexed as 1, 2, and 3, respectively.
- Clip census coverages with ring coverage. The clipped and unclipped census coverages were both needed for the area-weighted reapportionment of census data. The clipped areas of the polygons were divided by the unclipped areas to produce the ratio applied to the census numbers.
4.3.2.1 Place and Attribute Farms.

Median farm sizes were prepared for all counties containing farms for the entire country prior to human/farm processing. Median farm size was used rather than average farm size because of the general distribution of farm sizes in most counties. Large outlier farms caused the average farm size to be a poor representation of a typical, or central tendency, farm size.
Calculation of the median farm size was automated using a median estimation equation from Snedecor and Cochran (1967).
Steps in farm placement and attribution included the following:
- Overlay the block group census coverage with the land use coverage.
- For every block group that had farmers and farm-type land use (i.e, Anderson Code 21, crop and pastureland) place a farm:
- �From a lookup table, find the median farm size for the county being processed.
- �Check to see if the block group/farm land use polygon was smaller in area than the median farm size. If so, then the entire polygon became the farm and the program moved to the next block group.
- �If the block group/farm land use polygon was larger in area than the median farm size, then, for the current block group, pick a random point inside the farm land use.
- �Calculate a radius to produce a circle with an area matching that of the median farm size.
- �Create the circle and clip it with the block group/farm land use polygon. If the resultant clipped circle still approximately matched the median farm area, then the farm was placed and the program moved to the next block group. If it didn't match, then the radius of the circle was increased by 100 m. This incremental process was repeated until the program produced a polygon that approximately matched the median farm area and was contained by the block group/farm land use polygon.

- After processing all block groups, merge all farm polygons were merge into one farm coverage.
- Create coverage of farm centroids from the coverage of farm polygons. These were used as farm well points (i.e., the farms are assumed to have one well located at the farm centroid) and added to the drinking water well coverage
- Process farm polygons with watersheds, local watersheds, and rings. The resultant files contained the farm index, the watershed, local watershed, or ring index and the area of their intersection. These indexes and areas were exported to the Microsoft Access database program that calculated the farm/watershed fractions, farm/local watershed fractions, and farm/ring fractions.
- Overlay farm polygons with the coverage of waterbodies at the site so that a nearest or impacting waterbody could be found. This was determined as the nearest second-order stream, pond, or lake to the farm.
- Convert farm polygons to UTM coordinates and overlayed with the master 100 by 100 m grid file to create the grid tables containing the farm x,y coordinates.
4.3.2.2 Processing Block Group Census Data.
Block group data, including the farmer population and households with wells, were processed within the GIS according to the following steps:
- Use area weighting to calculate census item totals with the AOI.
- Apply the beef-farms-to-total-farms ratio and the dairy-farms-to-total-farms ratio to the total number of farmers per block group to calculate the number of beef and dairy farmers in each block group. Ratios for beef and dairy farmers were derived from the lookup table created from Census of Agriculture data (see Section 4.3.1).
- Calculate fisher numbers using the lookup table created from NSHFWAR data. This table included the percentage of residences with recreational fishing licenses in urban, rural, and rural farm areas by state. These percentages were applied to populations by category (persons in urban areas, persons in rural nonfarm areas, and persons in rural farm areas) to find total recreational fishers.
- Calculate beef and dairy farmers/fishers from the NSHFWAR lookup table by applying the percentage of residences with recreational fishing licenses in rural farm areas to the calculated number of beef and dairy farmers. The calculated number of beef and dairy farmers/fishers were then subtracted from the totals of beef and dairy farmers so that there was no overlap of the beef and dairy farmer populations with the beef and dairy farmer/fisher populations.
- Calculate ratio of people on private water supplies to people on public water supplies. This ratio was applied to block-based human receptor points within each block group to identify points with wells (i.e., points with a nonzero ratio).
4.3.2.3 Processing Block Census Data.
Please click on image to see full view...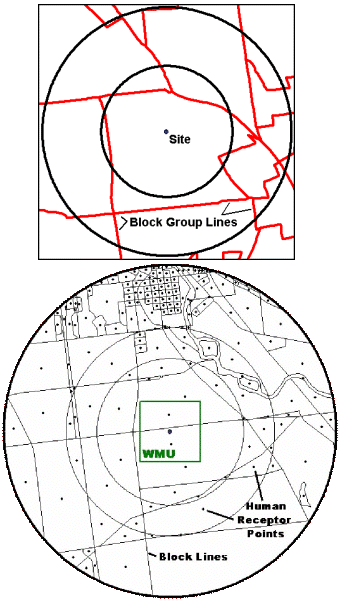
Block census data were processed by applying the percentages and ratios calculated in the preceding steps to the U.S. Census block data. When census blocks extended across rings, the block data were fractionated into each ring/block combination based on the relative areas in each. GIS processing steps for census block data include the following:
- Create human receptor points from the centroids of census blocks or census block/ring polygons created when merged block coverages were clipped by ring coverages.
- Apply well ratios and recreational fisher ratios to human receptor (census block) points. Block group polygons were overlayed with the block points, and the attributes (ratios) calculated at the block group level were applied to each block point within a block group.
- Calculate home gardener, home gardener/fisher and resident fisher so no overlap or double counting occurred across receptor types. This is a sample of pseudo-code:
Home gardener = total block population * 0.38 (nation ratio of home gardeners)
Home gardener fisher = home gardener * recreational fisher ratio
Resident fisher = (total block population - home gardener) * recreational fisher ratio
Home gardener = home gardener - home gardener fisher.
- Calculate total residents so that all receptor types added up to the total population at the site:
Residents = total block population - (home gardeners + home gardeners/ fishers + resident fishers + total farmers).
- Convert human receptor points to UTM coordinates to create the human receptor location grid tables.
After block data GIS processing, all data tables created were exported as Access data tables for further processing.
Section 5.0 --- Ecological Receptor Data
5.1 Technical Description of GIS Habitat Delineation Tool
Due to time and resource constraints we decided to develop a delineation tool that could be used by the delineators. The tool eliminated the need for the delineated habitats to be digitized by GIS staff and therefore saved many hours of labor. The Esri product ArcView was used for several reasons: it's easy to develop, it was already in use in other aspects of the HWIR project, and it is PC based and could be used on the delineators' computers. The basic concept of the tool was to allow the users to easily pull together different layers of GIS data for a given site and delineate habitat areas with a minimal amount of training.
Two different scripts were written to be run from within the ArcView GIS software. The first script would start a dialog box that would prompt the user for a site ID. Once entered, the script would load and symbolize the different GIS data layers needed for habitat delineation:
- Site location
- Area of interest
- WMU
- GIRAS land use
- Delineated waterbodies - rivers, lakes and wetlands
- NWI wetlands
- RF3 waterbodies
- Managed Areas
- 2-meter DEM contours
- Preprocessed habitat grid -- habitats were delineated by selecting grid cells and coding them with one of the 12 habitat codes. Since most habitats were based on the GIRAS land use data, the grid was preprocessed and attributed with habitat codes based on a crosswalk from the GIRAS Anderson level 2 land use types. This gave the delineators a starting point and sped up the process since they did not have to delineate habitats from scratch but rather edit the habitats based on land use. Generally, the major changes the habitat delineator made were the addition of waterbody or wetland habitats.
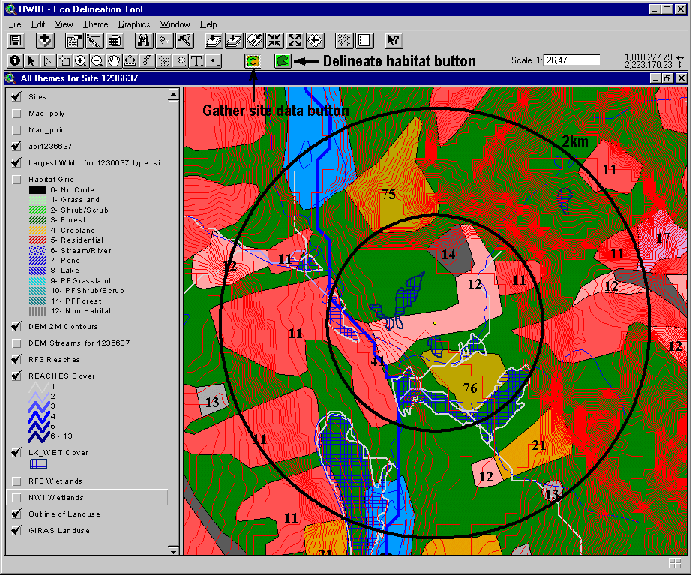 Figure 5-1. Example of ArcView Habitat Delineation Tool
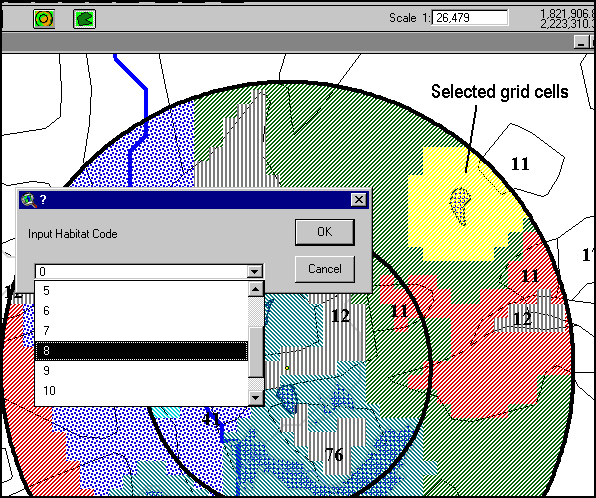
Once the layers were loaded and symbolized, the user could turn them on or off depending on which layers were needed for delineation. Habitats were then delineated in the second script. By pressing a button the user was prompted to select a group of grid cells and select a habitat code from a drop-down list.
Please click on image to see full view...
Finished habitat delineations were reviewed and QC'ed then transferred back to the GIS server for processing.
5.2 Technical Description of GIS Habitat Processing
Once habitats were delineated, the processing of the habitats and placement of the home ranges and receptors was fully automated. Processing for these steps took place with ARC/INFO on a SUN Microsystems 450 server. Automated programs written in AML were used.
In the following descriptions, GIS files are referred to as "coverages" --- the proprietary GIS file format used by the ARC/INFO GIS software. Coverages are self-contained GIS layers that hold graphic spatial information (points, lines, polygons) as well as attribute information. Figure 5-3 charts how habitats were delineated and processed and eco receptors are placed around each of the 201 HWIR sites and attributed with the information necessary to calculate exposure and risk in the HWIR risk model.
Please click on image to see full view...

The following section describes the AML program steps used to place and process ecological receptors and home ranges.
5.2.1 GIS Data Preparation/preprocessing
Data preparation and preprocessing include the following steps:
- Preparation of receptor look-up tables from spreadsheets provided by Eco Risk staff --- receptor by habitat and receptor by Bailey's section.
- Importing finished habitat delineation grid from delineator's computers.
- Creating AOI and WMU coverages for each site/WMU setting using automated AML programs.
- Importing watershed and waterbody coverages (see Section 5; note that all watershed and waterbody processing must be complete before processing Eco data at a site).
5.2.2 Habitat Processing
This program was designed to process all or a subset of all 201 HWIR sites one site/WMU setting at a time. A master point coverage of all 201 HWIR sites is maintained and holds the location of the site as well as information about the WMU sizes and types at the site. Although there are multiple WMUs at a site, the program processes site-specific data first before looping through the WMUs at the site:
- Select a site from the site coverage.
- Convert the habitat delineation grid into habitat polygons
- Place home ranges in habitats. Since habitats were delineated only for the largest WMU at a site, those habitats and the home ranges placed within those habitats were clipped by the WMU specific rings for each WMU at a site.
- Receptor home ranges were divided into 4 bins:
- Bin 4 = 1000000000 square meters
- Bin 3 = 10000000 square meters
- Bin 2 = 1000000 square meters
- Bin 1 = 100000 square meters
Home ranges were placed by calculating a radius to produce a circle with an area matching that of the current bin size. A random point was then selected inside of the area where the bin was to be placed. A circle polygon was then generated around the random point with the calculated radius. The circle was then clipped by its bounding area. If the resultant clipped circle still approximately matched the bin area, then the range was placed and the program moved to the next range. If it did not match, then the radius of the circle was increased by 10 m and the range "grows" until it matches the correct area. This incremental process was repeated until the program produced a polygon that approximately matched the Bin area and was contained by the bounding area.
Home ranges were placed largest to smallest with the following rules for the bounding areas:
- Bin 3 must fall entirely within Bin 4
- Bin 2 must start growing inside Bin 3 but can spill out, though it must stay within Bin 4
- Bin 1 must start growing with the intersection of Bin 2 and Bin 3.
-
The following steps were repeated for every WMU at the site:
- Create ring coverage for the site/WMU setting. Rings were created at 1,000 m and 2,000 m, starting from the diagonal corner of the square WMU and indexed as 1 and 2, respectively.
- Clip the habitat and the range coverages with ring coverage.
- Process the clipped ranges:
- Range polygons were then processed with watersheds, local watersheds, and rings. The resultant files contained the Range index, the watershed, local watershed, or ring index and the area of their intersection. These indexes and areas were exported to the Microsoft Access database program that calculated the Range /watershed fractions, Range /local watershed fractions, and Range /ring fractions.
- Range polygons were then overlayed with the coverage of waterbodies at the site so that a nearest or impacting waterbody could be found. This was determined as the nearest second-order stream, pond, or lake to the farm.
- Range polygons were converted to UTM coordinates and overlayed with the master 100 by 100 m grid file to create the grid tables containing the farm x,y coordinates.
- Add receptors to the habitat --- By looping through the habitats at the site the receptors were determined by using two look-up tables: receptors by habitat type and receptors by Bailey's section. First the habitat type and the bailey's section for a given habitat were determined. Then if a receptor type existed for that habitat type and Bailey's section based on the look-up tables, that receptor was added to that habitat.
- Process the clipped habitats:
- Habitat polygons were then processed with watersheds, local watersheds, and rings. The resultant files contained the habitat index, the watershed, local watershed, or ring index and the area of their intersection. These indexes and areas were exported to the Microsoft Access database program that calculated the habitat /watershed fractions, habitat /local watershed fractions, and habitat /ring fractions.
- Habitat polygons were then overlayed with the coverage of waterbodies at the site so that a nearest or impacting waterbody could be found. This was determined as the nearest second-order stream, pond, or lake to the farm.
- Habitat polygons were converted to UTM coordinates and overlayed with the master 100 by 100 m grid file to create the grid tables containing the farm x,y coordinates.
5.2.3 Database Processing
Following GIS processing, the resulting data tables were imported into Access databases, where Structured Query Language (SQL) and Visual Basic programs were used to prepare the final, HWIR model-ready data set, according to HWIR FRAMES modeling system specifications.
Section 6.0 --- References
Westat. 1987. Screening Survey of Industrial Subtitle D Establishments. [Draft Final Report]. Westat, Inc. EPA Contract No. 69-01-7359. U.S. EPA, Office of Solid Waste, Washington, DC.
Miller, D.A., and R.A. White. 1998. A Conterminous United States Multi-Layer Soil Characteristics Data Set for Regional Climate and Hydrology Modeling. Earth Interactions, 2. Available online: http://EarthInteractions.org.
Schwarz, G.E., and R.B. Alexander. 1995. State Soil Geographic (STATSGO) Data Base for the Conterminous United States. Edition: 1.1. Open-File Report 95-449. U.S. Geological Survey, Reston, VA. http://water.usgs.gov/lookup/getspatial?ussoils.
U.S. Department of Agriculture (USDA). 1994. State Soil Geographic (STATSGO) Data Base. Natural Resources Conservation Service, Fort Worth, TX. Available online: http://www.ftw.nrcs.usda.gov/stat_data.html.
Cowardin, L.M., V. Carter, and F.C. Golet. 1979. Classification of Wetlands and Deepwater Habitats of the United States. U.S. Department of the Interior, U.S. Fish and Wildlife Service, Office of Biological Services, Washington, DC.
Hellweger, F. 1997. AGREE--DEM Surface Reconditioning System. Available online at: http://www.ce.utexas.edu/prof/maidment/gishydro/ferdi/research/agree/agree.html.
Strahler, A.N. 1957. Quantitative analysis of watershed geomorphology. Transactions of the American Geophysical Union 8(6):913-920.
U.S. EPA (Environmental Protection Agency). 1994a. 1:250,000 Scale Quadrangles of land use/Landcover GIRAS Spatial Data in the United States. Office of Information Resources Management (OIRM), Washington, DC. Available online at: http://www.epa.gov/ngispgm3/nsdi/projects/giras.htm.
U.S. EPA (Environmental Protection Agency). 1994b. The U.S. EPA Reach File Version 3.0 Alpha Release (RF3-Alpha) Technical Reference, First Edition. Office of Wetlands, Oceans, and Watersheds, Office of Water, Washington, DC. Available online at: http://www.epa.gov/owowwtr1/NPS/rf/techref.html
U.S. EPA (Environmental Protection Agency). 1999a. Source Modules for Non-Wastewater Waste Management Units (Land Application Units, Waste Piles, and Landfills): Background and Implementation for the Multimedia, Multiple-Exposure Pathway and Multiple-Receptor Risk Assessment for the Hazardous Waste Identification Rule. Draft Report. U.S. EPA. July 1999.
U.S. EPA (Environmental Protection Agency). 1999b. Watershed Module: Background and Implementation for the Multimedia, Multiple-Exposure Pathway and Multiple-Receptor Risk Assessment for the Hazardous Waste Identification Rule. Draft Report. U.S. EPA. July 1999.
U.S. EPA (Environmental Protection Agency). 1999c. HWIR99 Surface Water Module. Draft Report. U.S. EPA. July 1999.
U.S. FWS (Fish and Wildlife Service). 1995. National Wetlands Inventory (NWI) Metadata. U.S. Fish & Wildlife Service. St. Petersburg, FL. Available online at: ftp://www.nwi.fws.gov/metadata/nwi_meta.txt.
USGS (U.S. Geological Survey). 1990. Digital Elevation Models, National Mapping Program Technical Instructions, Data Users Guide 5. 2nd Printing (Revised). Reston, VA. Available online at: http://edcwww.cr.usgs.gov/glis/hyper/guide/1_dgr_dem.
Snedecor, G.W., and W.G. Cochran. 1967. Statistical Methods. 6th edition. Iowa State University Press, Ames, Iowa.
U.S. Bureau of the Census. 1992. Census of Population and Housing. Summary Tape File on CD-ROM Technical Documentation. U.S. Bureau of the Census, Washington, DC.
U.S. Bureau of the Census. 1990. TIGER: The Coast-to-Coast Digital Map. Washington, DC.
U. S. Bureau of the Census. 1987 and 1992. Census of Agriculture. Geographic Area Series State and County Data. Washington, DC.
U.S. Environmental Protection Agency (EPA). 1995a. 1990 Census Block Boundaries in the Conterminous U.S. Office of Information Resources Management, Washington, DC.
U.S. Environmental Protection Agency (EPA). 1995b. 1990 Census Block Group Boundaries in the Conterminous U.S. Office of Information Resources Management, Washington, DC.
U.S. Fish and Wildlife Service. 1991. The National Survey of Fishing, Hunting, and Wildlife-Associated Recreation. U.S. Department of the Interior. Washington, DC.
U.S. Geological Survey (USGS). 1990. USGeoData 1:250,000 and 1:100,000 Scale Land Use and Land Cover and Associated Maps Digital Data. U.S. Geological Survey Reston. VA. Online. Available: ftp://www-nmd.usgs.gov/pub/ti/LULC/lulcguide.
Authors: Gerald T. Conrad
Mark V. Andrews
Robert S. Truesdale
Robert A. Hyatt
Linda S. Andrews
Presented by William D. Wheaton at the 1999 Esri User Conference